How to Sell on Amazon for Beginners - Complete Guide
Download Amazon Seller Guide
This guide will help you get started, understand the basics of Amazon selling, and explain in simple words how it all works.
If you are thinking about selling online, Amazon is a great way to start your business. With millions of customers worldwide, this world’s largest marketplace provides incredible sales opportunities.
However, if you're new to Amazon selling, it can be challenging to figure out where to start and how to avoid sad mistakes and losing money.
This guide will help you get started, understand the basics of Amazon selling, and explain in simple words how it all works.
.avif)
Intro
Who is this guide for?
This guide can be useful for anyone who wants to sell on Amazon. Sections dedicated to product sourcing are targeted at online arbitrage, wholesale, sellers, and dropshippers, while retail arbitrage and private label sellers can also find them useful.
What does this guide cover?
If you wonder how to sell on Amazon, this guide will help you get started, understand the basics of Amazon selling, and explain in simple words how it all works from A to Z.
What to Know Before You Start Selling on Amazon?
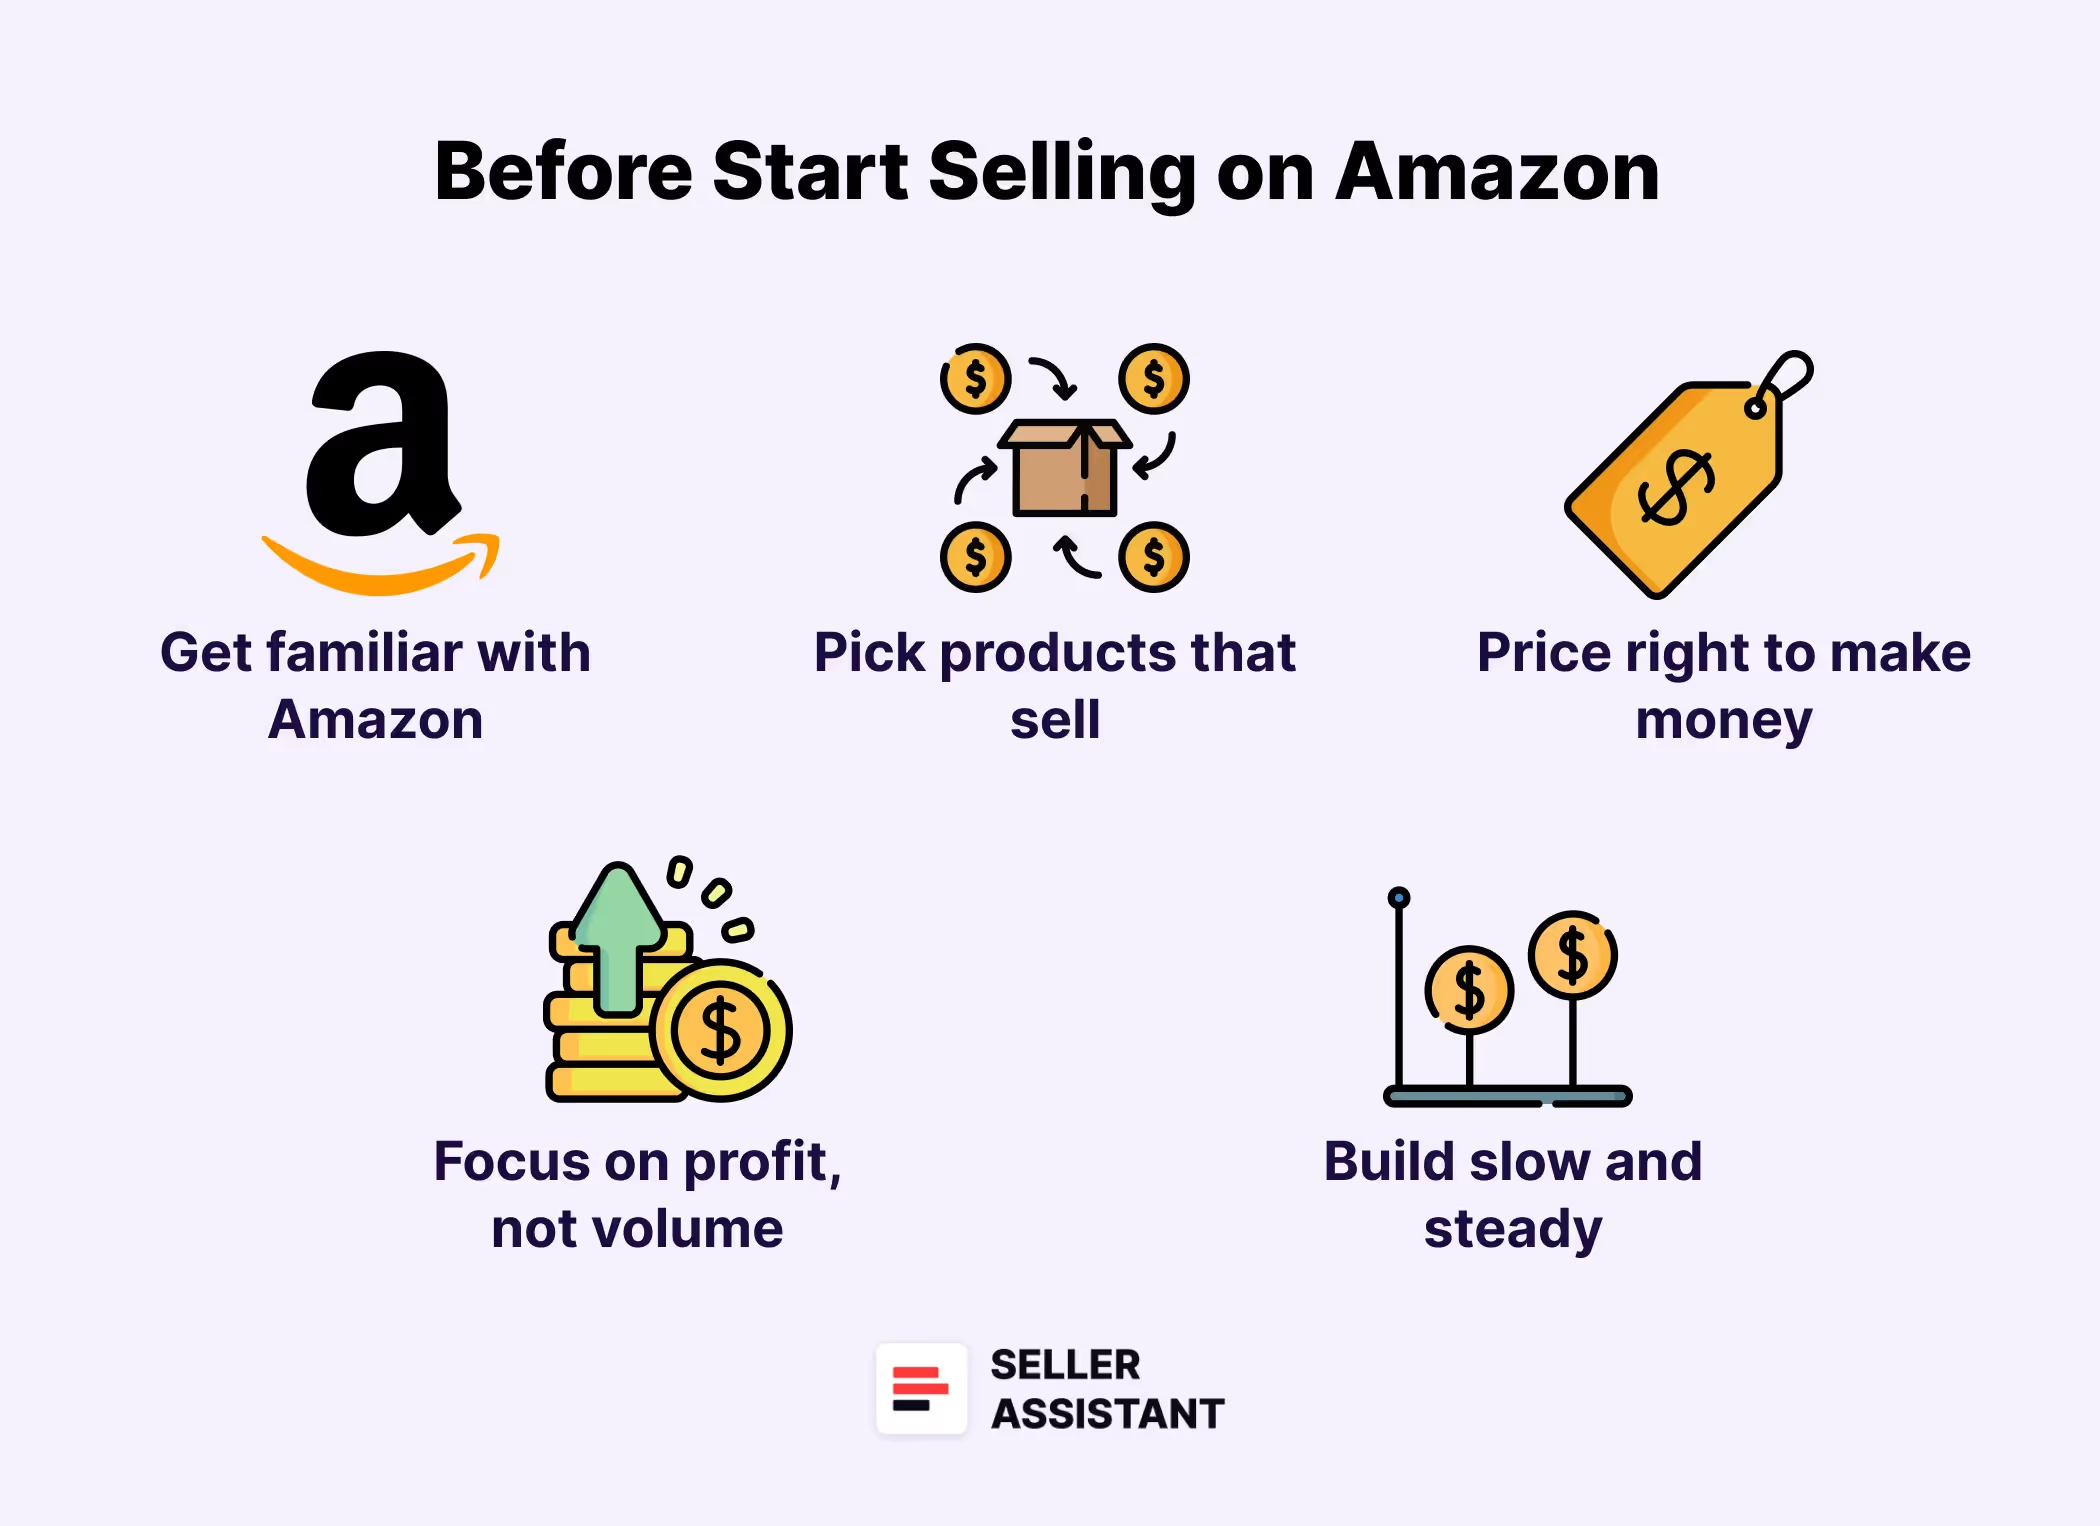
Before you start selling, briefly glance at a few key things to remember about Amazon sales. That is important to better understand what you should expect from Amazon sales.
Get familiar with Amazon
Take some time to learn the basics of selling on Amazon, like how to list products and get them shipped to customers. This will help you avoid any bumps in the road.
Pick products that sell
Don't just sell anything! Look for items that people want to buy and that don't have a ton of other sellers offering them already.
Price right to make money
Before you offer anything to customers, figure out all the Amazon fees involved (like a selling fee) so you can price your products high enough to make a profit after everything is paid for.
Focus on profit, not volume
Focus on making money on each sale, not just selling a bunch of stuff for super cheap. Remember, you're running a business and your target is to make money.
Build slow and steady
Growing a successful Amazon business takes time and effort. Don't get discouraged if you don't see results overnight. Keep putting in the work, and it can be a really rewarding experience.
Related: Amazon Glossary for Sellers
How Does Selling on Amazon Work?
Understanding how Amazon sales work comes down to answering 10 key questions. Here you will find short answers, while below we will discuss each of them in detail.
1. What do I need to start on Amazon?
To start selling, you must register yourself as a seller. To do that, you must choose a selling plan and create an Amazon seller account, called Seller Central account.
Individual plans are for casual sellers who sell a limited number of products, while Professional plans cater to sellers with many products for a monthly subscription fee.
Related: How to Create an Amazon Seller Central Account?
Creating an account in Amazon Seller Central step-by-step
2. How will I sell?
On Amazon, sellers most frequently use 5 selling strategies called business models: online arbitrage, retail arbitrage, wholesale, dropshipping, and private label. All of them are reselling models, which means you get a product for a lower price at any retailer and resell it for profit. You can also sell products you created by your own hands, like handmade items, custom designs for t-shirts or mugs, or books you wrote.
3. What will I sell?
The next thing you need to do is pick the products you are going to sell. Amazon sellers call this process product research.
Typically, you will look for a product with good market demand (popular with Amazon customers) and low competition (to be able to sell it for the price you planned). Also, it should not have any problems (be restricted or have other flags).
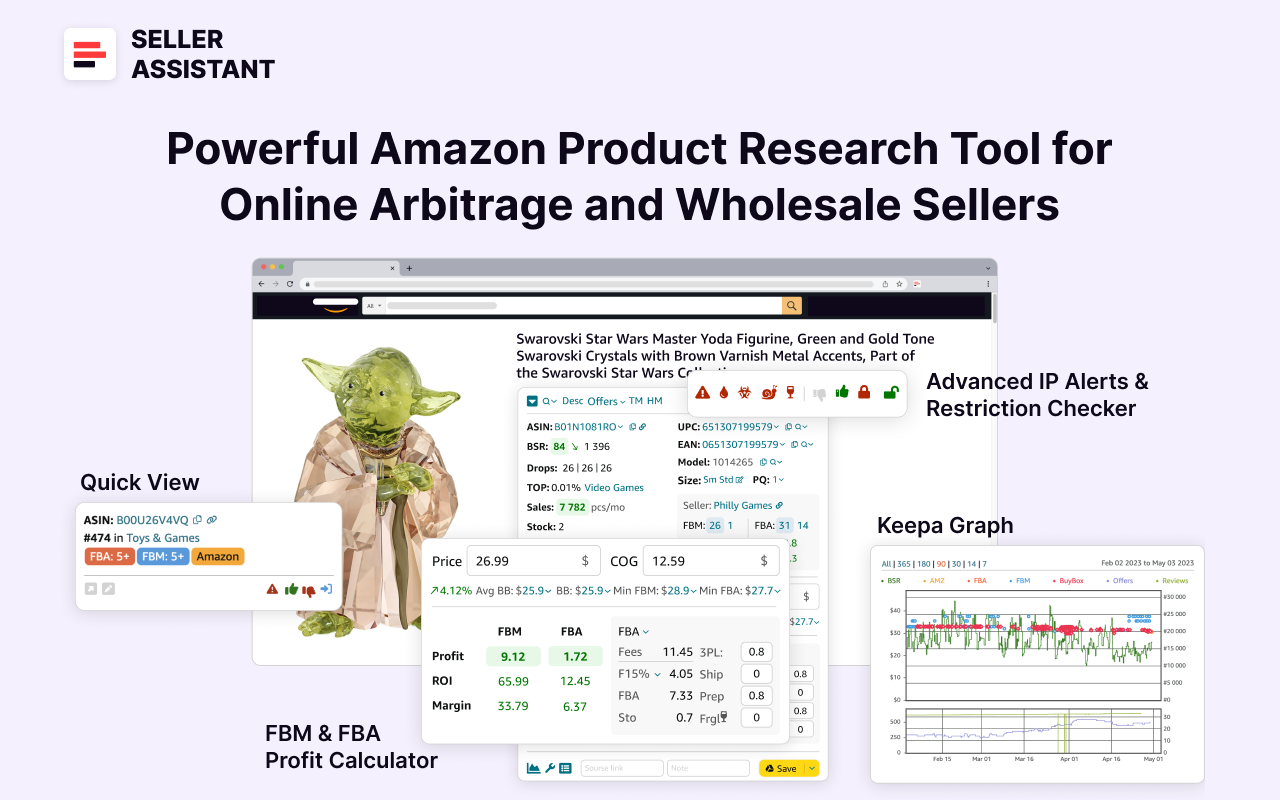
Most sellers use product sourcing tools to find products for Amazon. One of the most popular product sourcing tools is Seller Assistant.
4. Where do I get a product?
After you ensure the product will sell, you must check it will generate good profit. You must find a product supplier who offers a price substantially lower than it sells on Amazon.
At the same time, a supplier must be reliable, offer good quality products, and have dependable lead times. Depending on the business model, you will use different types of suppliers.
5. How many products should I buy?
In all business models except dropshipping you need to buy your products first to resell them on Amazon. In such a case, you must decide how many products you need. That is called inventory management.
You can get guidance on how many units of a product you can sell from the estimated sales number in Seller Assistant. The general advice is not to buy too many products (inventory) at the start.
6. How to add my product to Amazon?
When you have a product ready to sell, you must add your offer to Amazon. The Amazon product page is called product listing, while the process is to list a product. That is a place where all buyers get when they look for a product they want to buy on Amazon.
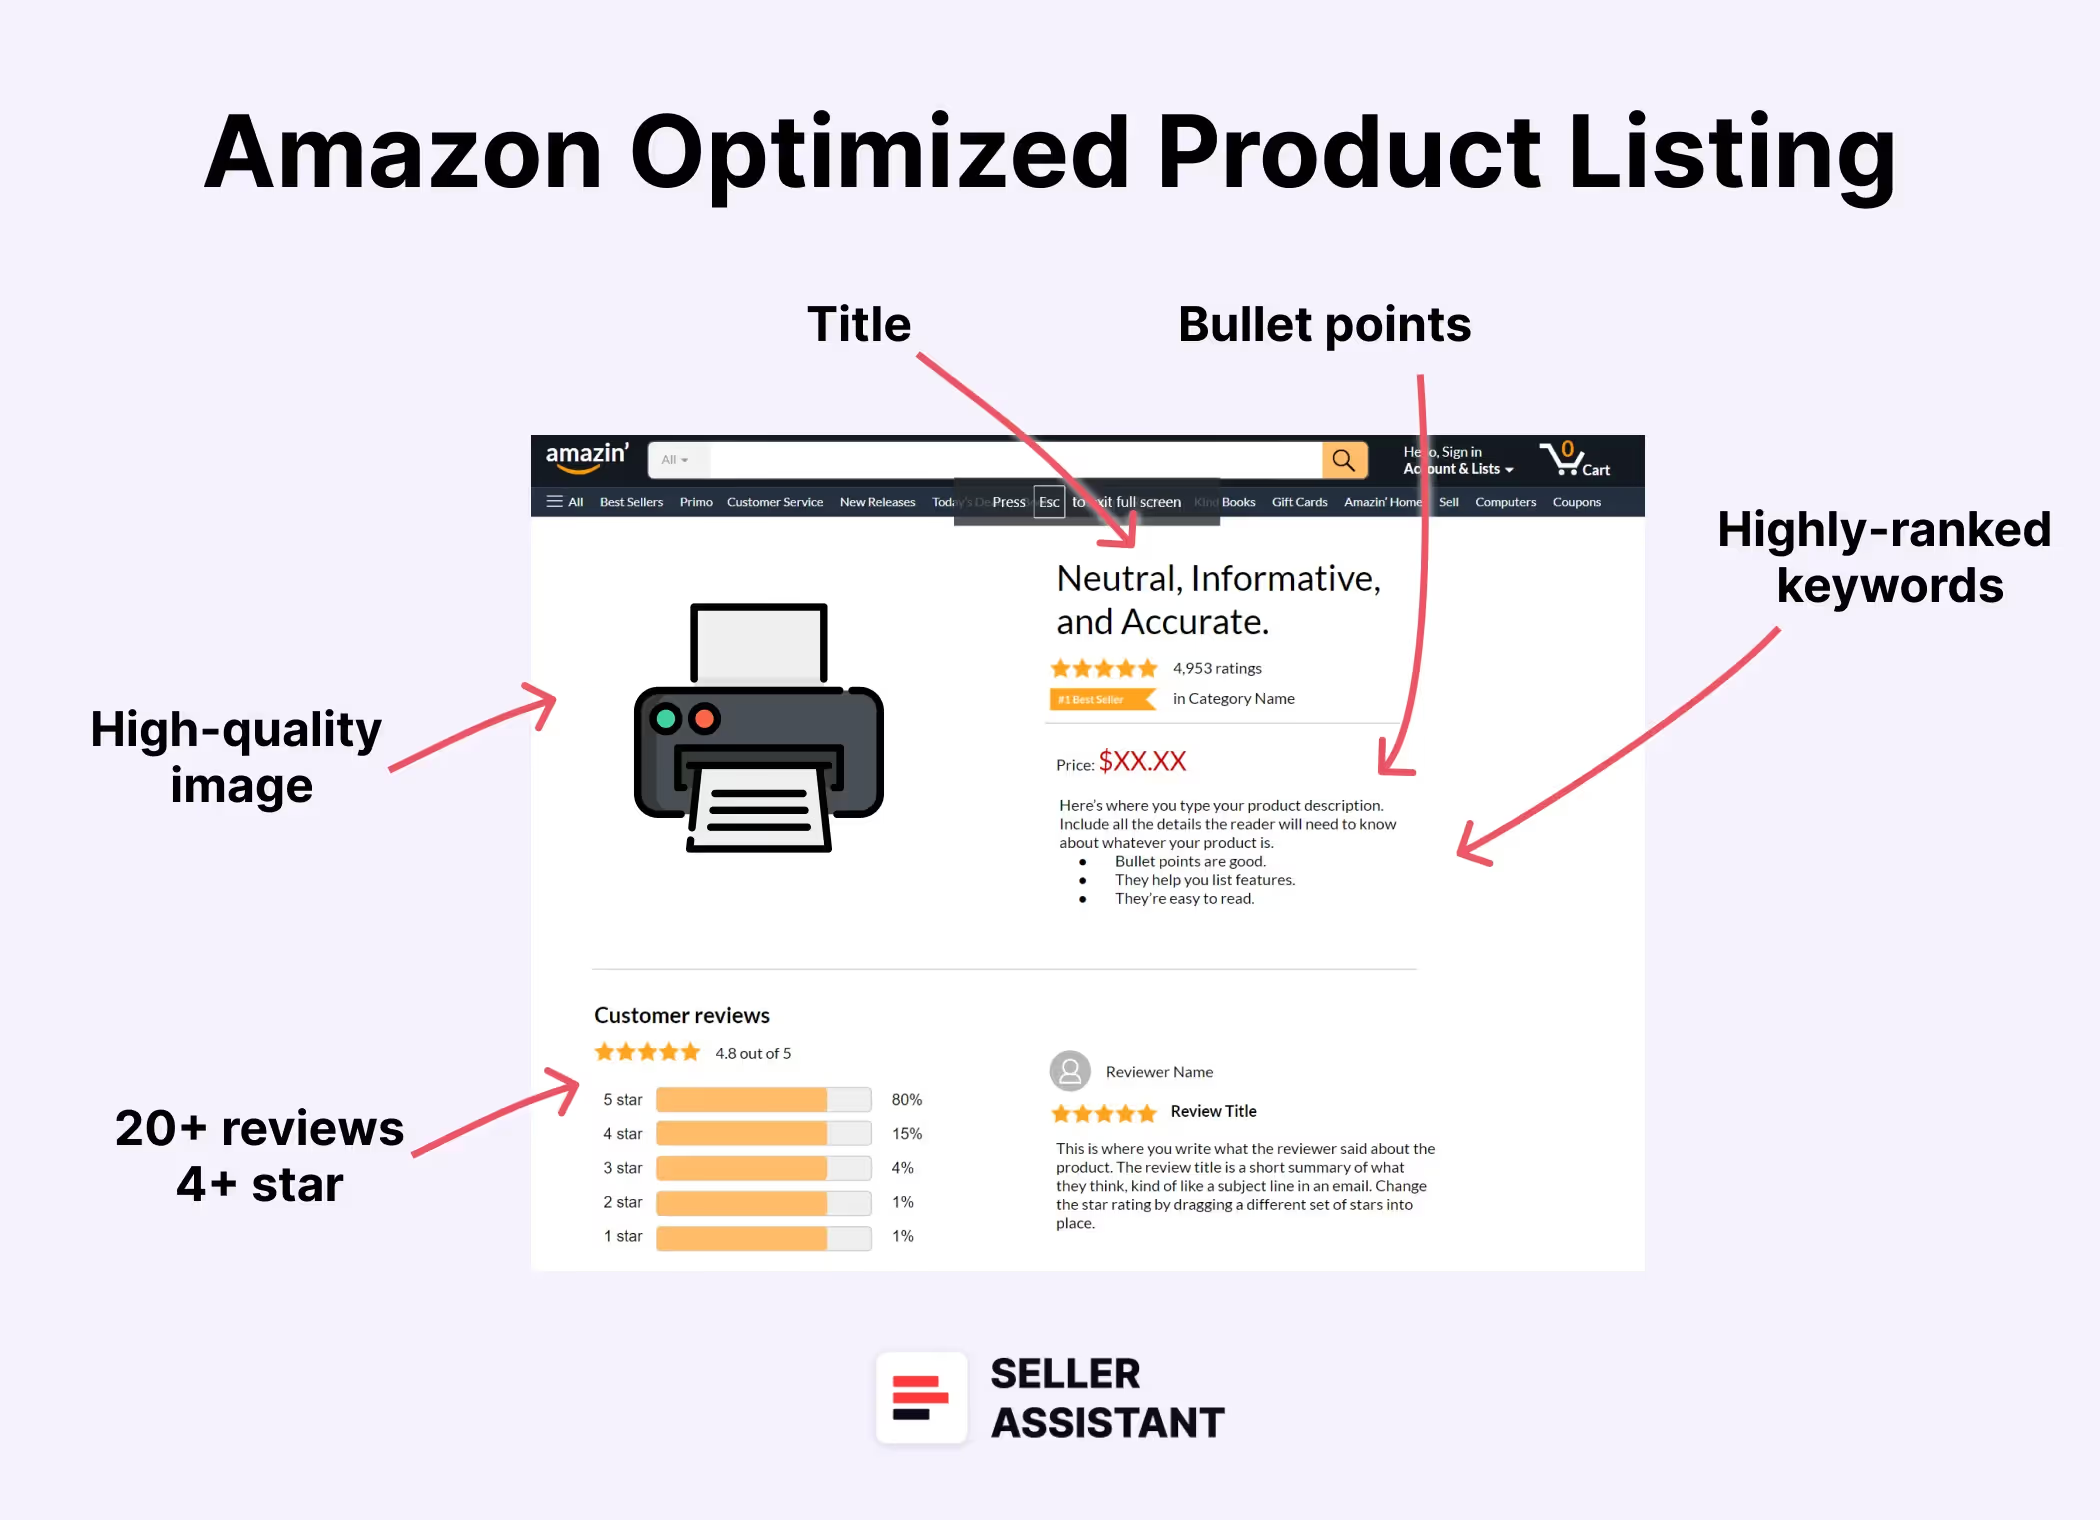
You can either add your offer to an existing Amazon listing (if it already exists) or create a new listing (if a product doesn’t exist on Amazon).
Don’t create a new listing if your product already exists on Amazon. Unlike other e-commerce platforms, Amazon doesn’t allow multiple listings of the same product. You must add all offers of the same product to one listing.
7. How to ship the order to the customer?
When you list a product, Amazon will ask you how you are going to ship it to the customer. That is called the fulfillment method.
You can fulfill orders yourself (with Fulfillment by Amazon, FBM) or use Amazon's Fulfillment by Amazon (FBA) service, where they handle storage, picking, packing, shipping, and customer service for a fee.
FBA is a convenient service, but you must carefully account for all related fees so that they don’t eat into your profit margins. You should also remember, that with FBA you must still package the product in line with Amazon’s requirements and send it to Amazon’s warehouse (fulfillment center).
8. How to price a product?
Pricing competitively is key because Amazon chooses what offers it shows on the listing mainly based on the price (that is called a Featured Offer, or Buy Box).
Research what similar products are selling for and factor in all your costs (including Amazon fees) to ensure you make a profit on each sale. Use Seller Assistant’s FBM&FBA Profit Calculator.
9. How to know my product was sold?
If you use Amazon FBA, they take care of shipping orders (buyer’s purchases) to the customers. You don’t need to know exactly when you receive each order because you don’t have to send it to the customer.
However, if you are an FBA seller and ship orders yourself, you must know it immediately to timely process and ship it out. You can get this information in your Seller Central and the Amazon Seller App.
10. How will I get money for the products I sell?
Amazon takes money from the customers and then pays you what you’ve earned. They will deposit your earnings from sales into your seller account, minus any applicable fees. You can then transfer these funds to your bank account.
Related: How to Sell on Amazon Without Inventory?
Selling on Amazon: Beginner’s Guide
If you are interested in getting a detailed overview of how selling on Amazon works in detail, here’s what new sellers on Amazon must consider.
How to Create an Amazon Seller Central Account?
%2520(1).avif)
Creating an account in Amazon Seller Central step-by-step
Step 1. Prepare your business and personal details
What you need to register a Seller Central account:
- valid government ID or passport;
- bank account or credit card statement;
- valid credit or debit card;
- mobile phone.
Step 2. Choose an Individual or Professional selling plan
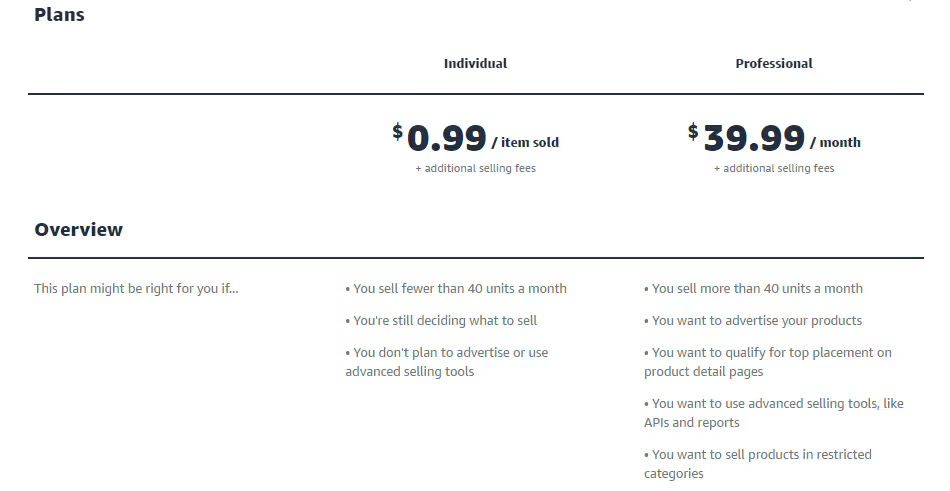
- Select an Individual plan if you want to sell single products occasionally. You will be charged $0.99 for every product you sell. This plan will work for you if you plan to sell less than 40 products monthly.
- A Professional plan is a great option if you sell many products (more than 40 products each month). In that case, it will save you money on each sale. With a Professional plan, you’ll pay $39.99 per month. In addition, the Professional plan gives you access to many sales and reporting tools. You can qualify for the Buy Box, enroll in different seller programs, and more.
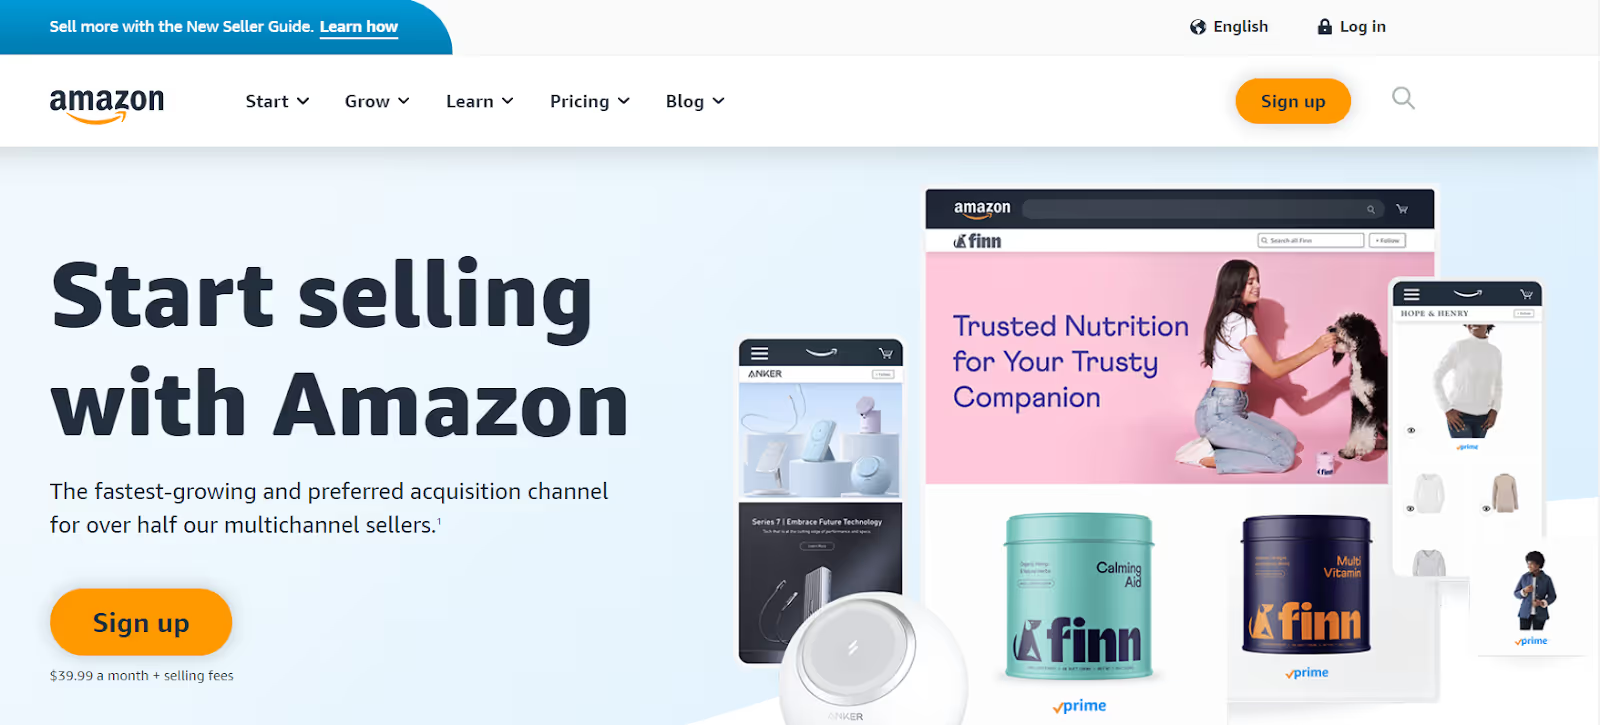
Step 3. Open the ‘Start selling with Amazon’ sign-in page.some text
- If you want to register for a Professional plan, click the Sign-up button.
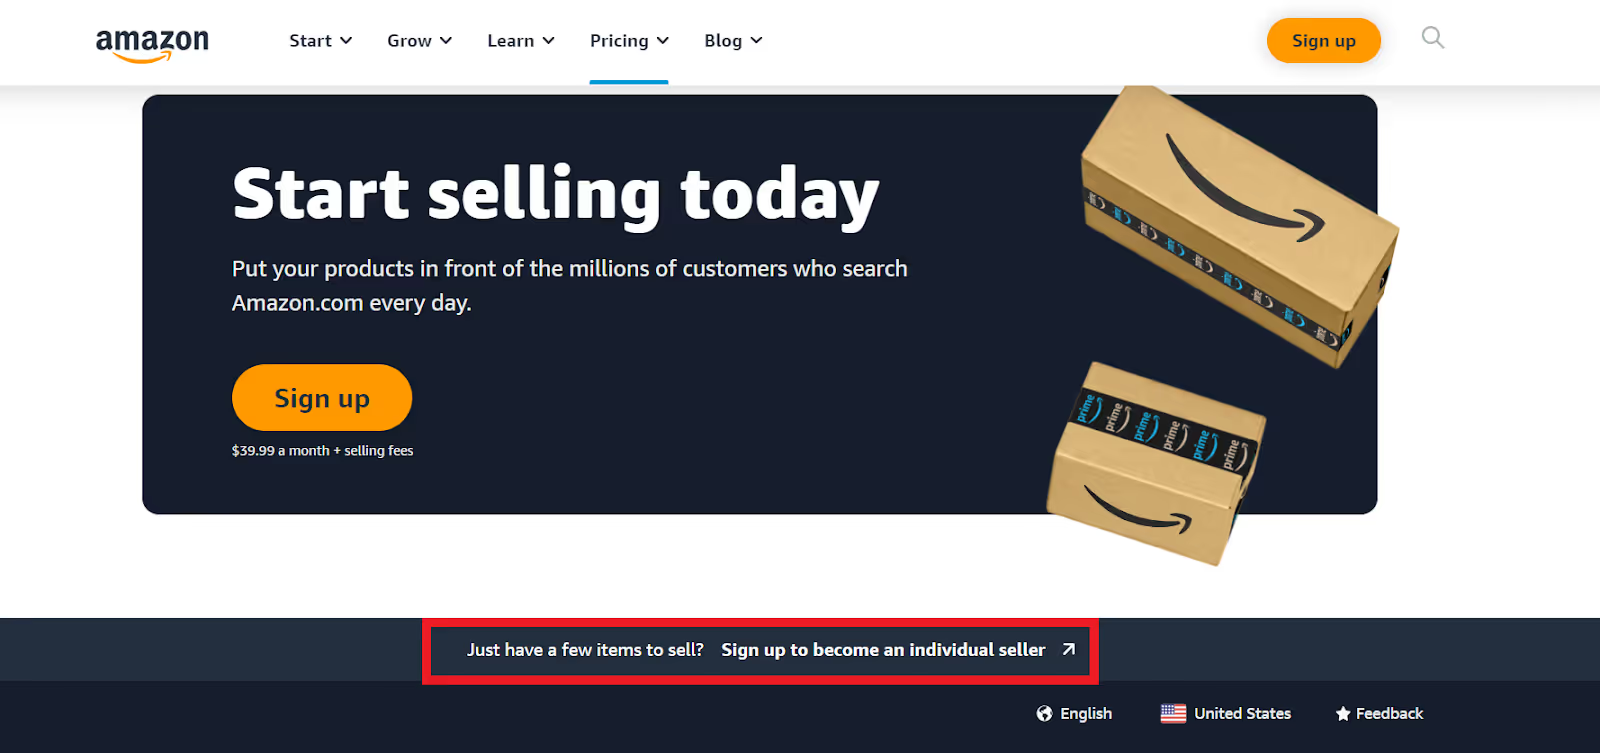
- If you want to register for an Individual plan, scroll down the page and click “Sign up to become an individual seller.”
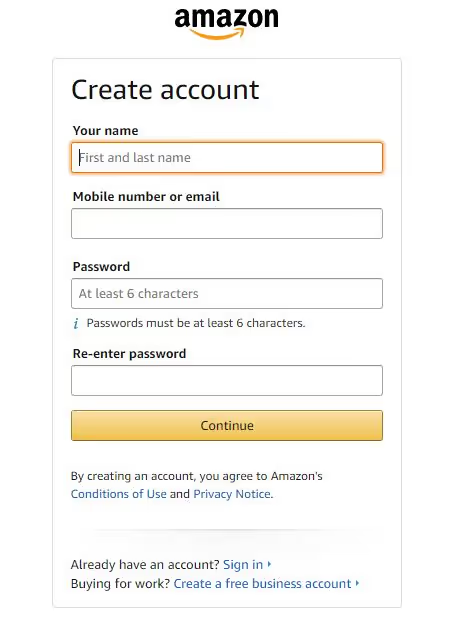
Step 4. Enter your e-mail address and password
When you enter your e-mail address and password. Amazon will send the verification code (OTP) to your e-mail. Type it in the “Enter OTP” field.
Step 5. Add your business location and business typesome text
- Enter the country where your business is registered or the country where you live.
- Choose your business type from the drop-down; if you are not a business owner, select “None, I am an individual.”
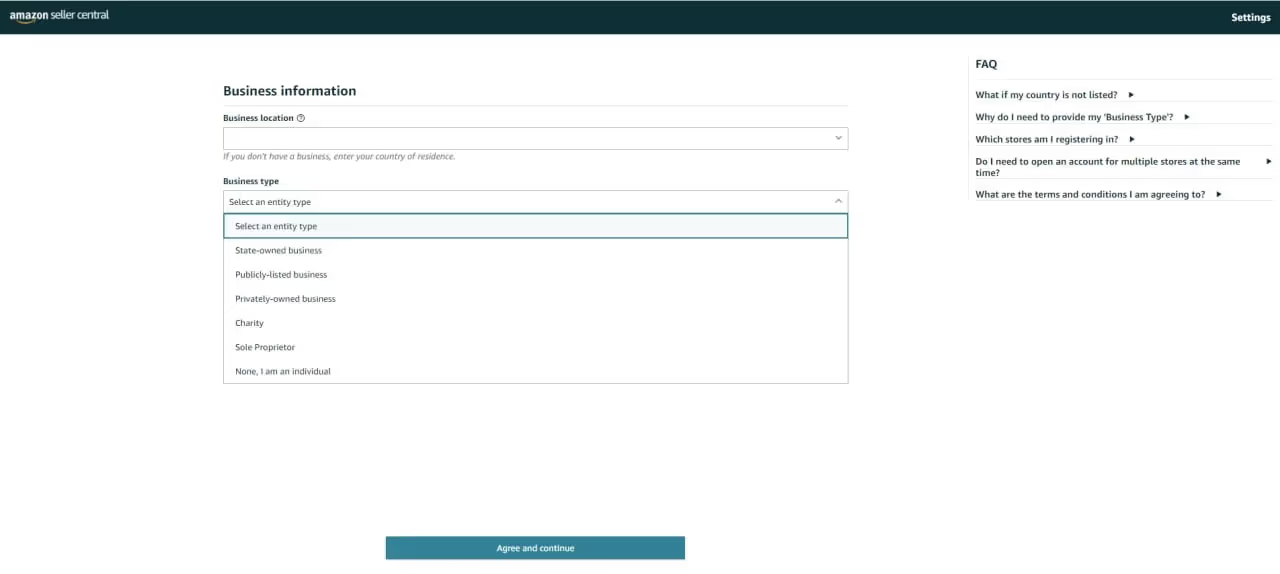
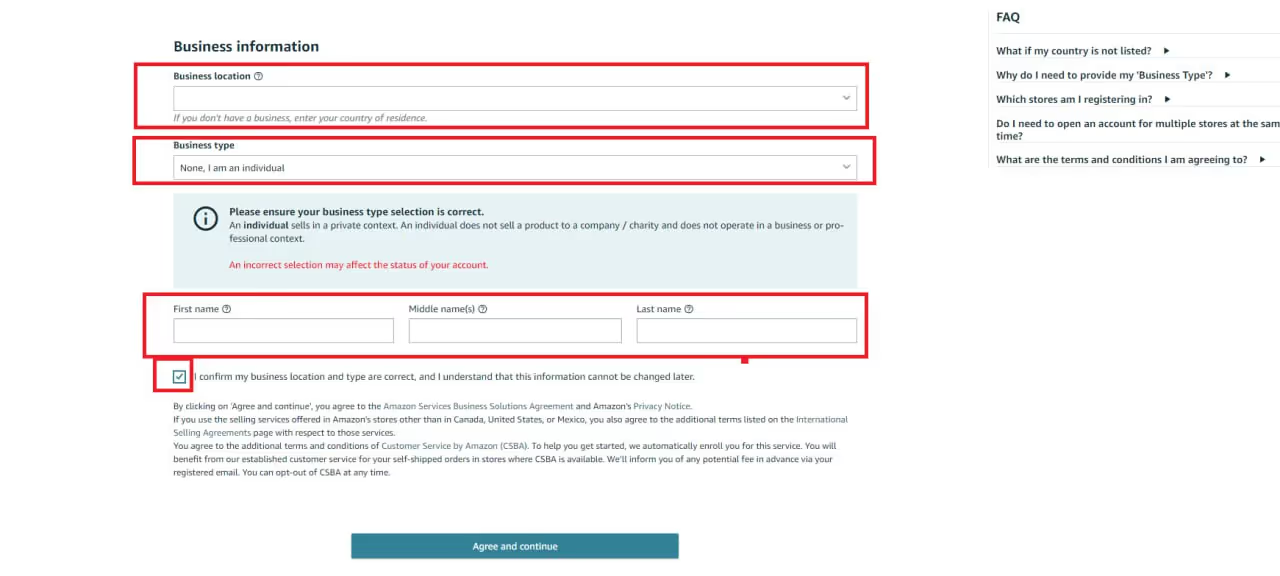
Step 6. Enter your personal and business details
Add your first, middle, and last name, and tick the box “I confirm my business location and type is correct…”
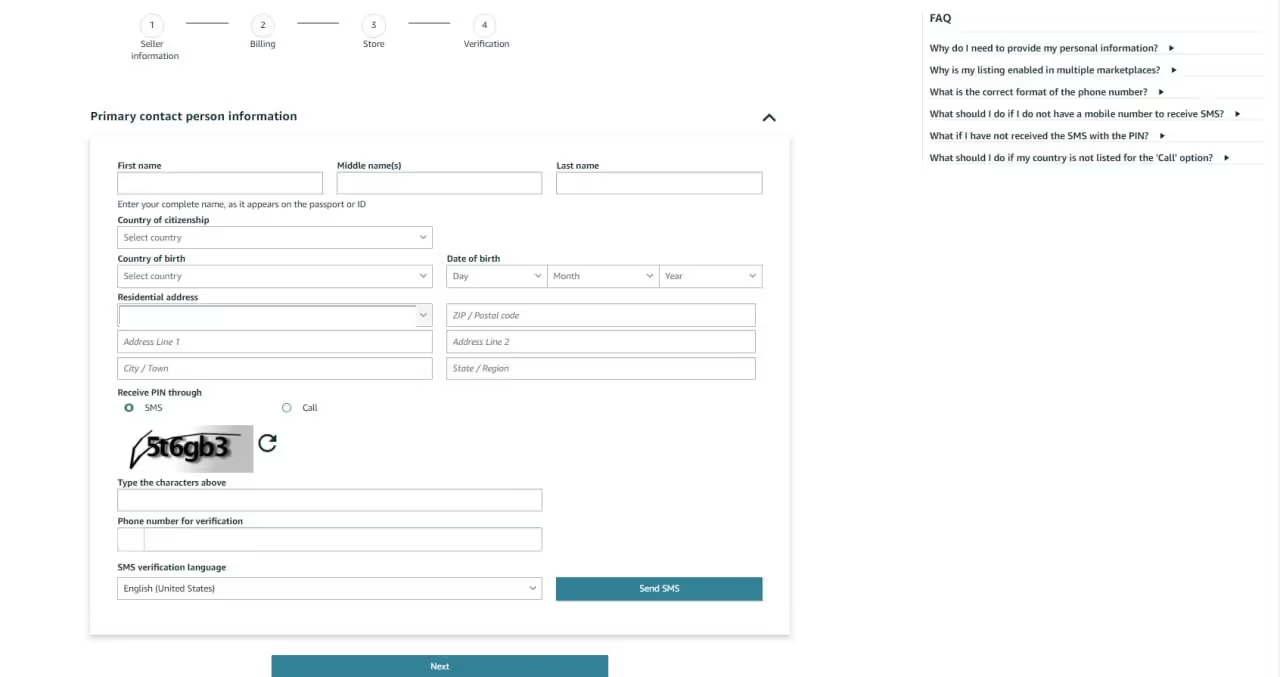
Step 7. Fill in and verify the primary contact person information
Add your country of residence and birth, the address where you live, date of birth, and mobile number, where Amazon will send an SMS with a one-time verification pin. Click the “Send SMS” button, receive the one-time verification pin, and enter it in the pop-up window.
Step 8. Enter your payment method
Add your credit card number, expiration date, and cardholder name.
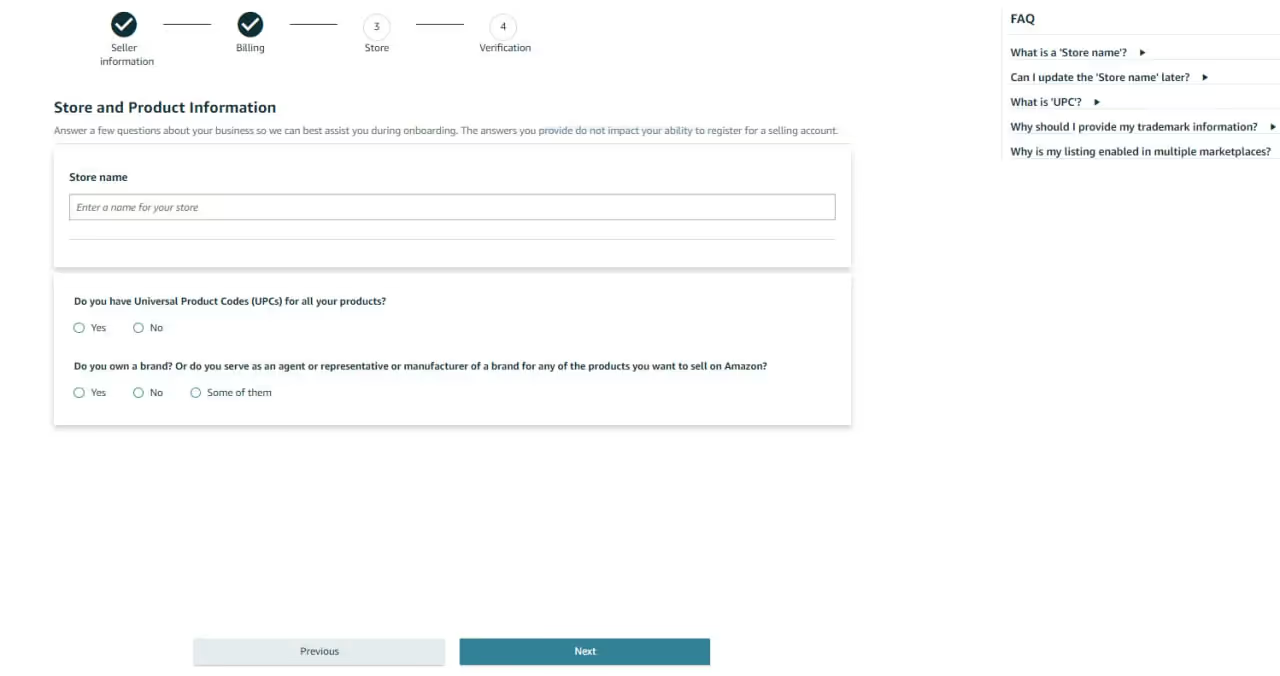
Step 9. Submit your Amazon store’s namesome text
- Choose any name of your Amazon store that doesn’t exist on Amazon (you can change it later if necessary).
- Confirm that you have the Universal Product Codes (UPCs) for your products. If don’t know, click “Yes” because the majority of the products have these codes.
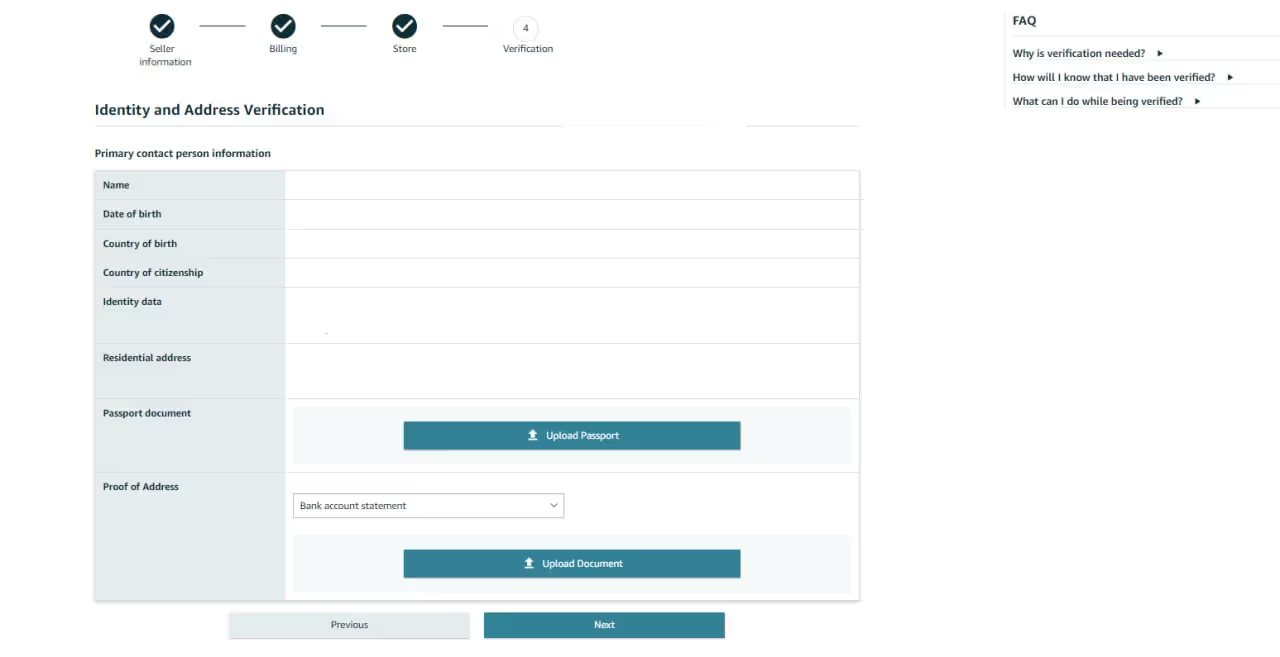
Step 10. Verify your identity
- Upload images of your passport or driving license, and a bank or credit card statement.
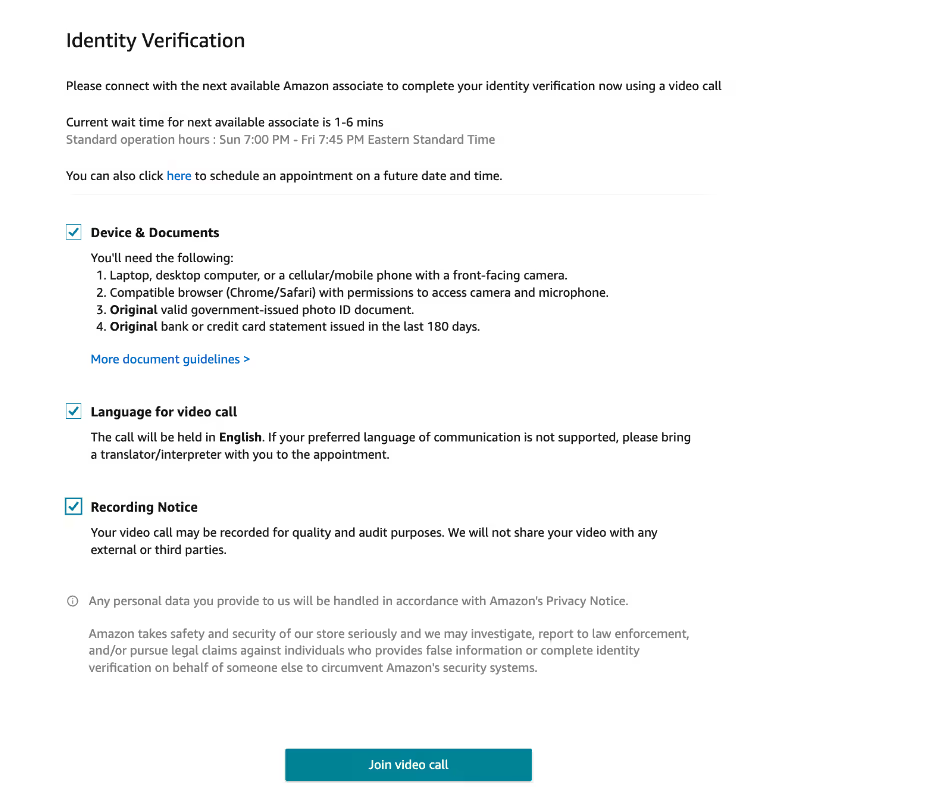
- Schedule a video call with an Amazon associate to complete the verification and confirm the data you entered.
Step 11. Wait until Amazon approves your account.
Related: How to Create an Amazon Seller Central Account
How to Sell on Amazon as an Individual Seller - Complete Guide
What Are Different Amazon Business Models?
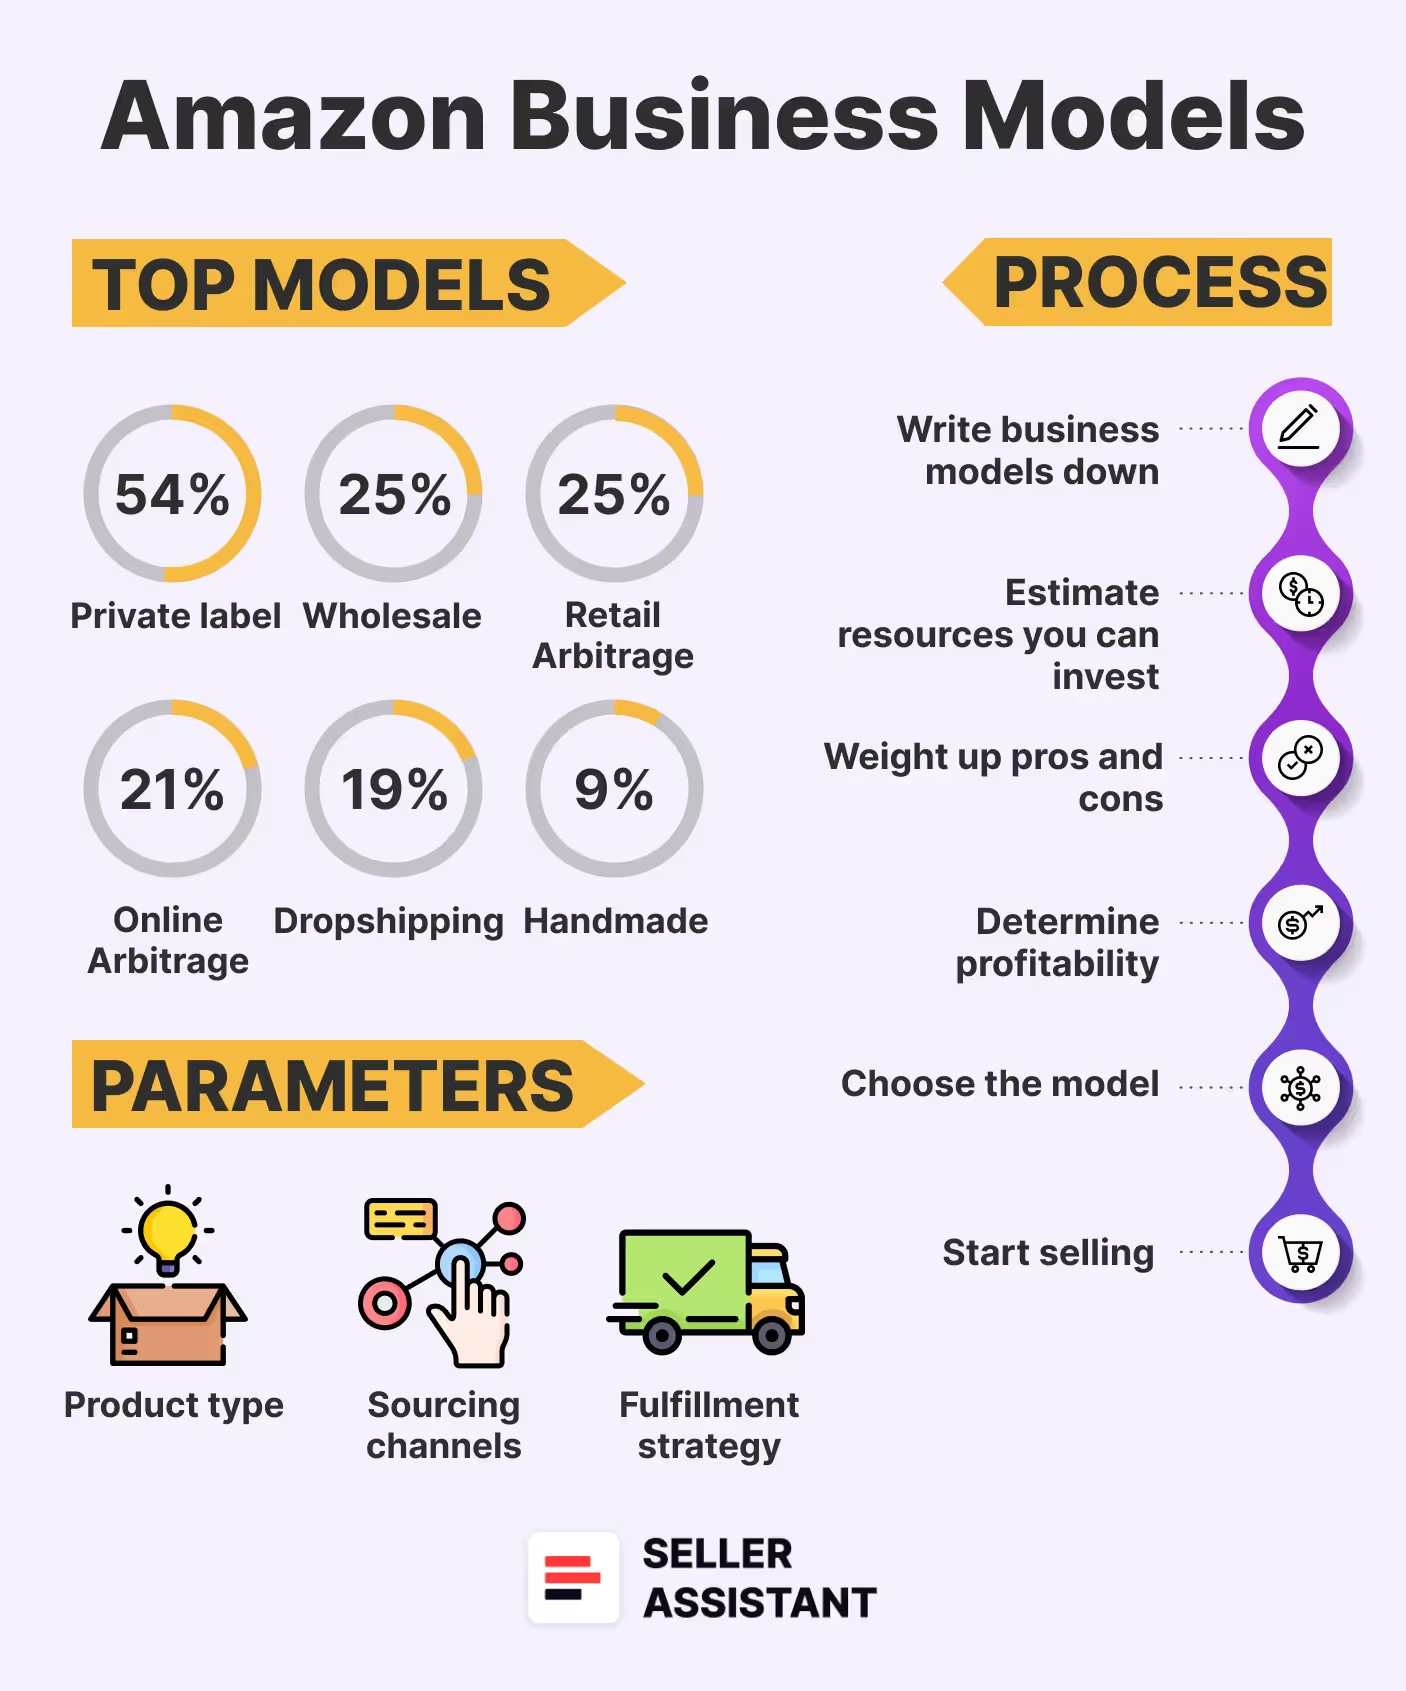
Amazon business model is the way you sell products. It defines the kind of product you sell, how and where you get it (sourcing), and the method you deliver the order to the customer (fulfillment).
The five popular Amazon business models include online arbitrage, wholesale, dropshipping, retail arbitrage, and private label.
Online arbitrage
Amazon online arbitrage (OA) is a business model of buying cheaper-priced products from one online retailer and reselling them for profit on another marketplace — Amazon.
%2520(1).avif)
How does online arbitrage work?
The main target of online arbitrage sellers is to find profitable deals. That means, finding a product on the online retailer, discounter, or other store to resell on Amazon with essential profit.
3 key things to know about online arbitrage
Winning product is key
The most important step in online arbitrage is to find the right product to sell. You must choose a popular product that is not sold by many sellers. It must not have issues like restrictions and other alerts and should bring the profit you want.
Product research takes time
Choosing a product for Amazon is called product research. This task is challenging and can take time and effort, but it's essential to do it right to avoid costly mistakes. You can use Amazon seller tools like Seller Assistant to simplify product research.
Check products for restrictions and flags
Before selling products, you must always check them for restrictions (you need Amazon’s approval to sell them), and other flags (fragile, meltable, oversize products, etc.). That is because all that may mean either extra hassle or costs. Seller Assistant helps detect these product issues.
What does it cost to start online arbitrage?
Online arbitrage is low-cost to start, the main cost is buying products. You can start this business with as little as $500.
Related: Amazon Online Arbitrage: How to Make Money
Online Arbitrage for Beginners
10 Reasons Why People Fail With Amazon FBA Online Arbitrage
Wholesale
Wholesale is a business model of purchasing products in bulk at a discounted price from a manufacturer, supplier, or distributor and then reselling them to Amazon customers for a profit. The profit comes from selling the products at a higher retail price than the wholesale price.
%2520(1).avif)
How does wholesale work?
Wholesale differs from other business models by selling products in large quantities. The main target of wholesale sellers is to obtain the lowest possible prices for popular products and the best purchase conditions. That is because they resell these products on Amazon and aim to get maximum profit from each product. To do so, wholesale sellers must contact the brand, manufacturer, or big distributor to get the best prices.
3 key things to know about wholesale
Wholesale is different from other business models, and there are several crucial things to keep in mind when selling with it.
High profits are generated by big investment
Wholesale is one of the most profitable business models but requires essential upfront investment because you must buy many products. Wholesale sellers get low prices directly from brands and can get a good profit on each product. Multiplied by the large number of purchased products they generate thousands of dollars when sold.
Finding wholesale suppliers is a challenge
Popular brands often have an established sales distribution network. That makes it challenging to convince them to sell to one more seller – you. Persuading a brand to work with you requires building a relationship and demonstrating how your business can benefit theirs.
Product research helps avoid risks
Wholesale sellers buy products in bulk and must invest significant upfront costs. Therefore, it's essential to ensure that the products you buy are profitable and won't create issues when selling them, such as intellectual property complaints, restrictions, or product flags, which can lead to financial losses. Wholesale sellers avoid risks with product-sourcing tools like Seller Assistant.
What does it cost to start wholesale?
Starting wholesale is costly. Initial investment can be as high as $2000 and up.
Related: Amazon Wholesale: All You Need To Know
How To Negotiate Prices With Amazon FBA Wholesale Suppliers
Online Arbitrage vs Wholesale on Amazon. What is the difference?
How to Find Amazon FBA Wholesale Suppliers
Dropshipping
Amazon dropshipping is a business model where a seller lists products on Amazon without physically holding the inventory. The dropshipper lists the product on Amazon, receives an order from the buyer, and then requests the supplier to ship it directly to the consumer.
.avif)
How does dropshipping work?
With dropshipping, the seller selects a profitable Amazon product and finds a supplier that agrees to ship it directly to the customer. The seller then lists the product on Amazon and notifies the supplier when a customer places an order. The supplier ships the product directly to the customer, and the seller acts as a middleman between the supplier and the customer.
The profit is generated by the difference between the supplier's lower price and the seller's higher price.
3 key things to know about dropshipping
Amazon dropshipping policy
Amazon has specific requirements for dropshippers. Dropshippers must identify themselves as sellers of record and issue all product-related documents in their name. Additionally, dropshippers must remove all third-party retailer signs from the product and packaging. That can be challenging because they don’t see the inventory and have to rely on the supplier to do that.
IP complaints are a challenge
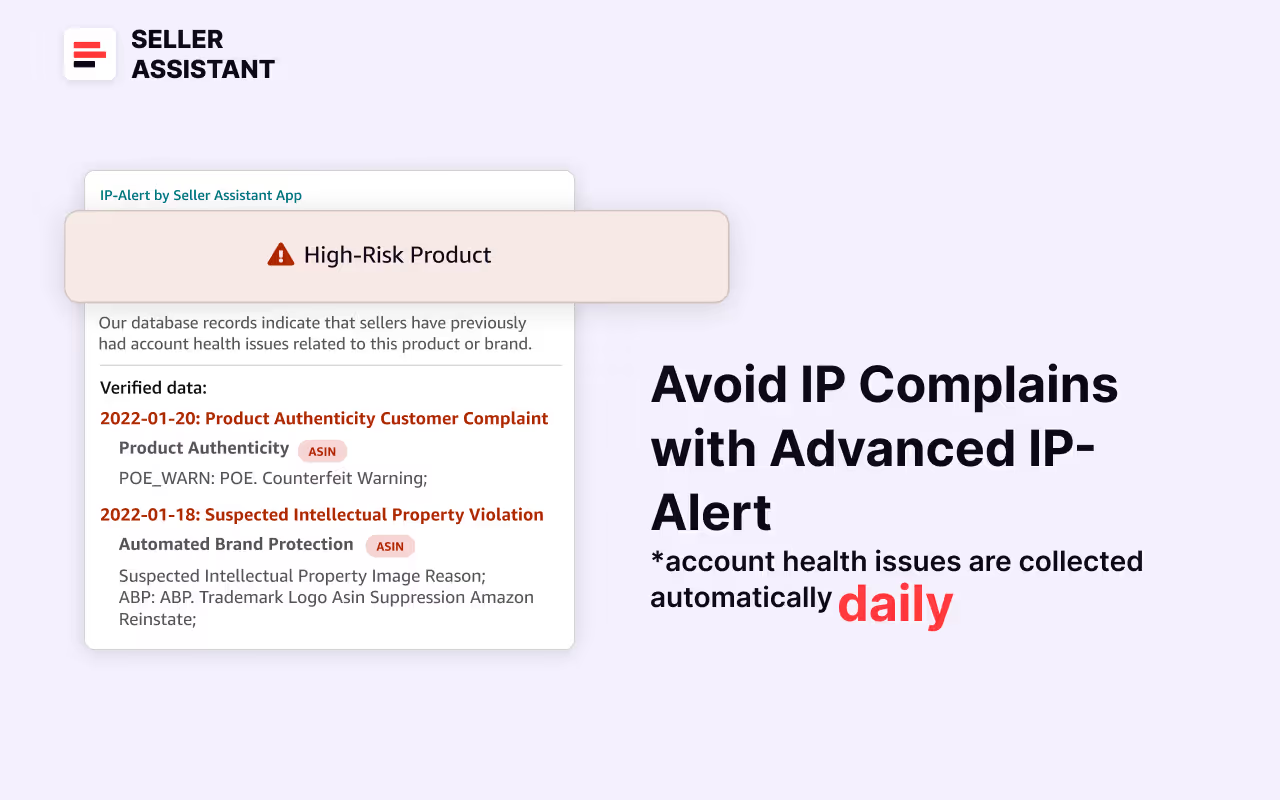
As a dropshipper, you often resell other brands’ products. However, some brands have policies against reselling their products, and they may file intellectual property complaints to Amazon. That may result in listing or account suspension and money loss. To avoid this issue, sellers can use Seller Assistant's IP Alert feature, which alerts them about such products.
Choose a supplier with care
Because dropshippers don’t deal with the inventory, they have little control over the product quality and shipping times. To reduce these risks of dropshipping, you must choose a reliable supplier that will ship your products on time and in saleable condition.
What does it cost to start dropshipping?
This model is the least expensive to start. You don’t need to invest in inventory upfront. Your only costs are Amazon fees and product-sourcing software.
Related: Online Arbitrage vs Dropshipping: Which Business Model Is Best For You?
New Dropshipping Strategy That Complies With Amazon’s Policy
Retail arbitrage
Amazon retail arbitrage is a business model where sellers buy products from brick-and-mortar stores retail stores at a discount and resell them on Amazon for a profit. This model is great for sellers who like shopping and visiting stores. However, it is a very time-consuming business because you must roam the stores physically.
%2520(1).avif)
How does retail arbitrage work?
Amazon retail arbitrage seller’s target is to find in offline retail stores the products that are priced lower than on Amazon. To do so, they visit stores that offer products at low prices. That could be stores having sales or clearance, liquidation stores, and promotional or discounted offers. When they find such products and make sure they are profitable, buy them and list them on Amazon.
3 key things to know about retail arbitrage
You must research products in-store
With retail arbitrage, you must use a barcode scanner to scan product codes with a mobile app in-store to match them with Amazon products. That is necessary for the app to show you which listing corresponds to your product on Amazon. The app will show product profitability and other data, and you must decide on the spot if you should buy a product you find in a retail store. You must do it quickly because you must instantly buy the products (the next day, the discount may be gone).
Time-consuming model
It takes much time to physically travel from one store to another to find profitable deals and choose the products. You must scan their barcodes and check products one by one on the go.
You must replenish inventory physically
With retail arbitrage, you must go to the physical store to get more inventory when you need to restock it. That can require additional time, effort, and mileage.
What does it cost to start retail arbitrage?
To start retail arbitrage on Amazon, you don’t need much money. You pay Amazon fees and buy cheaper-priced products to sell on Amazon. The startup cost can be around $500.
Related: Online Arbitrage vs Retail Arbitrage on Amazon
Private Label
Private label (PL) is a business model where sellers create and sell products under their own brand instead of reselling existing brands. These products are typically manufactured by a third-party manufacturer but customized, packaged, and marketed by the seller to establish their brand identity on Amazon.
How does private label work?
With private label differs from other models by creating your own brand. You can either manufacture the products yourself or hire a company to make them for you. You must identify profitable product opportunities through extensive market research, find reliable manufacturers, and develop your brand including a name, logo, and packaging design.
Related: Amazon Private Label vs Online Arbitrage – What is the difference?
3 key things to know about private label
Private label brand is an asset
One of the advantages of the private label model is that you own both the brand and the product. This makes PL a valuable asset. If your Amazon business is successful, you can sell it, and the purchase price is often higher than with other business models.
Lower-competition model
A private label product is trademarked, and you have exclusive rights to it. Therefore, other sellers cannot sell these products, and you can be the only seller in the Buy Box.
Higher investment and risks
Compared to other models, starting a private label business takes more time and effort. You need to select a product and arrange for its manufacturing. Typically, it takes 4-6 months to launch a PL product. Because a private label brand is new to the market and has no sales history, it is difficult to predict how well it will sell. Therefore, there is a risk involved when investing money in a PL business.
What does it cost to start a private label?
Launching a private label product requires big money to produce and promote it. On average, Amazon sellers spend $2,500 or more to launch private label products.
Related: Amazon Business Models Guide 2024
How to choose a model for your Amazon business?
Your choice of a business model must be individual, and depend on your resources, sales experience, and product type. Below you can find some tips to help you select the one that fits you.
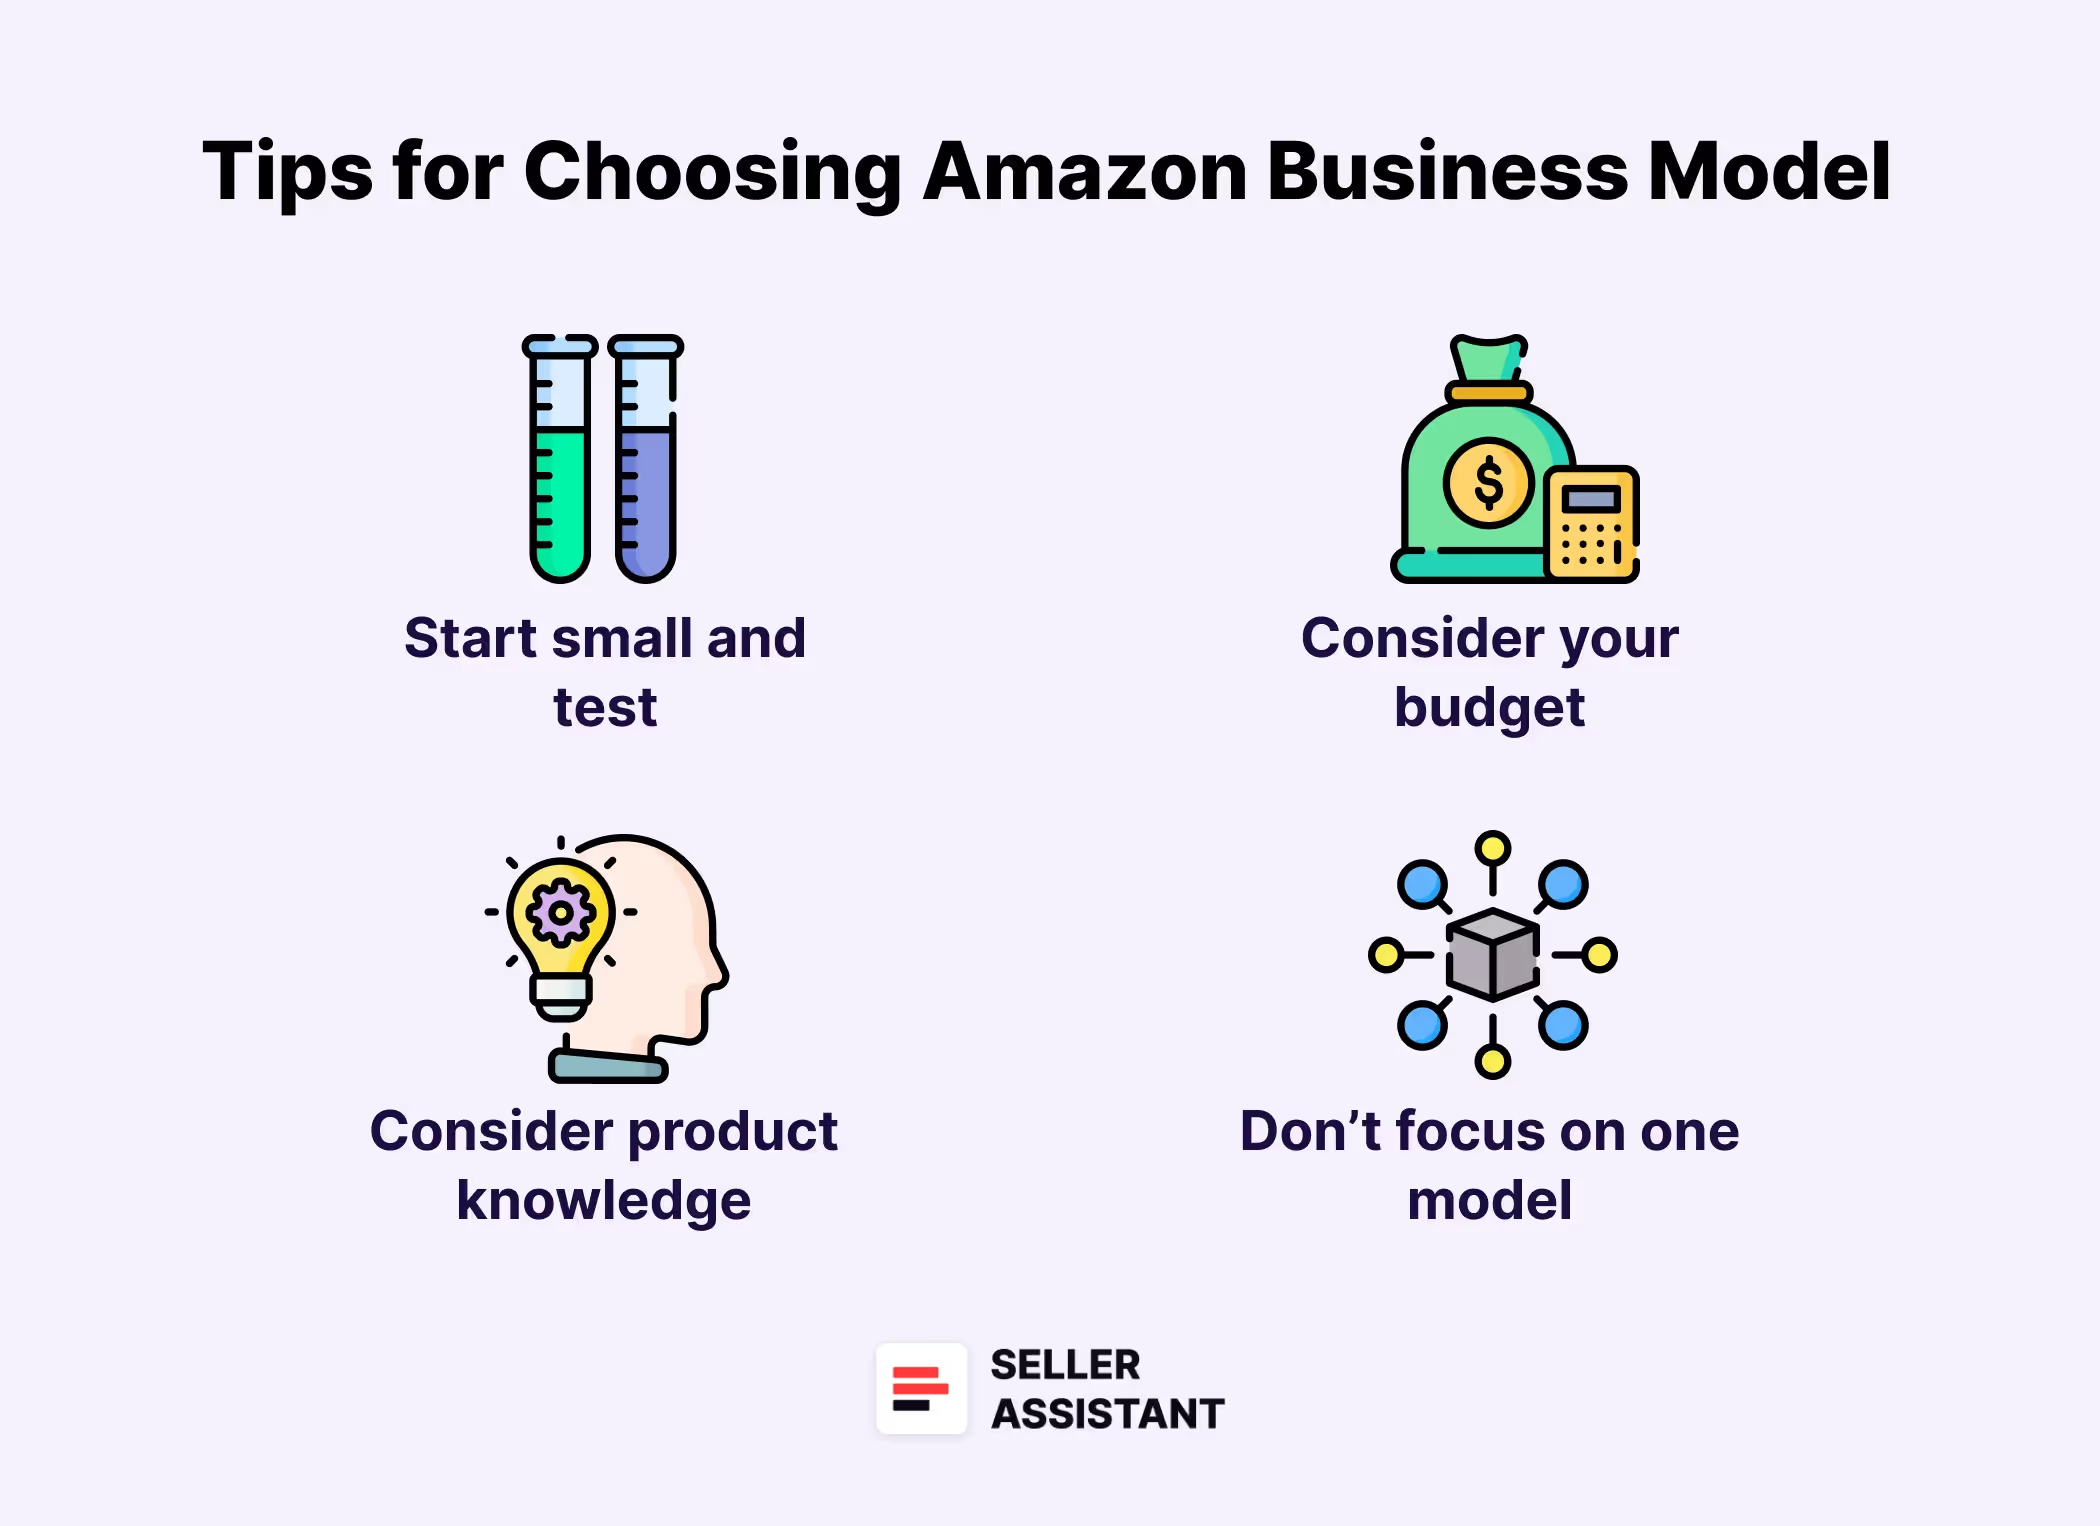
Tip 1. Start small and test
Start selling with one of the business models that are easy to set up and don’t require a high upfront investment. That will help learn to sell on Amazon without much risk. Dropshipping or online arbitrage are good options if you want to start selling on Amazon.
Tip 2. Consider your budget
Look at the startup costs associated with each model. Private label and wholesale models require more upfront capital than online arbitrage, retail arbitrage, and dropshipping models.
Tip 3. Consider your product knowledge
Assess your product research skills. While online arbitrage and dropshipping require product research, product sourcing tool Seller Assistant, can essentially simplify this task. Wholesale sellers can also use it to validate wholesale products. On the other hand, with the private label, you need to do extensive market analysis and understand the product manufacturing process, branding, and marketing.
Tip 4. Don’t focus on one model
Choosing the right business model is an ongoing process. As you gain experience and scale your business, you can adapt your business model type to your new needs and goals. For example, many successful Amazon sellers have grown their online arbitrage business to wholesale.
Related: Amazon Business Models: How to Choose the Right One?
What to Sell on Amazon?
Choosing what to sell is one of the most important tasks of any Amazon seller. Ultimately, the right product makes you money, while with a problematic item, you can lose all you invested. But how do I select what to sell? What should I look at?
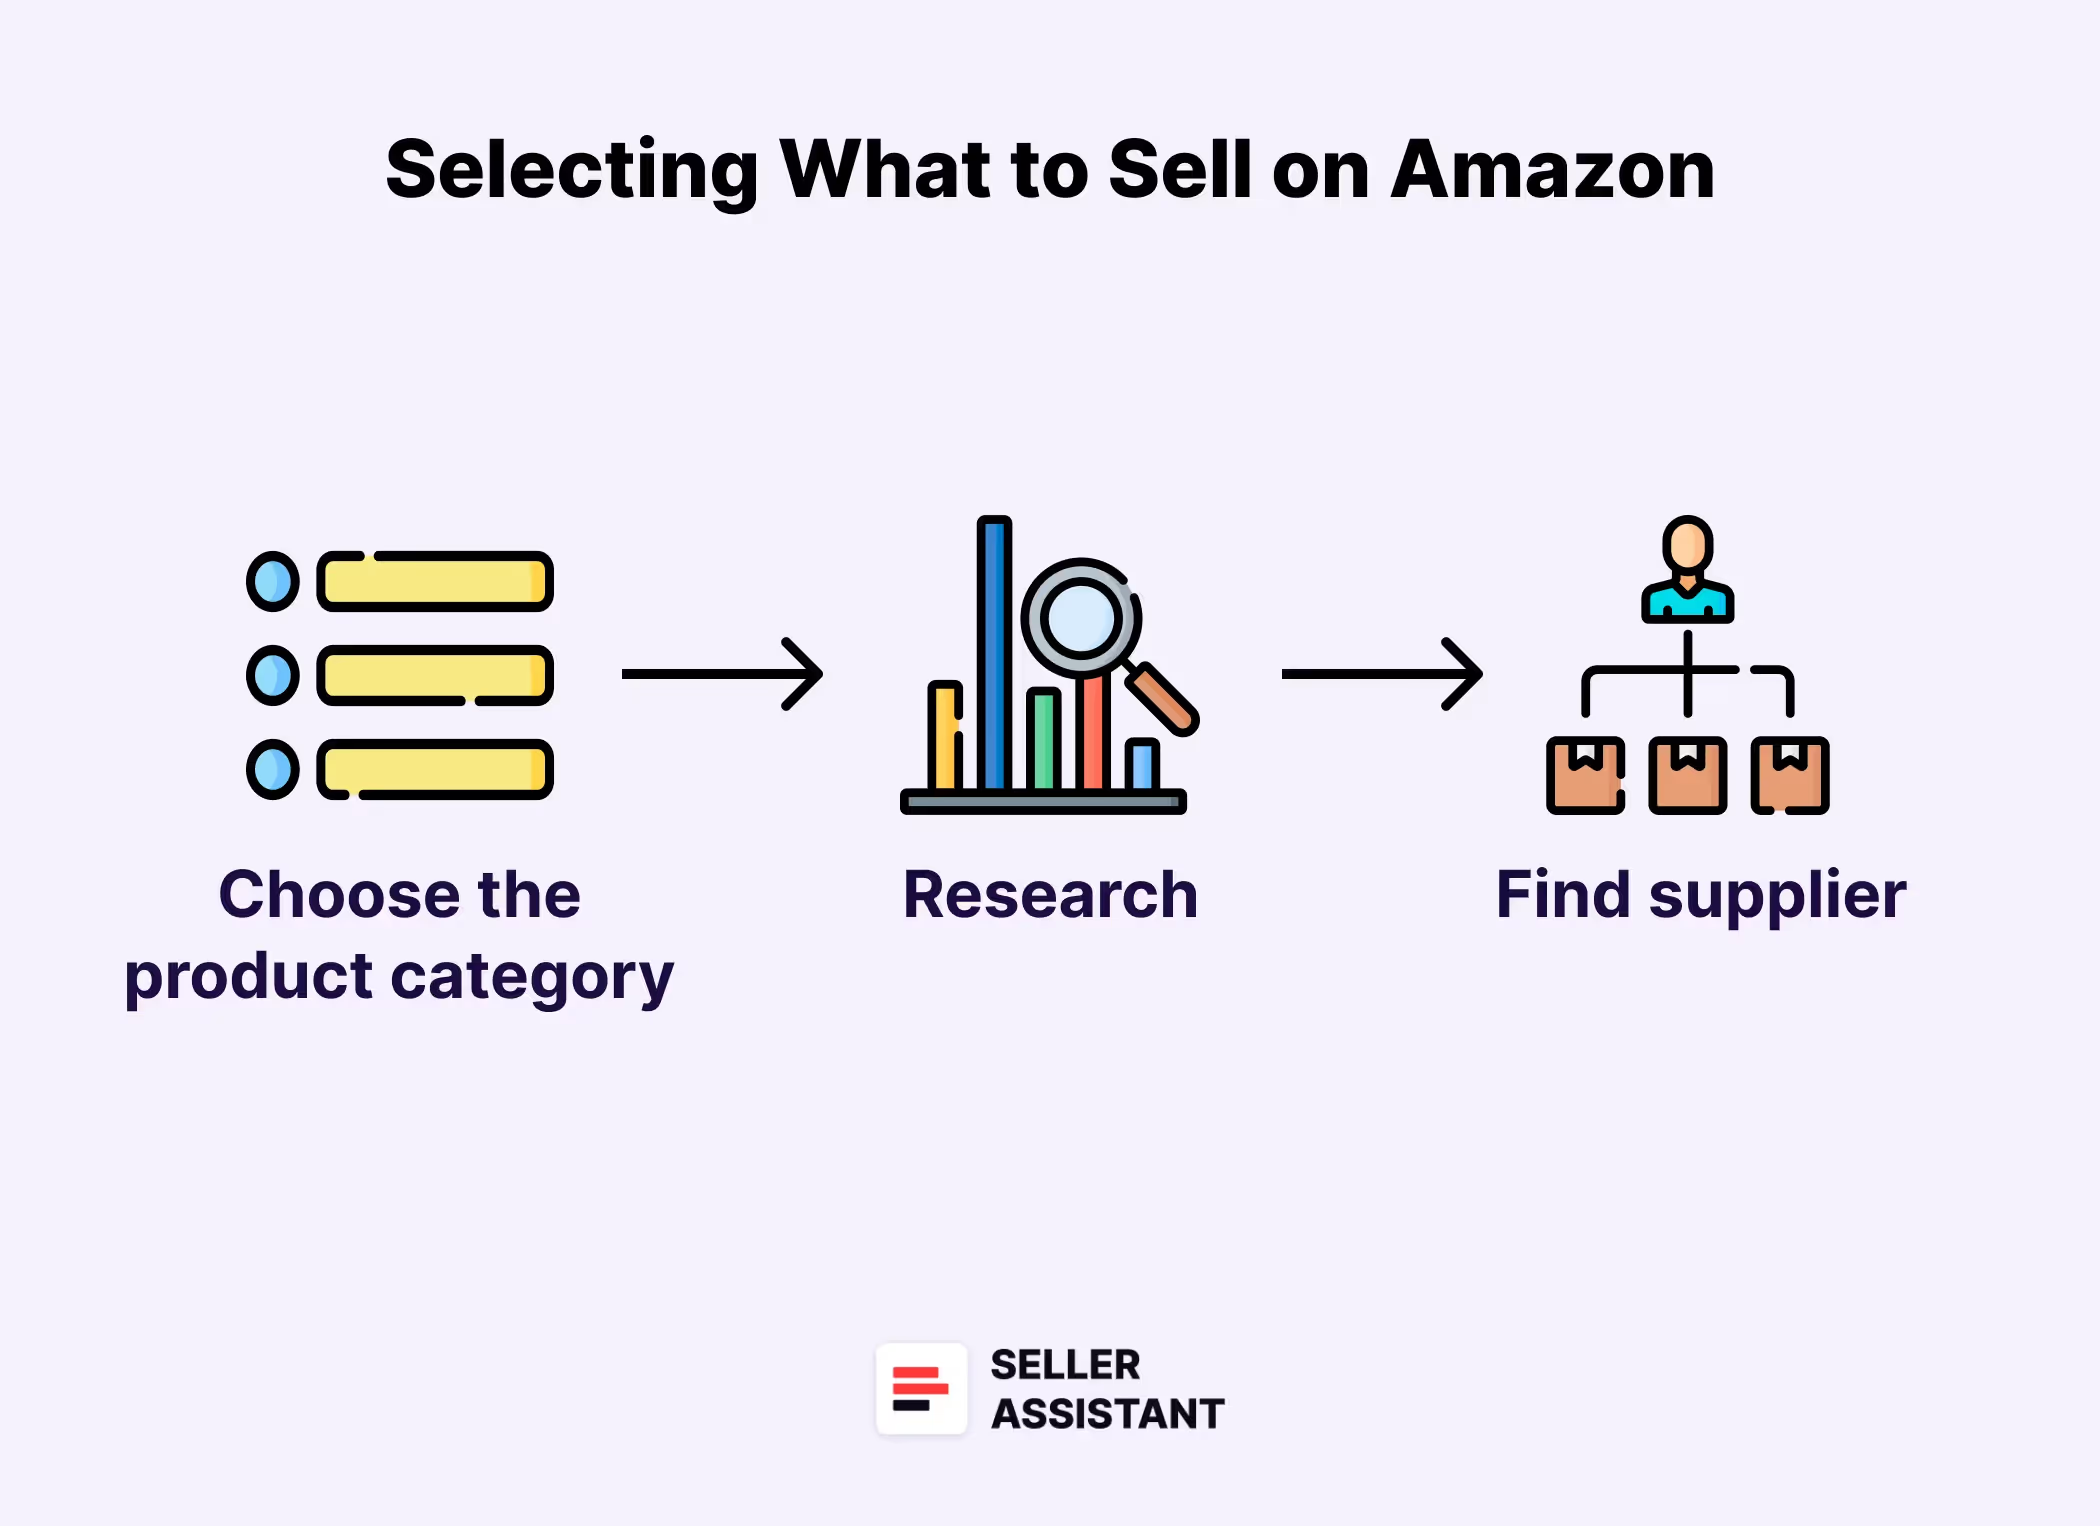
Selecting what to sell involves 3 parts: choosing a product category, product research (checking the product for the criteria we will discuss below), and finding a product supplier.
Note. In some business models, the process will look differently, however, you will still need to do product research. For example, wholesale sellers start by finding a supplier, then research the list of products they get from that supplier, and choose the most profitable of them to sell (direct sourcing, discussed below).
How to choose an Amazon product category to sell?
Amazon uses categories to group similar items together. This makes it easier for shoppers to find what they're looking for and for sellers to list their products in the right place. Amazon divides products into main categories and subcategories.
Example: If you sell a smartphone, you must list it in the "Cell Phones & Accessories" subcategory under the larger "Electronics" category.
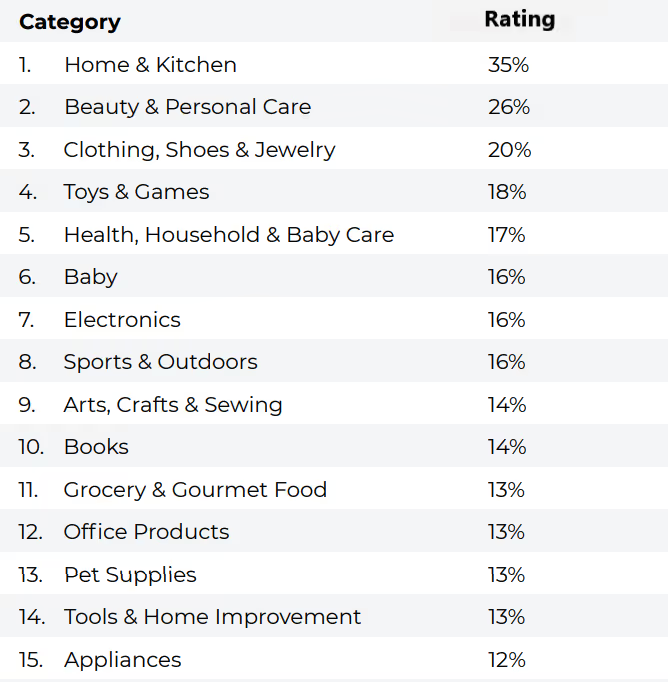
Some product categories are more popular than others, and you must remember that when choosing a product. Below you can find the categories rated by popularity among sellers.
Top Amazon product categories
Tips for choosing what Amazon category to sell
If you are not sure how to make your category choice, you can use our tips below.
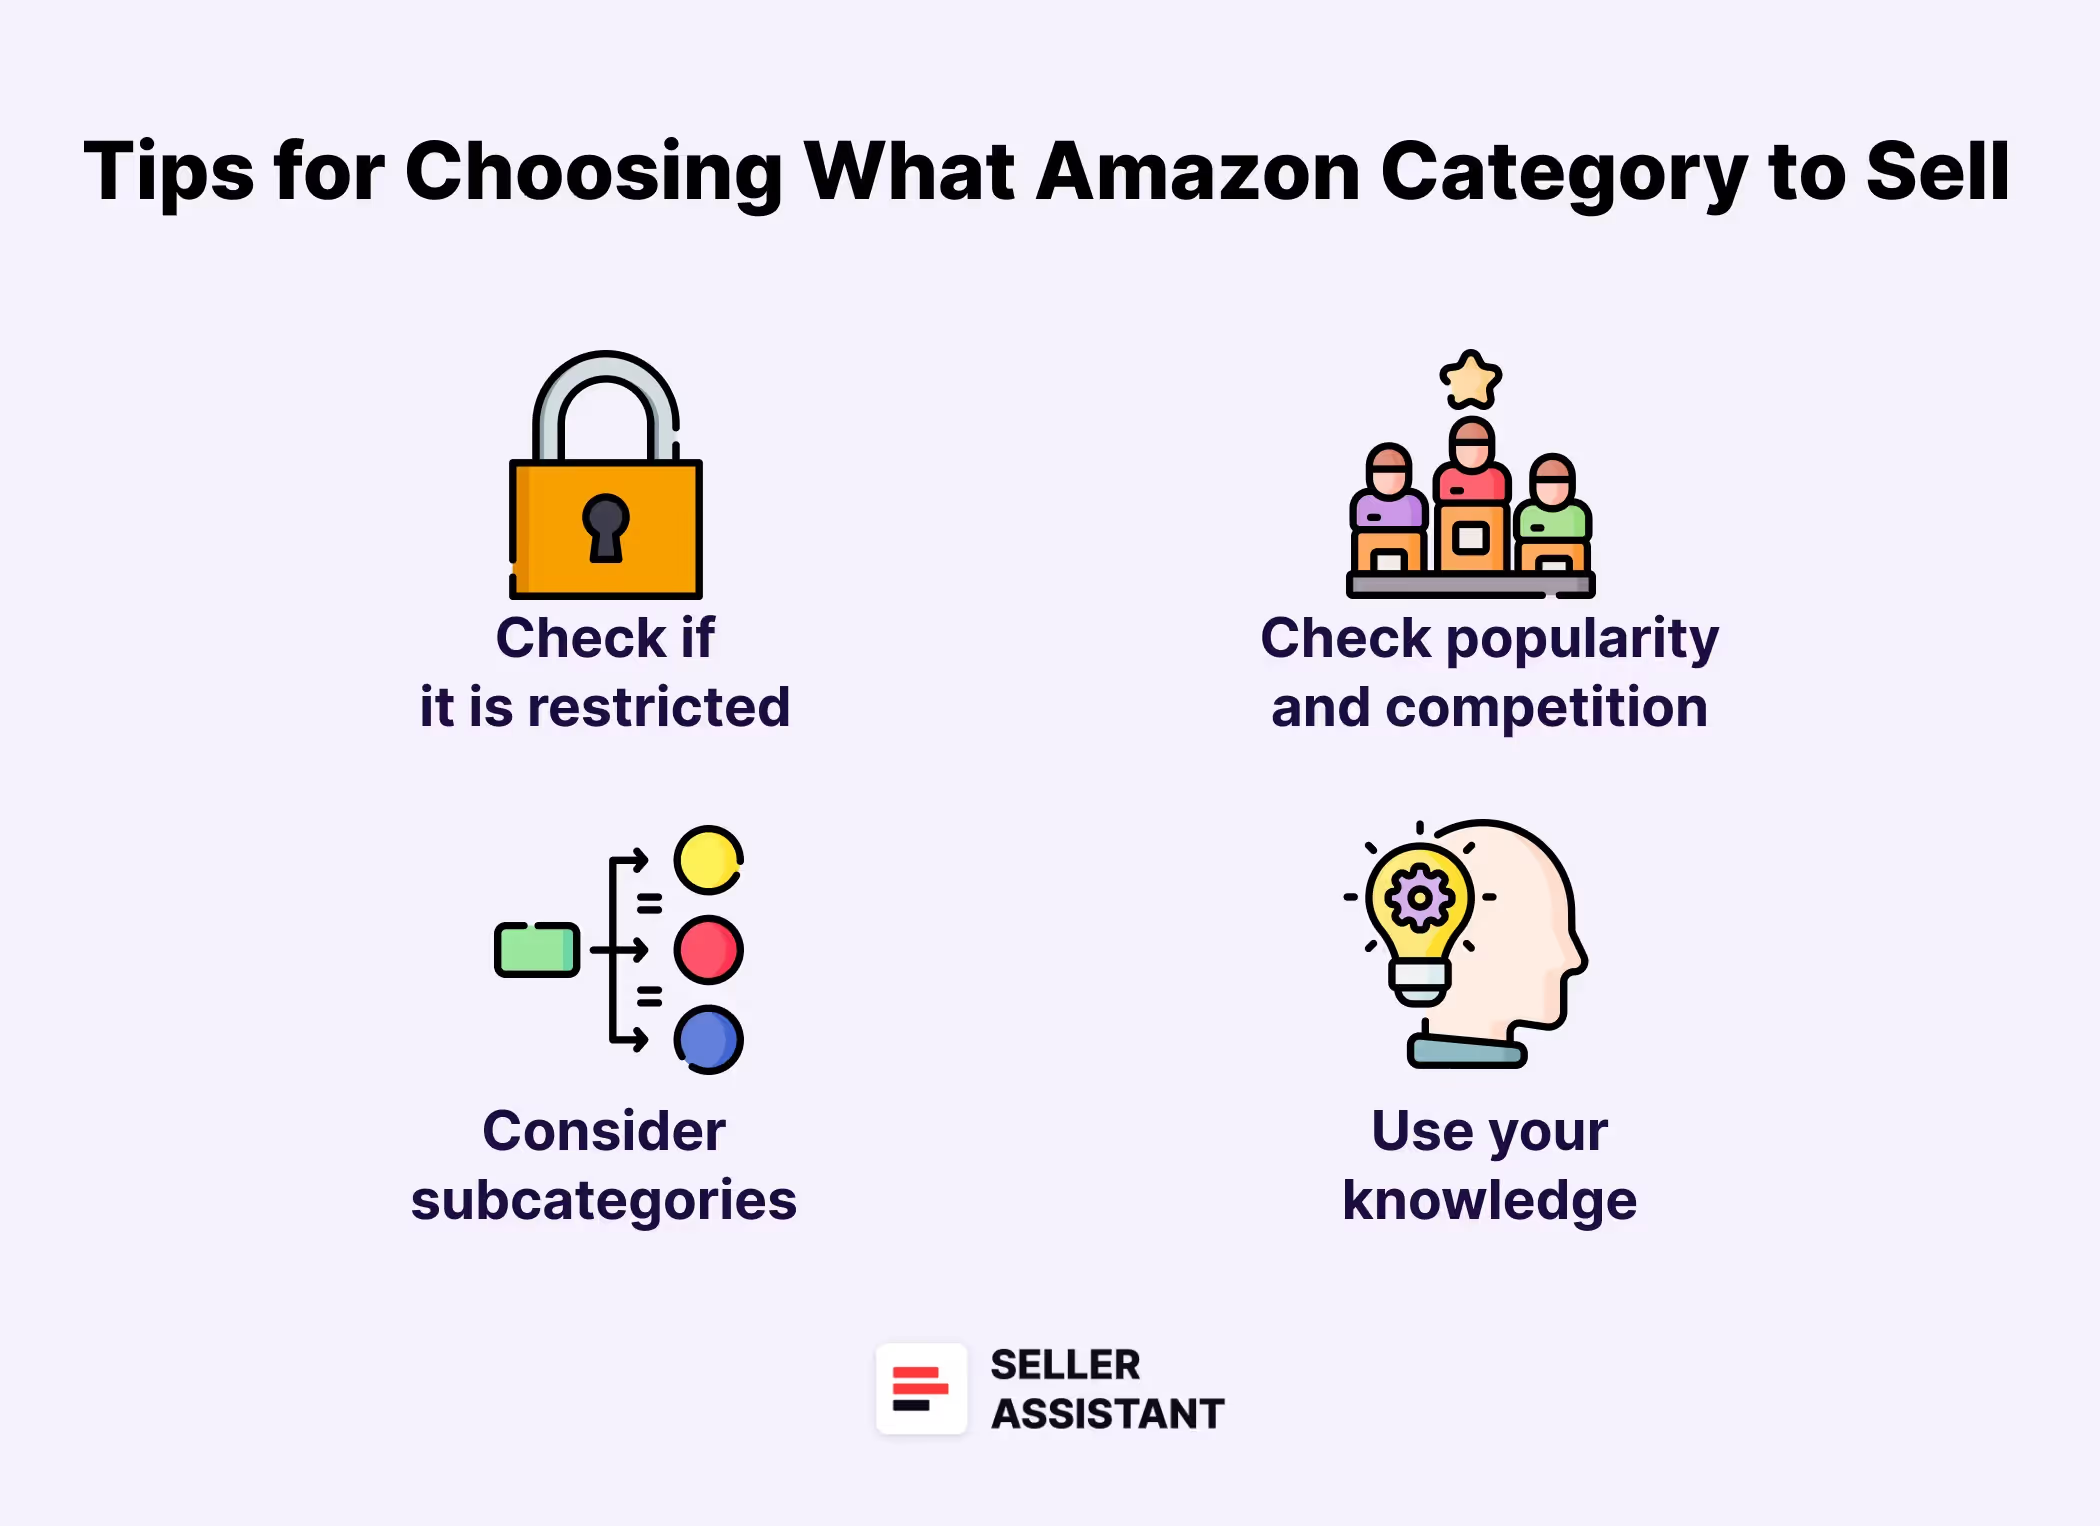
Tip 1. Check if the category is restricted
Start by finding out if the category you're considering is restricted (gated). Gated categories require Amazon's approval to sell. That may mean additional steps like submitting invoices to Amazon and other document verification. In addition, as a new seller, Amazon may not approve you to sell in a restricted category, so it’s better to avoid such categories.
Tip 2. Look for a balance between popularity and competition
Some categories are more popular than others. However, selling in popular categories often means higher competition because everyone wants to sell popular products. Look for categories with a good balance of demand and competition
Tip 3. Consider subcategories
Don't just focus on the main category, explore subcategories. A subcategory might offer a more targeted audience – customers looking for products of your kind.
Tip 4. Use your knowledge and experience
Start selling with what you are interested in and know about. That will be easier for you to handle and get involved with.
Related: Top Amazon Product Categories
How to choose your first product?
When you’ve chosen the category for your products, it’s time to start looking for your first product. In essence, that means you must ensure it meets specific criteria for best-selling products. This is called product sourcing.
To simplify this process, sellers use a product research checklist and make sure the product meets that checklist. If it does, that’s a profitable deal you can sell without hesitation.
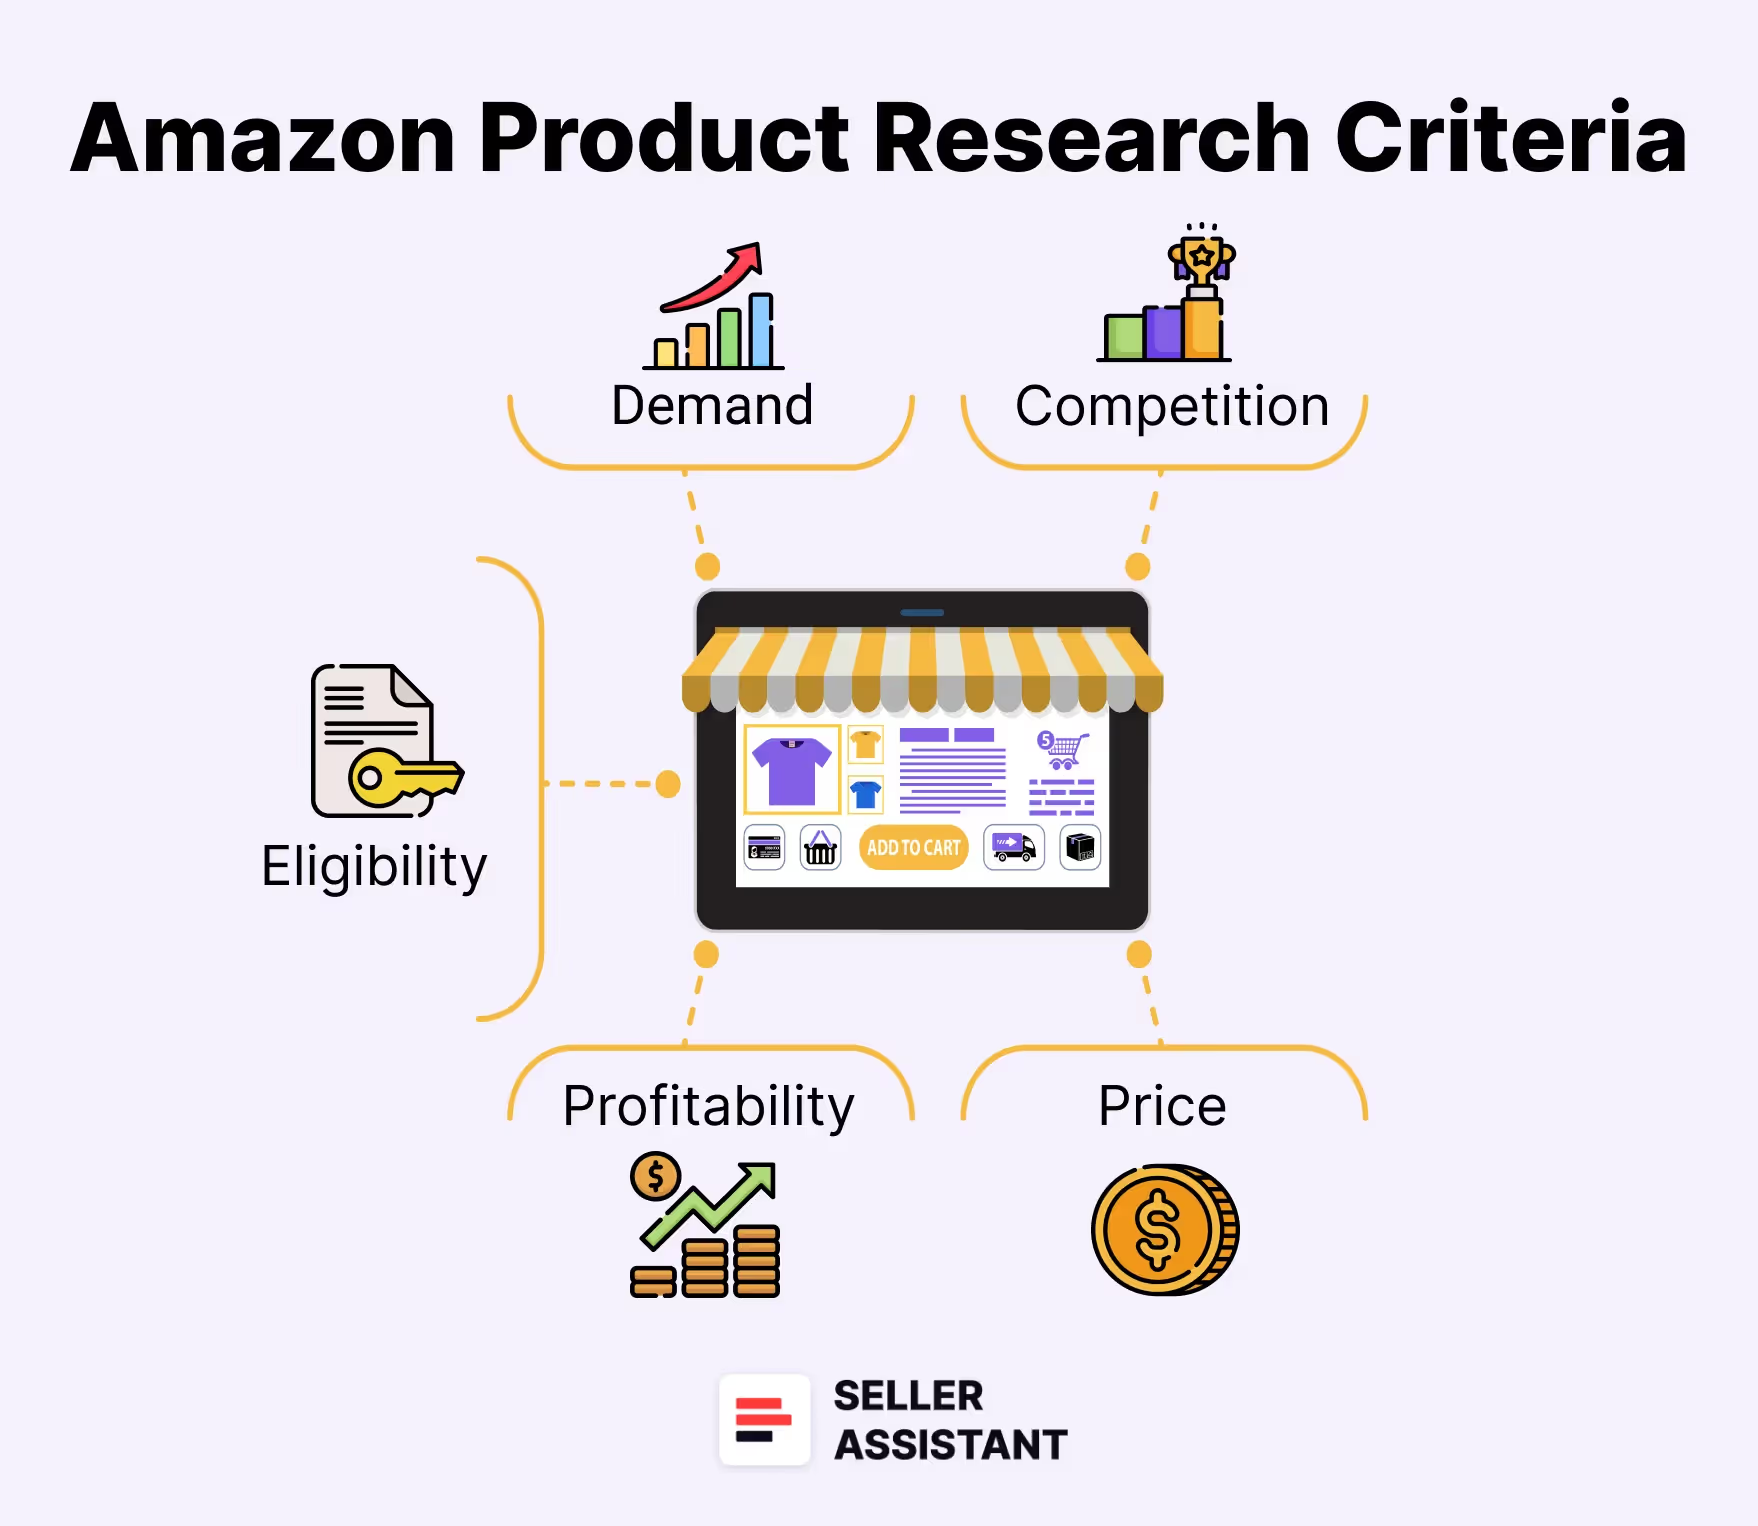
To research a product, we will use Seller Assistant, a popular and effective product-sourcing platform. It allows you to choose items with good profit potential and no issues. It also helps find reliable suppliers with competitive prices.
13 steps to choosing your Amazon product
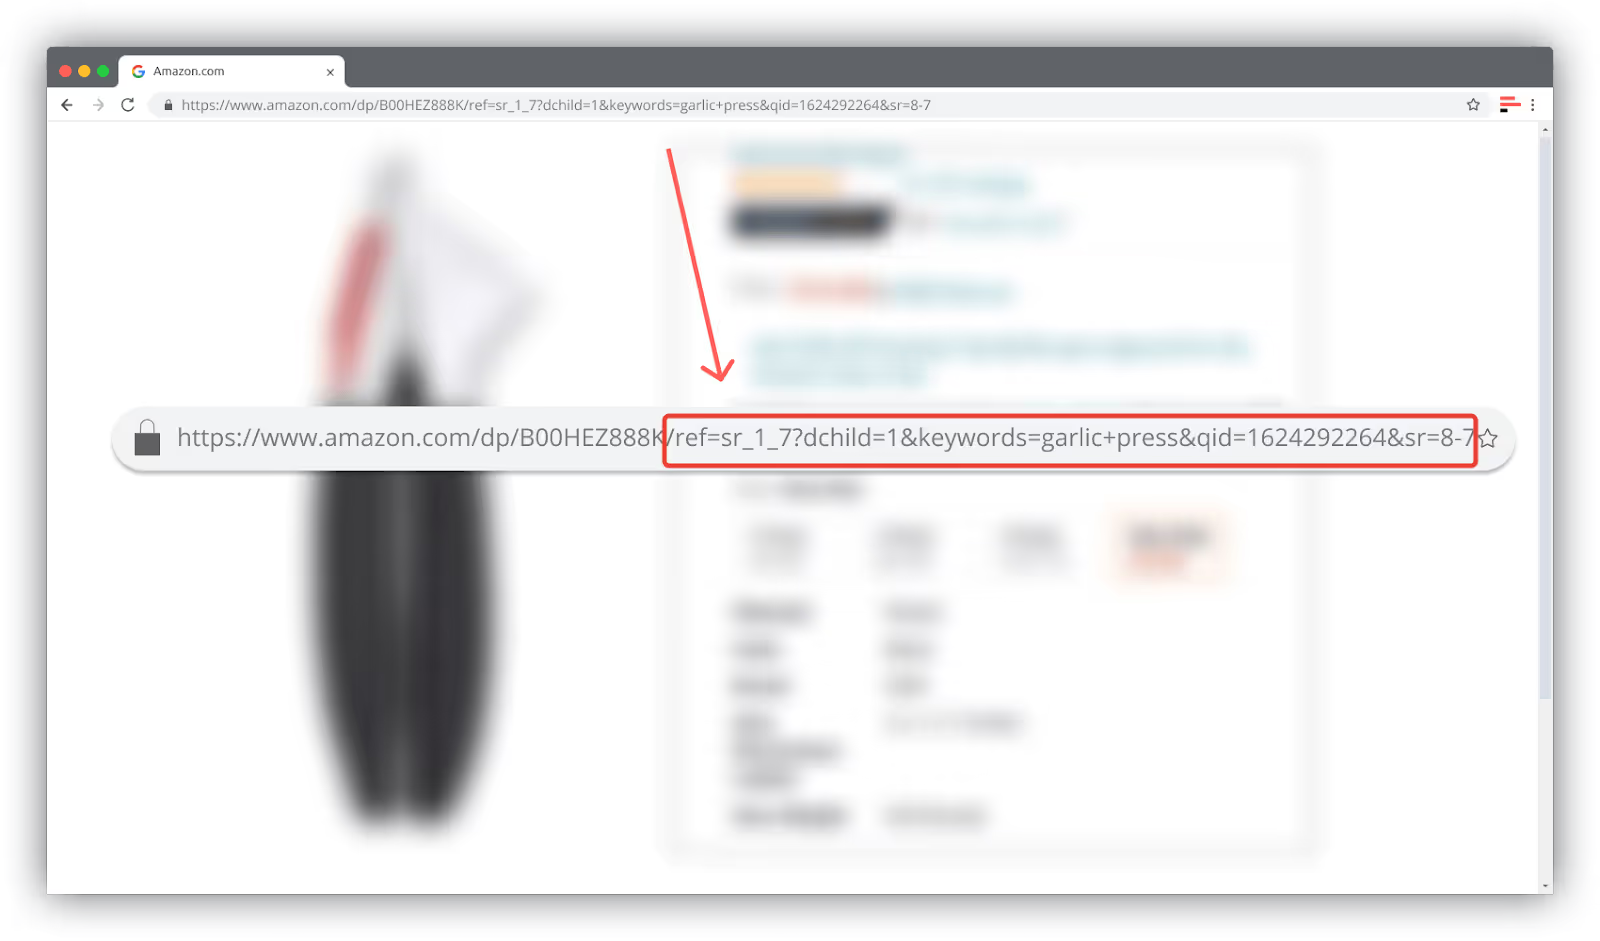
Step 1. Remove the referral from the product link
Make sure the product link you use doesn’t contain a referral (part of the link, starting with ref=). It can give you wrong information about the product. For example, you may not see all seller offers or product variations (different sizes and colors of the same product).
How to do it. Delete the part of the link, starting with ref= and refresh the page.
Step 2. Check a product for IP alerts
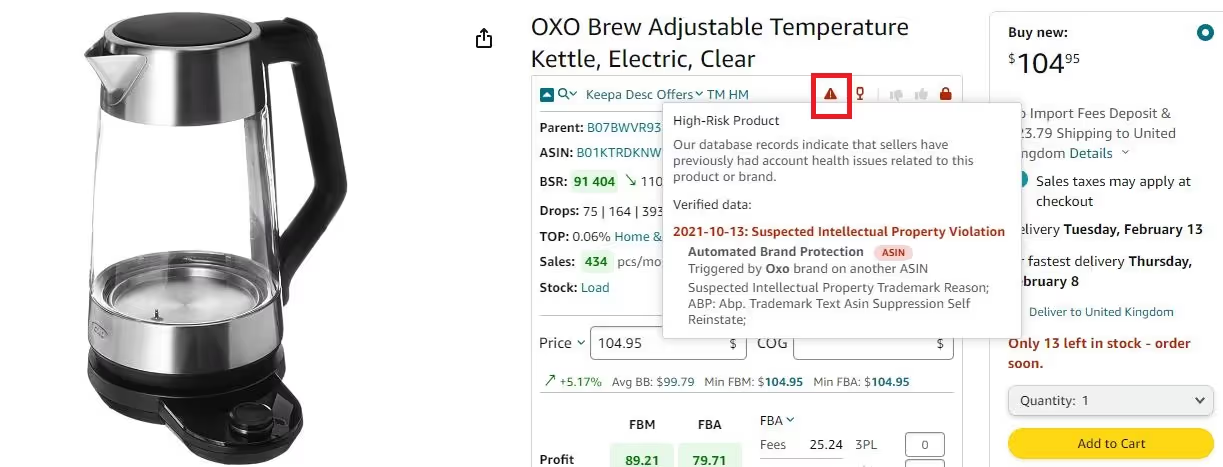
Before selling a product you must make sure it doesn’t have IP (intellectual property) complaints.
IP complaints happen when brands complain to Amazon that other sellers resell that brand’s product without its permission. Amazon will not allow you to list such products because they are trademarked.
How to do it. You can detect products with IP complaints with Seller Assistan’s IP Alert feature. It shows the red triangle icon if a product has IP complaints and the type of IP complaint. That means you must stay away from that product and brand.
Step 3. Check competition by FBA seller count
The next step helps avoid products with high competition. If many sellers compete, they drop the price and you can lose much of the profit.
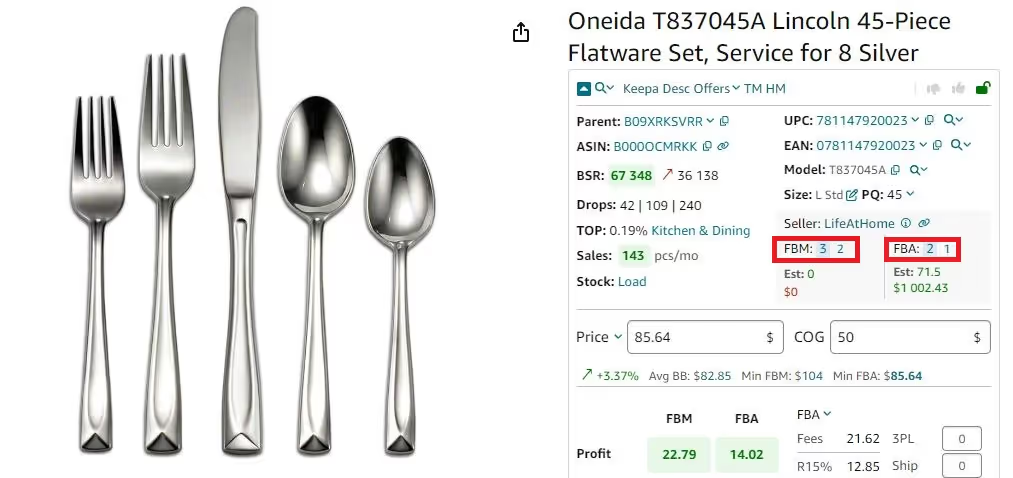
The «good» count of FBA seller offers must range from 2 to 15.
- The minimum number of 2 sellers shows that a product is not sold by a brand owner and it doesn’t file IP complaints if someone else sells that brand’s products;
- The maximum number of 15 sellers shows that the competition is too high. If that is the case, the product price can drop because the sellers engage in a price war. That means price dumping and low profits.
How to do it. You can see the count of FBA sellers with Seller Assistant. It shows the count of FBA and FBM sellers on the product and search pages. The number on a blue background is the count of all FBA or FBM sellers. The number on the white background next to it is the count of FBA or FBM sellers offering the Buy Box price +5% (your potential competitors).
Related: How to Avoid a Price War on Amazon
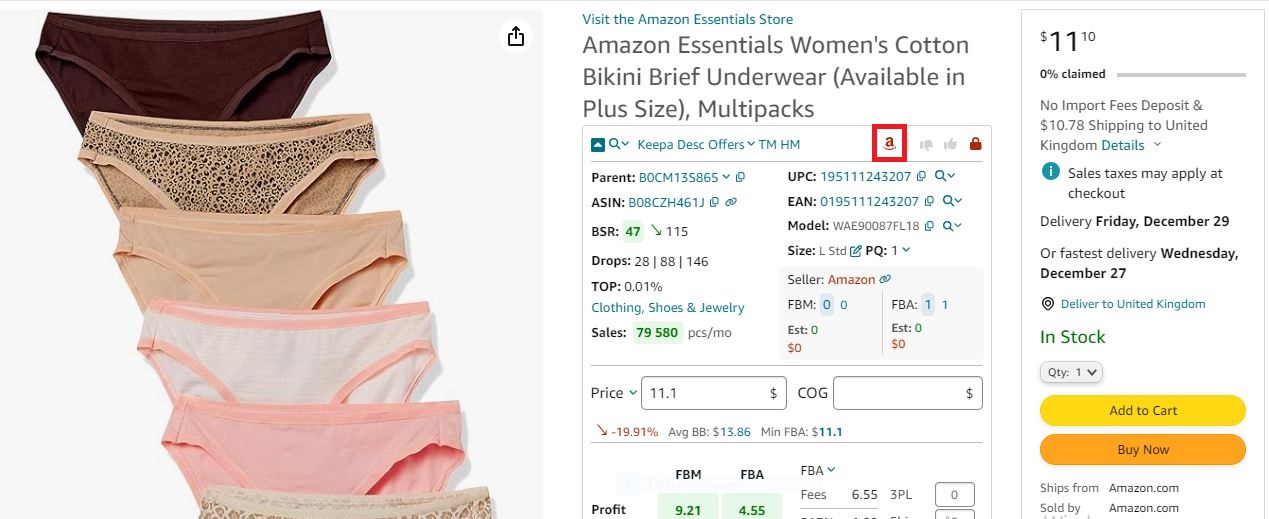
Step 4. Check if Amazon is a seller
Amazon can sell some products as a seller in its own marketplace. If Amazon sells a product, it is not suitable for selling. That is because it is almost impossible to compete with them. As a huge retailer, they always get the best offer. Therefore, it’s better to find another product to sell.
How to do it. You can see if Amazon is a Buy Box seller with Seller Assistant. It shows the Red Amazon icon on the product and search pages.
Step 5. Check out the listing age
The product listing must be old enough so that you can see how the product sales and price behaved over time. The «good» listing age is half a year or more.
How to do it. You can see that on the chart integrated within Seller Assistant (it’s called Keepa charts). If a product is new, the chart will not show you any data before a certain period.

Step 6. Find out how well the product sells
Amazon doesn’t show how many products are sold per month. However, you must know how much you can sell.
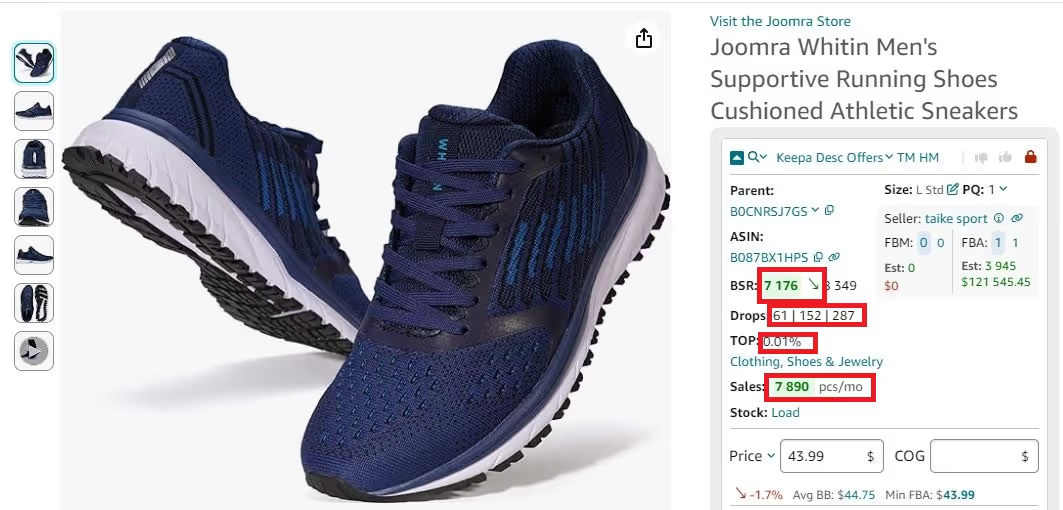
Amazon has a special indicator called Best Sellers Rank (BSR) to estimate how good (or bad) the product sells, but it doesn’t give you the number of sales. It shows the sales trend. The lower the rank, the better the product sells. It constantly changes, so you must look at the average BSR over 90 days.
How to do it. Seller Assistant calculates how many products you can potentially sell per month in the Sales field. Drops (BSR drops) show how many products were sold during 30, 90, and 180 days.
You can also see BSR figures with Seller Assistant. If the BSR number is green and the arrow beside it points down, the product is a good option for selling. If the BSR number is red and the arrow beside it points up, the product is not a good option for selling.
Related: Amazon Best Sellers Rank – Everything You Need to Know
Step 7. Estimate the selling price
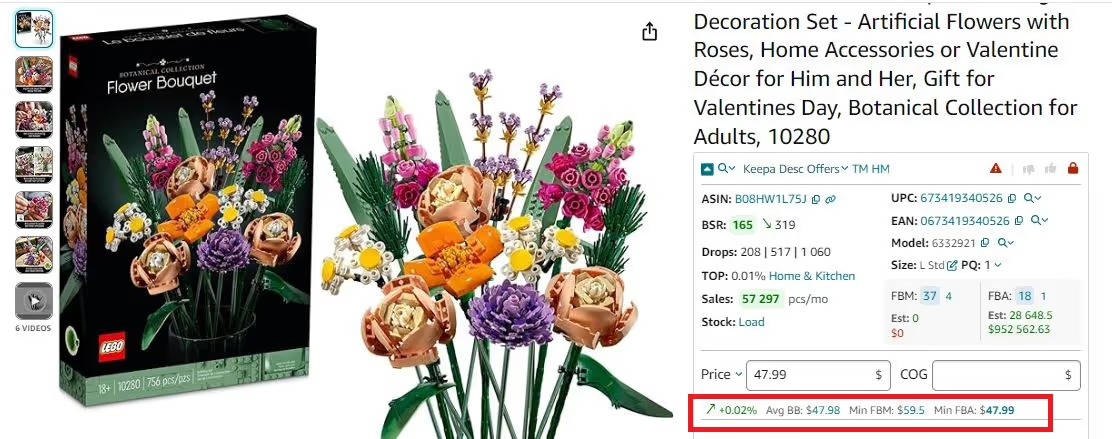
Look at the maximum and minimum price and average Buy Box price (the offers Amazon considers the best and shows on the listing).
How to do it. Seller Assistant shows the average Buy Box price (Avg BB), and if it goes up or down compared to a 90-day price (green arrow up or red arrow down). It also shows the lowest FBA (Min FBA) and lowest FBM (Min FBM) prices. You can set your price somewhere in between. You can use this price level to calculate if your product will bring profit.
Related: What is Buy Box? How to Win Buy Box on Amazon
Step 8. Research if the product has variations
Amazon variations are different attributes of the same products such as size, color, style, etc. grouped on one listing.
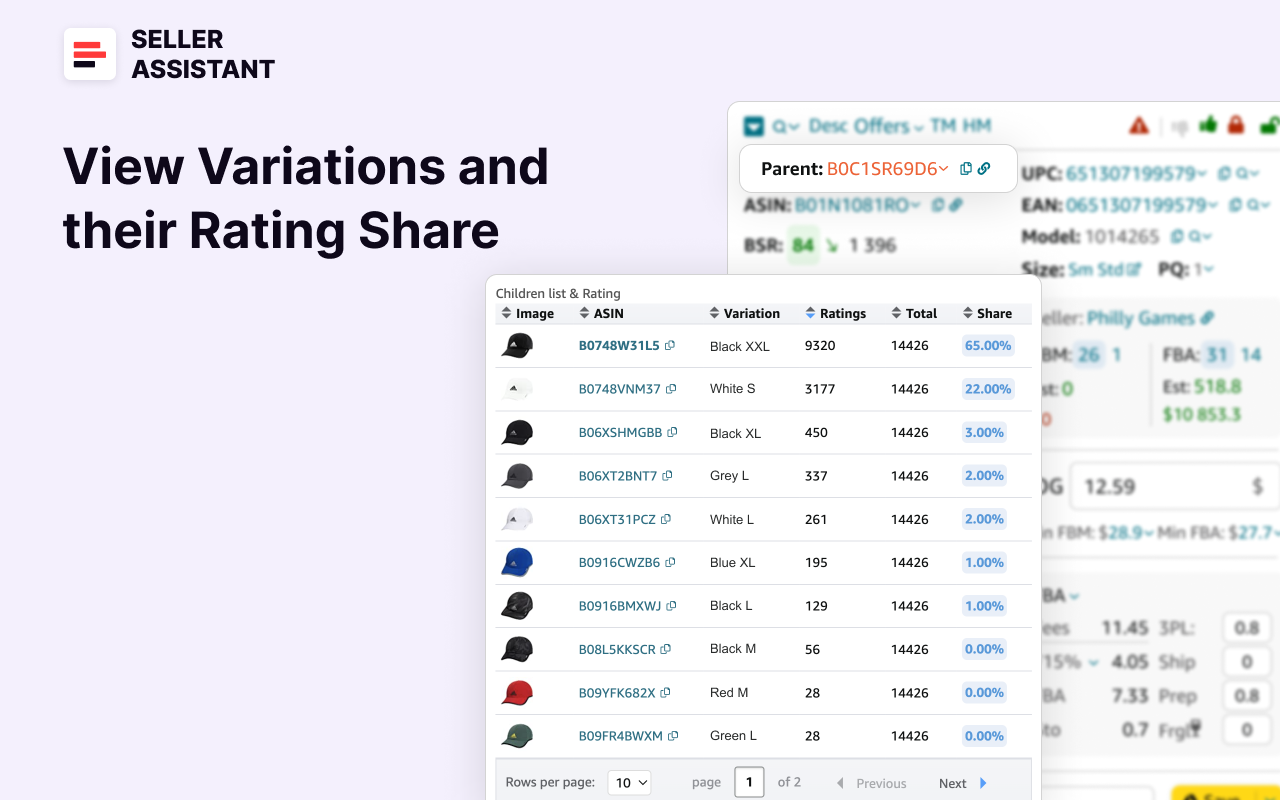
If a product has variations, not all of them will sell equally well. If you want to sell a product with variations, you must select one of the best-selling variations. However, the BSR doesn’t show which sells the best because it is calculated for the whole variation family (all variations together).
How to do it. Seller Assistant’s Variation Viewer lets you quickly see all variations' rating share, total ratings, and the rating percentage per variation (Share). The highest rating percentage indicates the most profitable variations. Variation Viewer also shows if a variation is out of stock.
Related: How to Add a Variation to an Existing Amazon Listing — Сomplete Guide
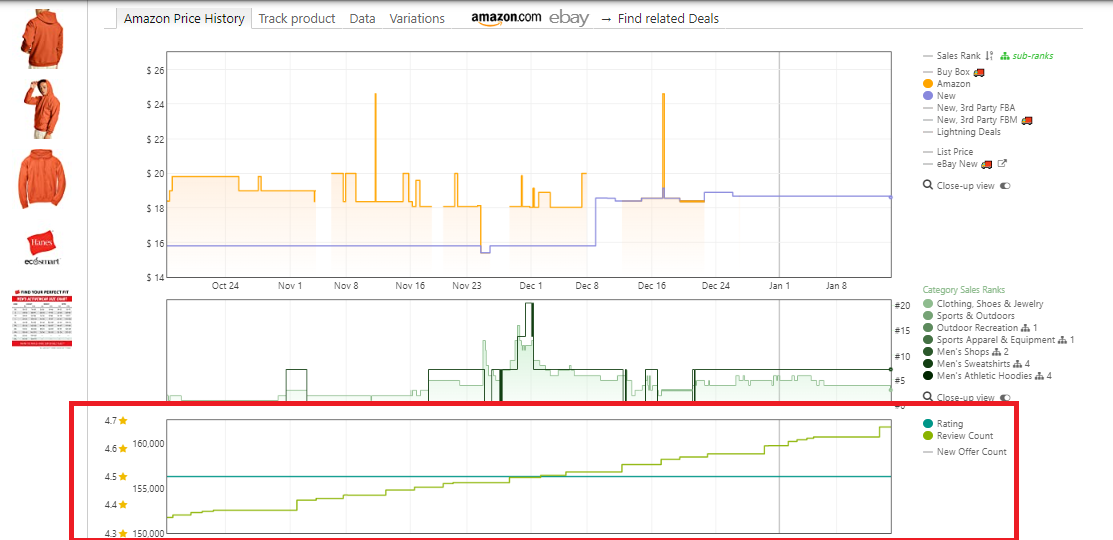
Step 9. Look at product reviews
Reviews are buyer feedback about a product in the form of a star rating or a text. The rating ranges from 1 to 5 stars. If a shopper rated your product over three stars, it is a positive review. If the product has less than three stars, it’s a bad review.
How to do it. Seller Assistant shows reviews on the separate Keepa chart. A «good» product must have reviews. If it doesn’t, it has too recent sales history or doesn’t sell. The average rating must be 4-5 stars, and it must not have many negative reviews.
Step 10. Verify selling eligibility and restrictions
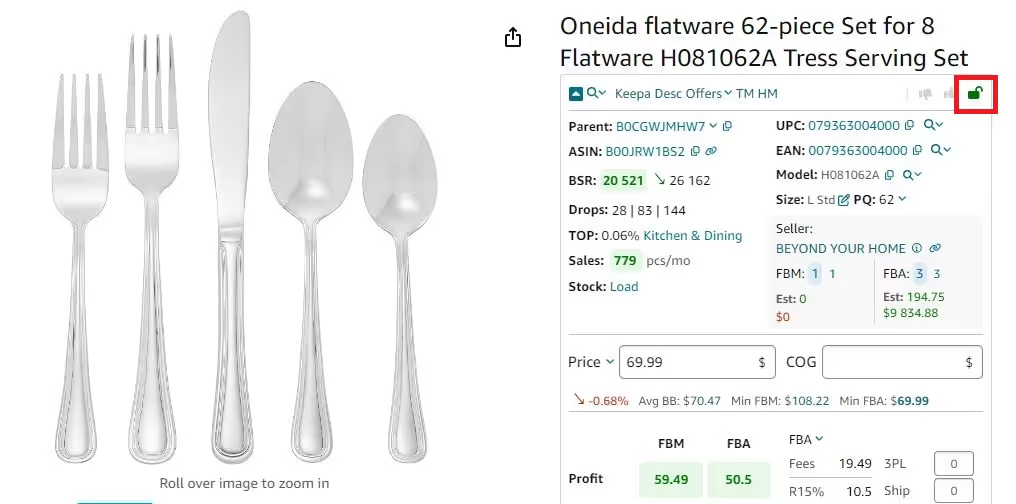
Certain products require Amazon's approval for sale. You may not be eligible to sell some products on your account. You must check that before buying products because Amazon may not allow you to add them to the listing.
How to do it. Seller Assistant shows a green open lock icon if you can sell a product and a red closed lock icon if you can’t.
Step 11. Check product for flags
Product flags are alerts prompting that a product can create problems when you sell it on Amazon.
Examples are oversize, fragile, meltable, hazmat, adult, and other products. Most of them are restricted categories. Even if not, they require extra shipping costs like heavy and bulky, hazmat, and fragile, or you can’t add your offer to the listing like with generic brands.
Also, some are not sold all year round like meltables. Some categories are processed in special Amazon fulfillment centers, which delays shipment (oversize, hazmat).
That means it’s better to avoid such products.
How to do it. Seller Assistant shows all product flags directly on the Amazon product and search pages.
Seller Assistant flag icons legend
- Closed Red Lock icon — you can’t sell the product on your account, or it belongs to a restricted category;
- Red Triangle icon — IP alert;
- Red Box icon — a product is oversize;
- Red Glass — a product is fragile;
- Red Drop — a product is meltable;
- Hazmat icon — a product belongs to the hazardous materials;
- 18+ — a product belongs to Adult goods;
- Red Amazon icon — Amazon is a Buy Box seller;
- GB — generic brand (you can’t add your offer to the listing).

Related: Seller Assistant : What Products to Avoid Selling on Amazon?
Step 12. Assess estimated sales
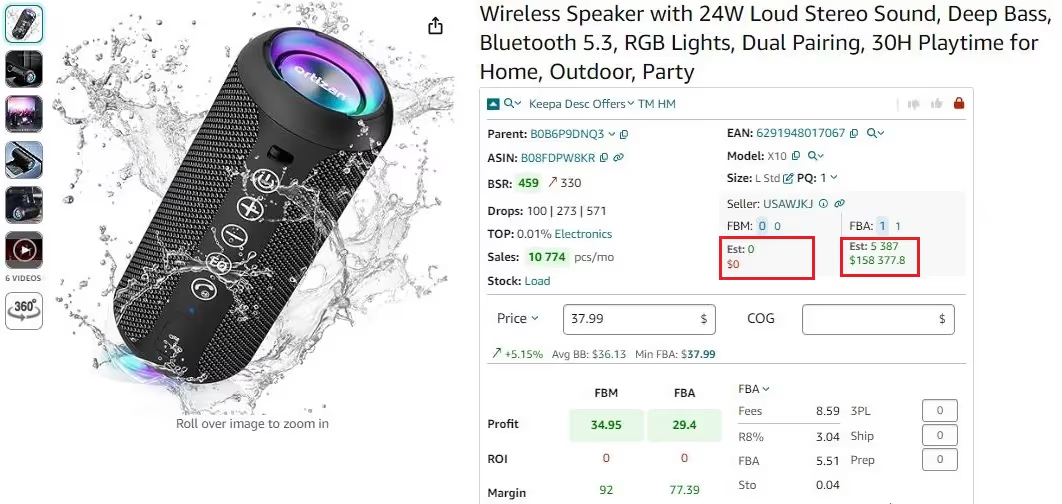
Estimated sales are how many product units you can sell per month. Your target estimated sales depend on how much you plan to make to cover expenses and make enough profit.
How to do it. Seller Assistant calculates estimated sales for each product if you become one more seller on the listing. The figure appears in the ‘Est’ line. This helps you understand if you can sell as many units as you expect.
Step 13. Calculate product profitability
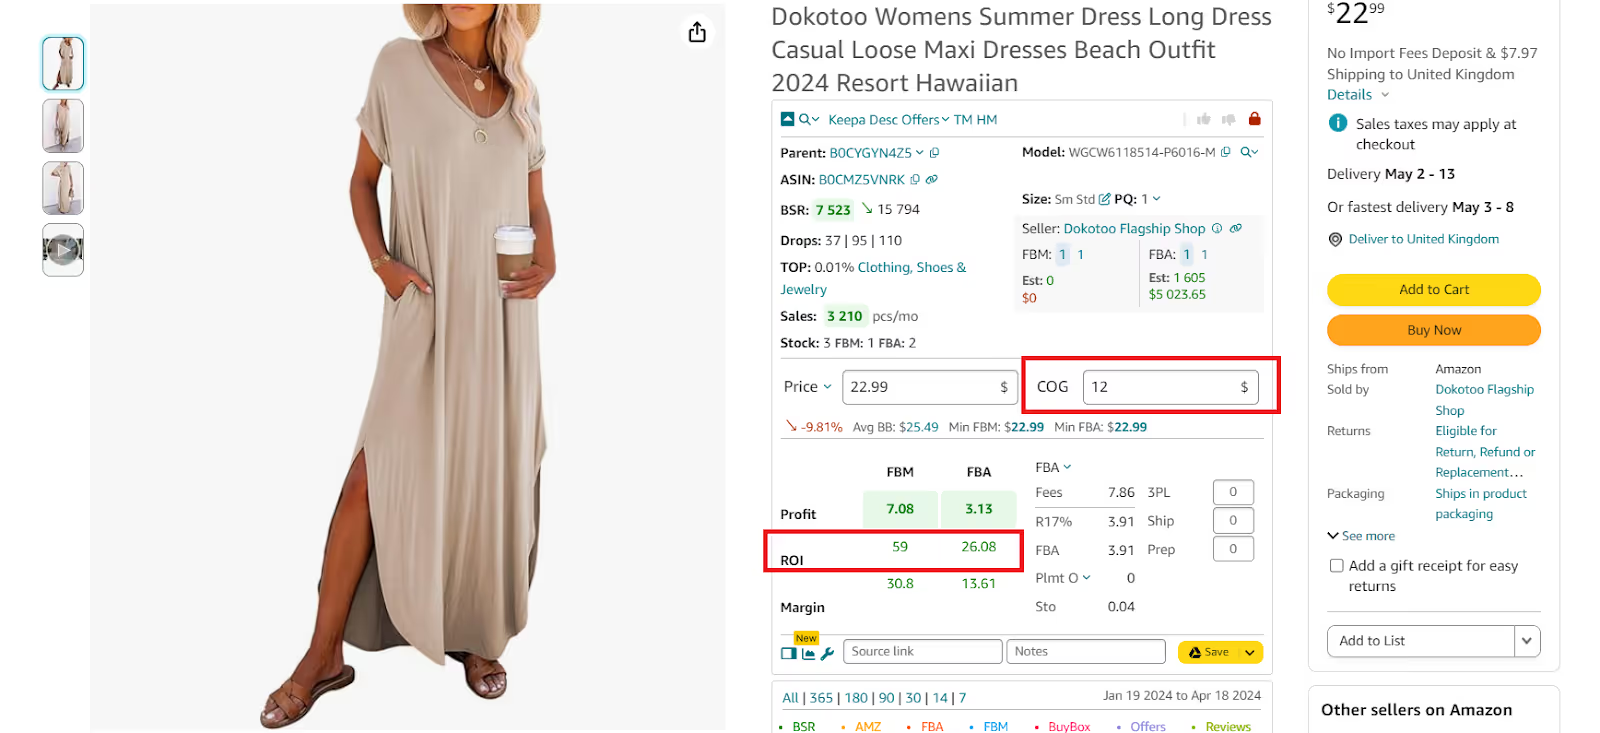
ROI (Return on Investment) shows how profitable your Amazon business is. Typically, anything above 10% is considered a “good” ROI for your Amazon business. If your ROI is more than 10%, the product is OK to sell. To calculate ROI, you must divide net profit by total investment.
How to do it. At this point, you will only need an estimated ROI to have an idea if a product is profitable (or not). To calculate ROI, you must know the Cost of Goods Sold (COG, the product price at the supplier). You can look up the price at several suppliers and take the average. Seller Assistant’s Quick Links allow you to quickly search products on Google, Google Shopping, eBay, Walmart, Target, Webstaurant, Katom, The Home Depot, and Alibaba, and find the suppliers and prices. To do that, click on the search icon, and in the drop-down, select a website you want to search. You will be redirected to search results.
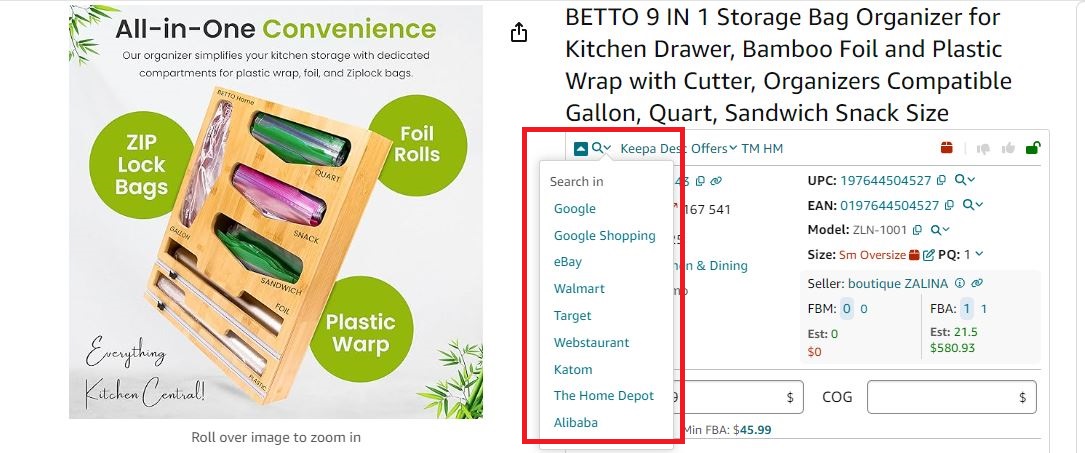
Then, you can quickly calculate ROI with Seller Assistant’s FBA&FBM profit calculator. It will be displayed on the Amazon product pages. Aim for Return on Investment (ROI) above 10% to ensure profitability.
How to find your product supplier?
After you make sure a product you plan to sell meets all the above criteria, you must look for a reliable supplier who offers low prices for your product. That will give you a good profit when you sell your product on Amazon.
Finding a product and its supplier for your chosen product is called product sourcing.
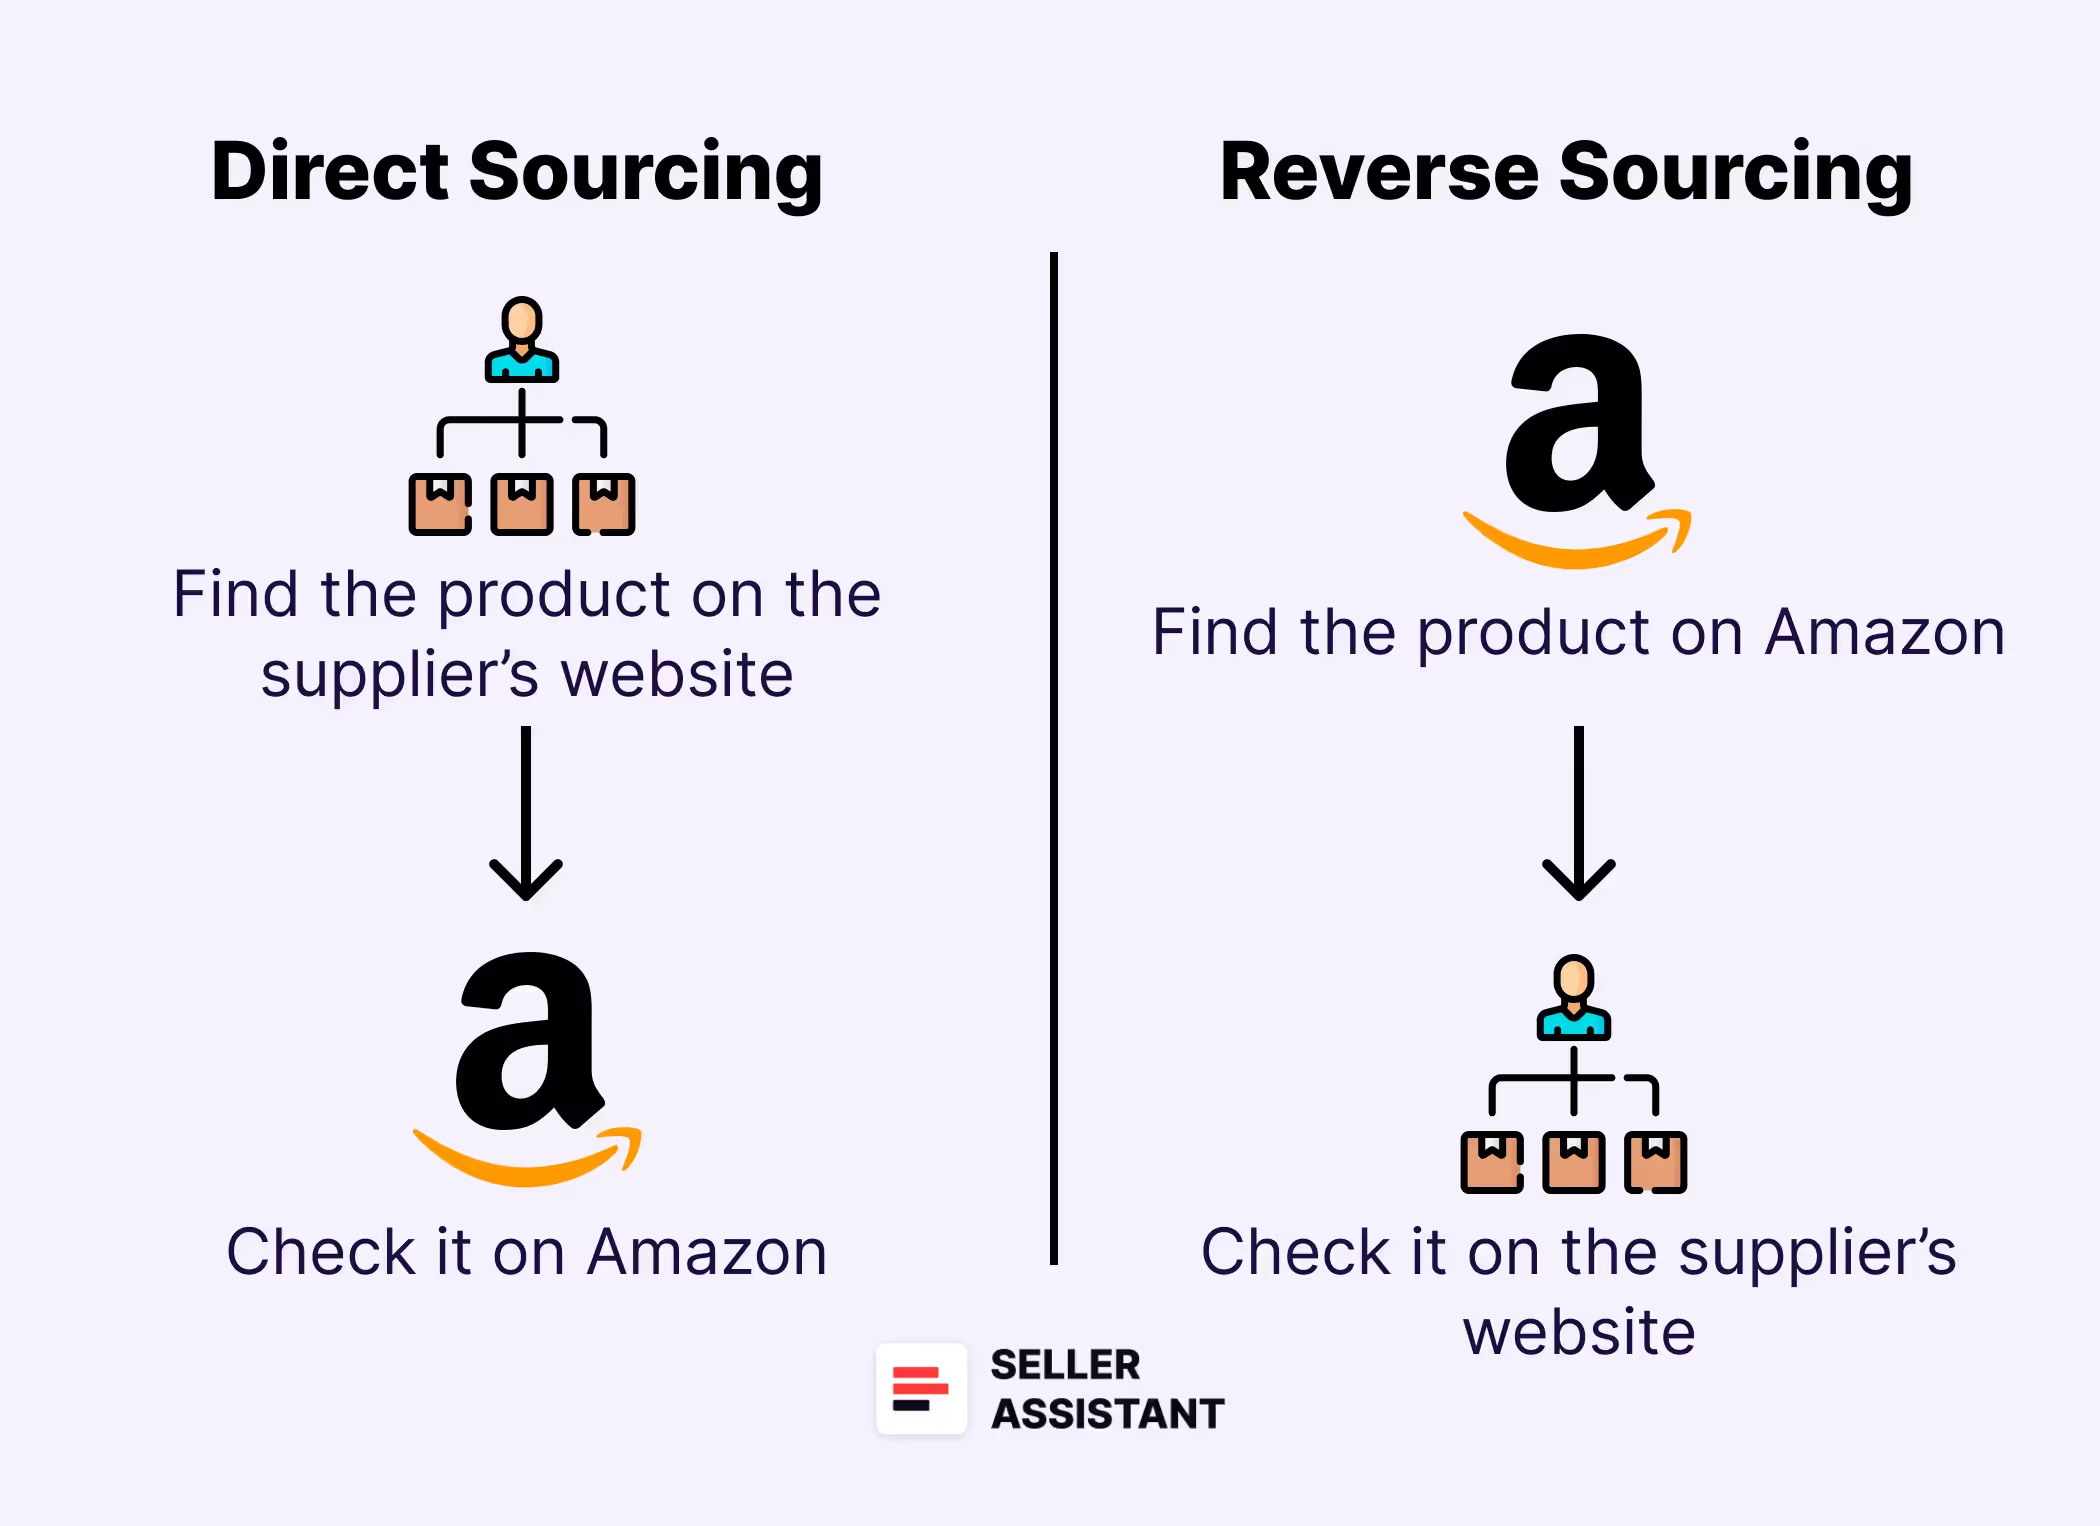
You can do product sourcing in several ways. The two most popular are called – direct and reverse sourcing.
How to find a supplier with direct sourcing?
The first way to find a supplier is direct sourcing. With this method, you select a product from the supplier and find its match on Amazon. That means you find a product at a low price at a supplier that has a much higher price on Amazon.
Direct sourcing is often used by wholesale sellers and those sellers who have existing suppliers. This is suitable if a supplier gives you a good discount and offers you a big price list of their products. You can select the items from that list to resell on Amazon for profit.
Other reasons to use this method are if a supplier offers you large discounts for bulk deals, or if you know that the supplier is reliable and delivers orders to Amazon’s fulfillment centers fast.
Direct sourcing step-by-step
- Step 1. Open the supplier’s website.
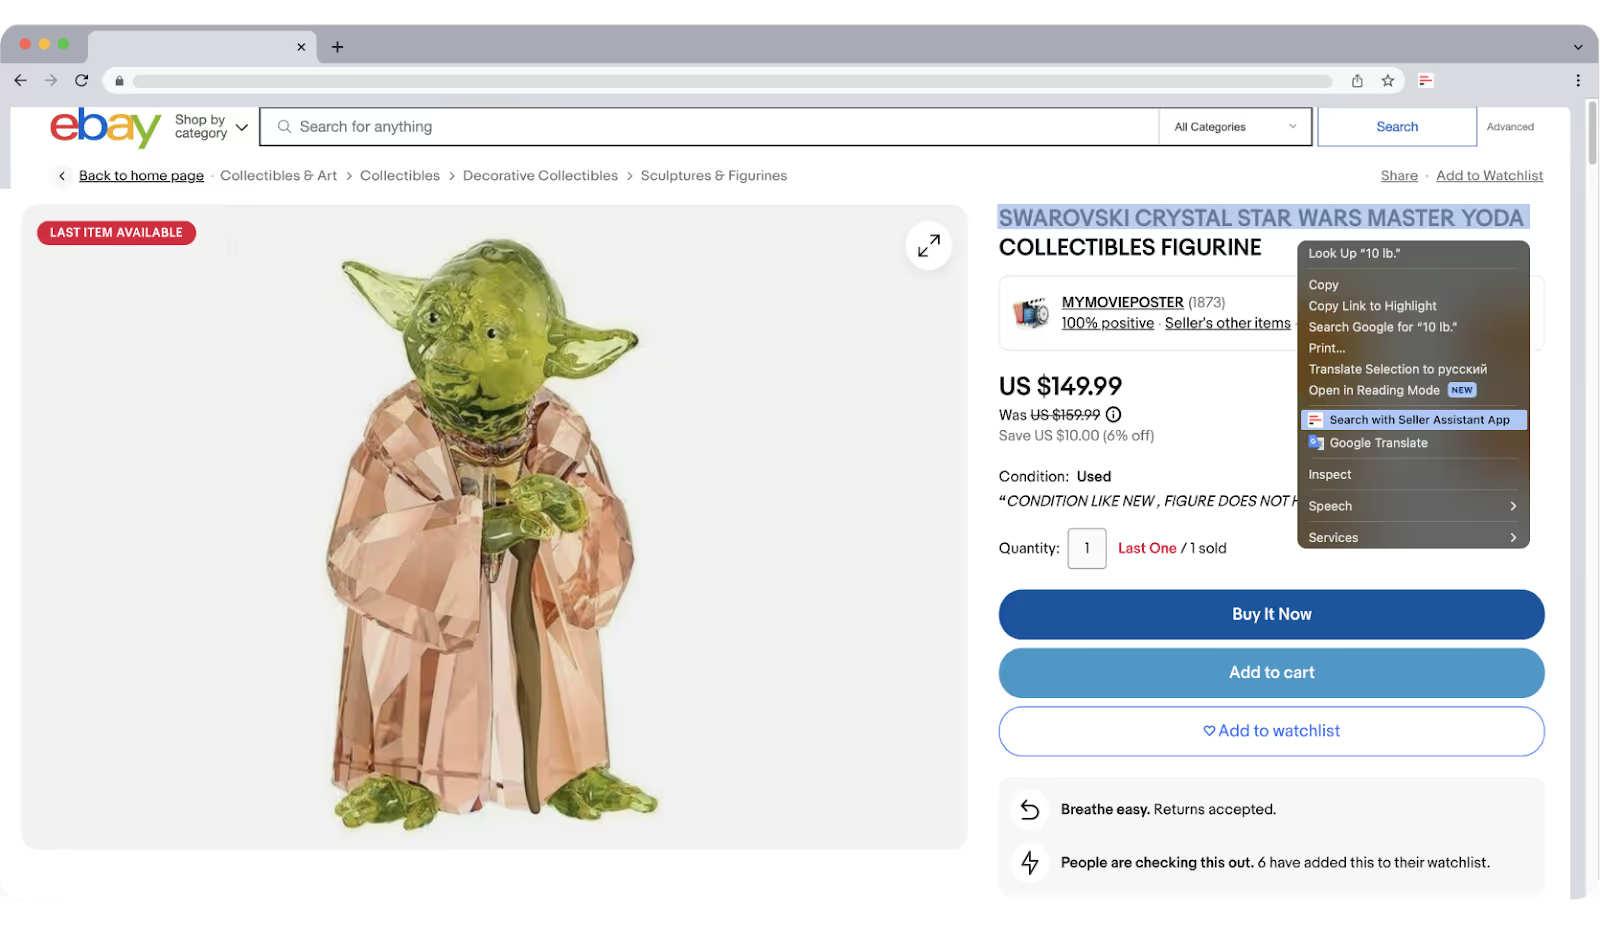
- Step 2. Open Seller Assistant’s Side Panel View.
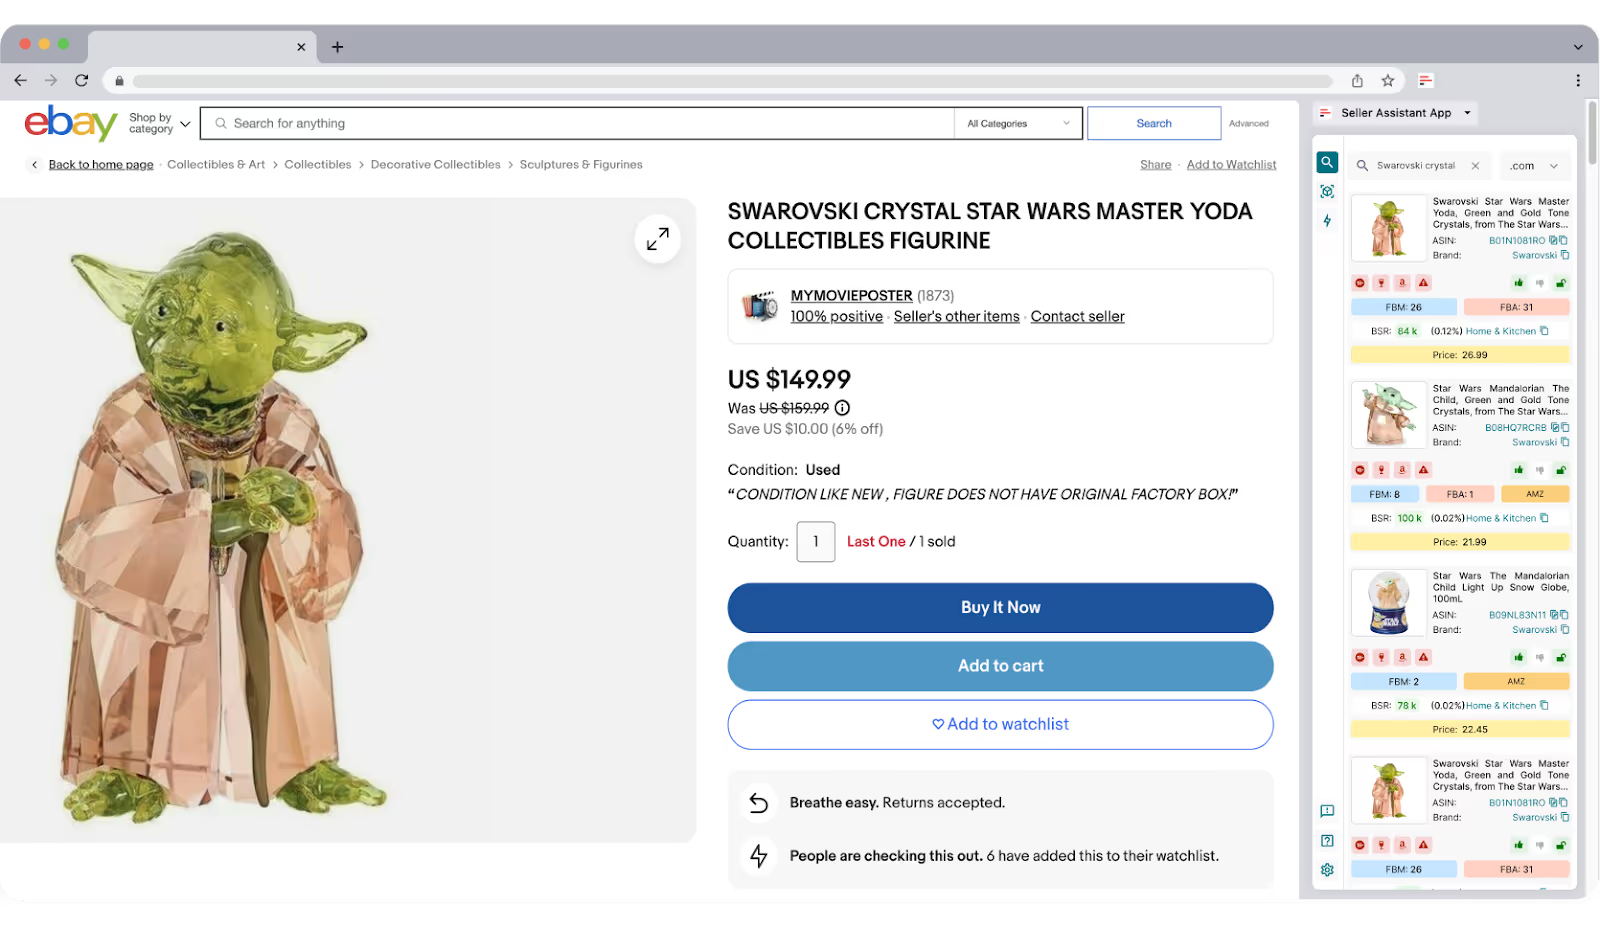
Side Panel View will appear on any website and show you a match on Amazon for the product you selected on that website. On your supplier website, select the text you want to search (product title, brand, or model), then right-click, and choose “Search with Seller Assistant”.
Step 3. Find your product on Amazon
Side Panel View will show you all available Amazon offers of similar products. Find the one you want to sell.
Step 4. Make sure the product at the supplier matches the item on Amazon
Open a product and make sure it exactly matches the one on the supplier’s website. Compare the brand name, model, size, color, materials, and pictures to make sure they are identical.
Step 5. Do product research
Because in this method we start by finding a supplier, we need to do product research afterward. Go through all 13 steps of product research we discussed above to make sure a product is suitable for selling. If you have permission from a brand to sell a product, skip step 2.
Step 6. Calculate profit and ROI with Seller Assistant’s FBA&FBM profit calculator
Enter the Cost of Goods, choose the fulfillment method, add prep center or 3PL costs if you use these services, get the profit and ROI figures, and see if they meet our criteria.

Step 7. If everything looks fine, order a product from the supplier.
How to find a supplier with reverse sourcing?
The second way to find a supplier is reverse sourcing. With this method, you select a product on Amazon and find its match at the supplier. That means you find a suitable product on Amazon and look for the same product at a much lower price at the supplier.
Reverse sourcing is often used by online arbitrage sellers and dropshippers because they source many products from different suppliers, and the decisive factor for a supplier choice is the low price.
Reverse sourcing step-by-step
- Step 1. Open on Amazon a product you want to sell.
- Step 2. Explore supplier options
Open Seller Assistant and click the search icon in the top left corner. Seller Assistant will display a drop-down list with the most popular supplier websites.
Seller Assistant App supplier links
- Google Shopping;
- eBay;
- Walmart;
- Target;
- Webstaurant (Home and Kitchen supplies);
- Katom;
- The Home Depot;
- Alibaba (for international sourcing).

Step 3. Redirect to search results
Select a supplier website from the list and Seller Assistant will then redirect you to the search results page for that product on the chosen supplier's platform.
Step 4. Make sure your product on Amazon matches the one at the supplier
Open the product with the best price. Activate the Seller Assistant’s Side Panel View icon. It will automatically appear on the supplier's website. Compare all product information on Amazon and at the supplier: brand name, model, size, color, materials, and pictures to check if they are identical.
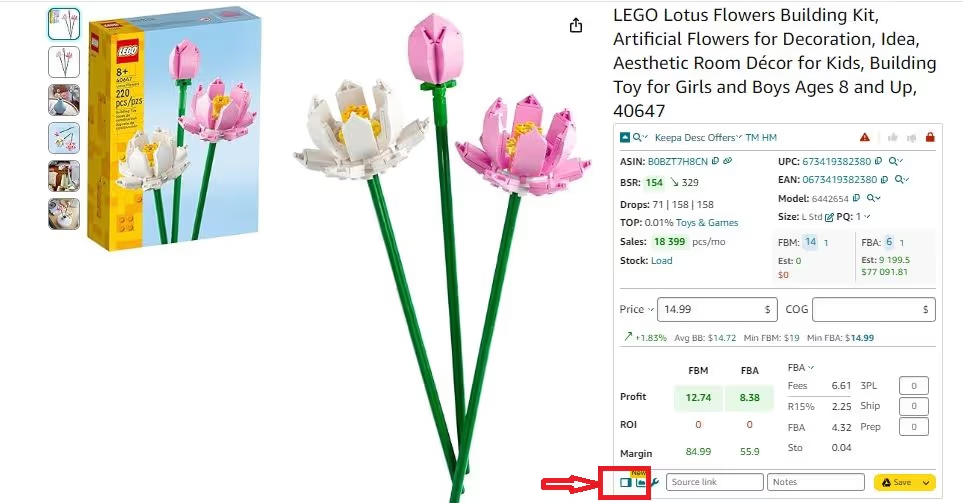
Step 5. Calculate profit and ROI with Seller Assistant’s FBA&FBM profit calculator
Enter the Cost of Goods (product price at the supplier), choose the fulfillment method, add prep center or 3PL costs if you use these services, get the profit and ROI figures, and see if they meet our criteria.

Step 6. If everything looks fine, order a product from the supplier.
How Many Products Should You Buy?
When you first sell a product, you don’t know how fast it will sell. However, you must determine how many products you need to buy. Here are several ways to do that.
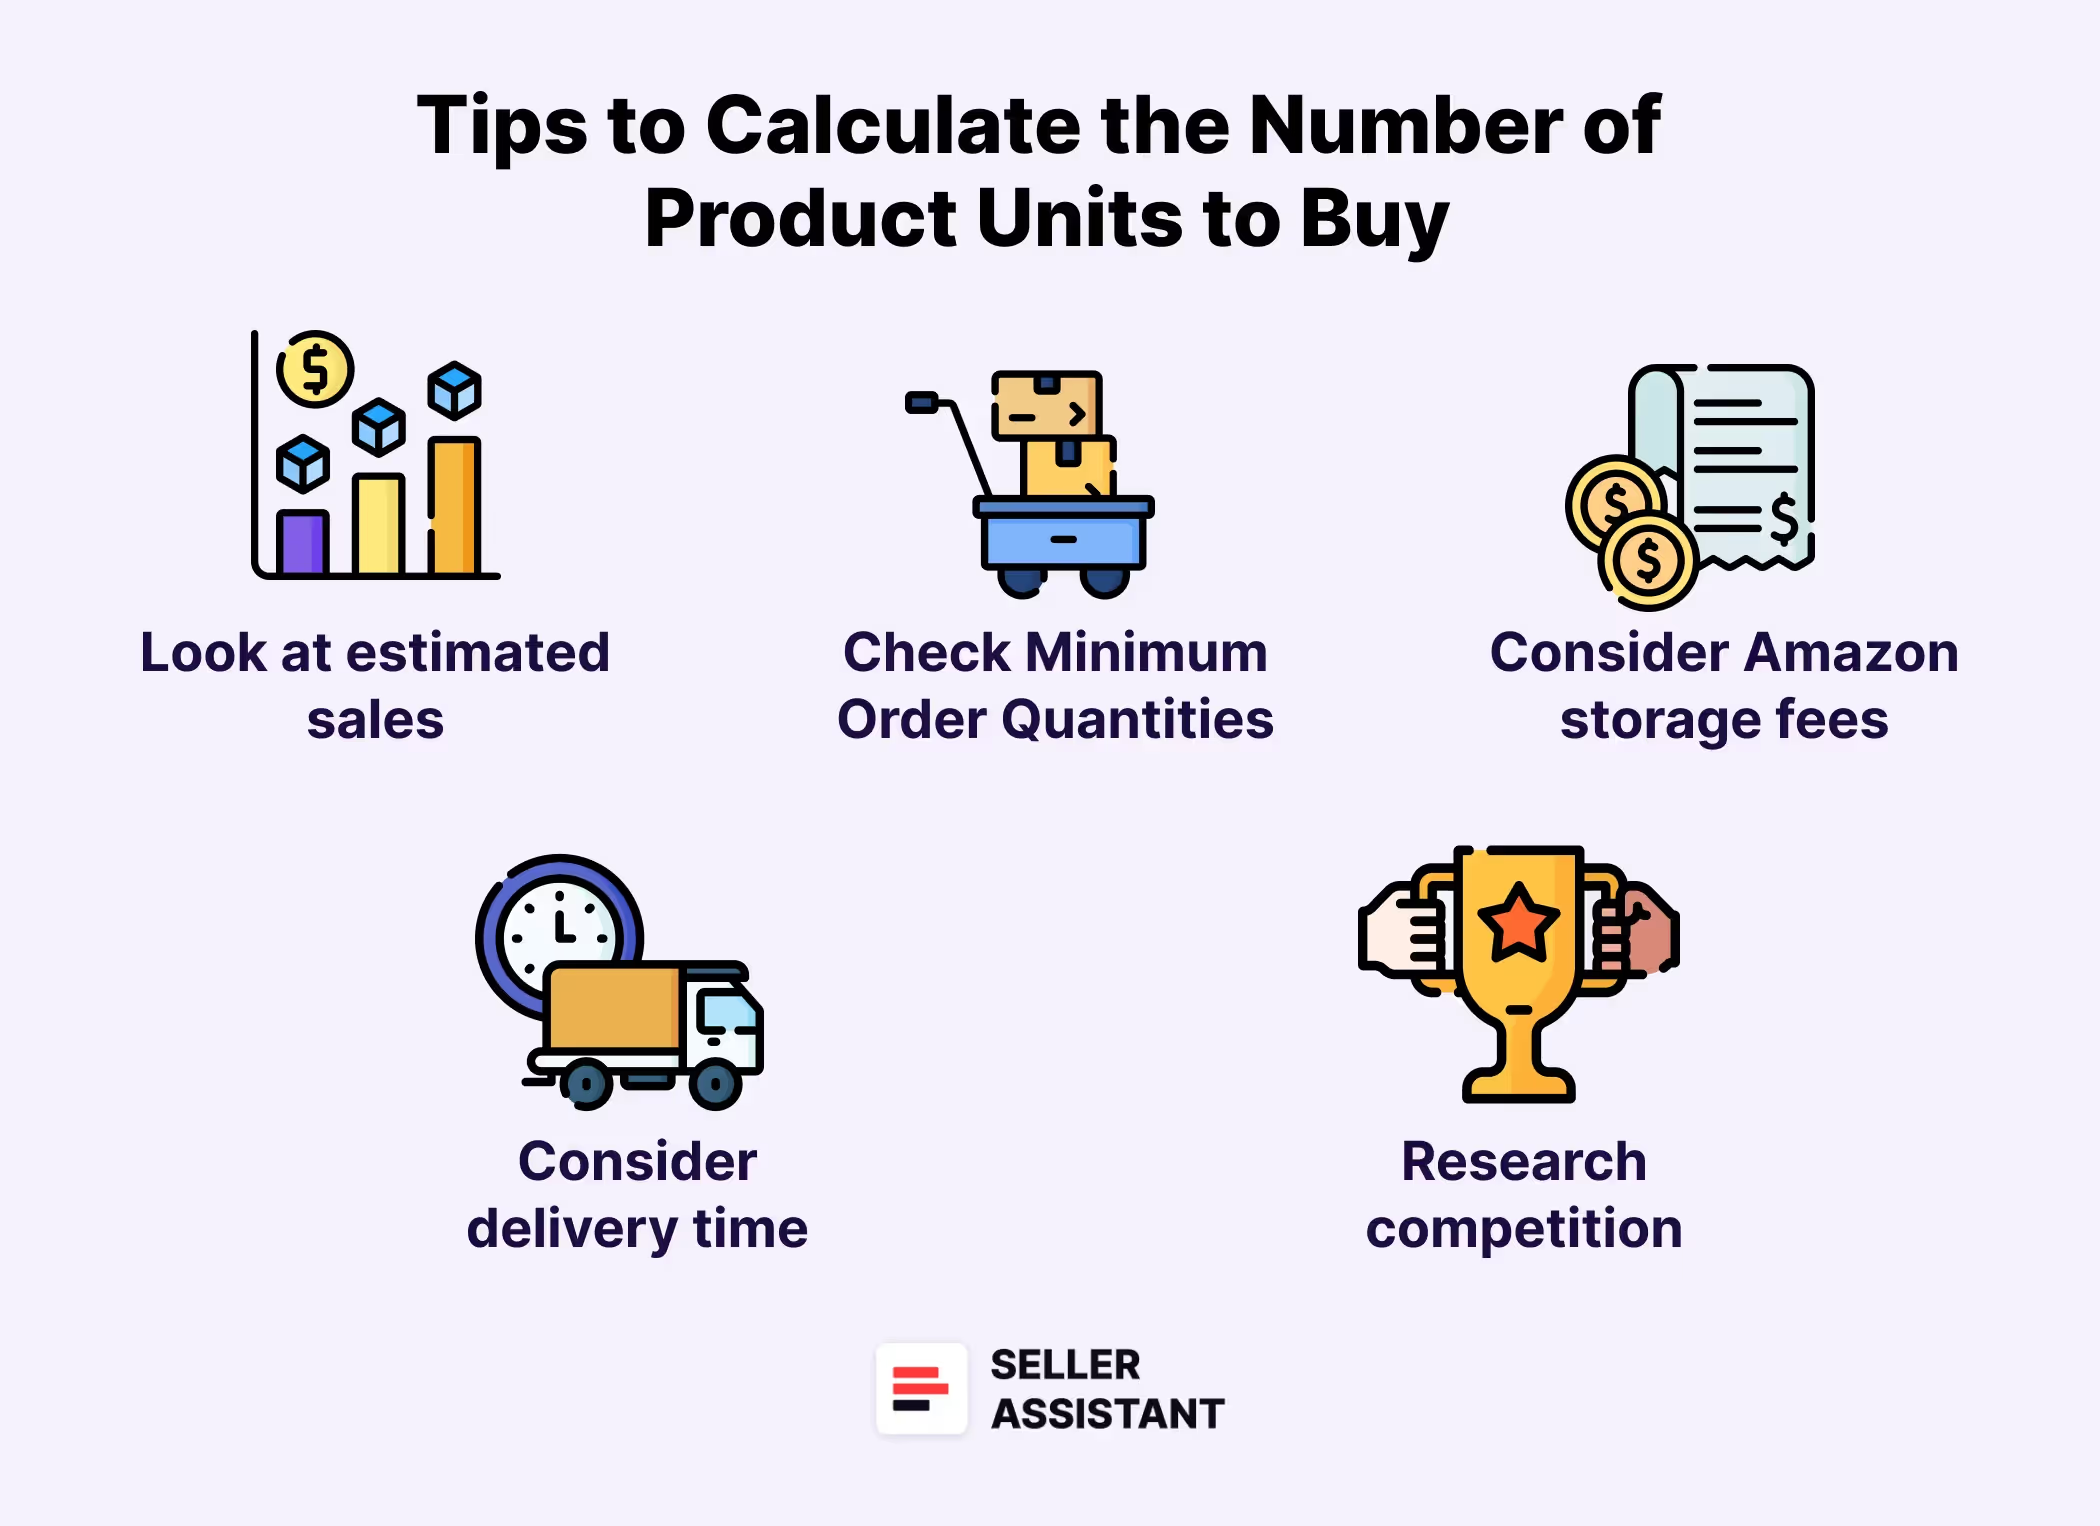
5 tips to calculate the number of product units to buy
Look at estimated sales and BSR drops
You can get guidance on how many units of a product you can sell from the estimated sales number in Seller Assistant. It shows 3 figures related to potential product sales: Est (your sales potential per month if you become one more seller on the listing), Drops (BSR drops during 30, 90, and 180 days, showing how many products were actually sold), and Sales (sales estimation based on BSR). Use them to understand how many products to buy. The general advice is not to buy too many products (inventory) at the start.
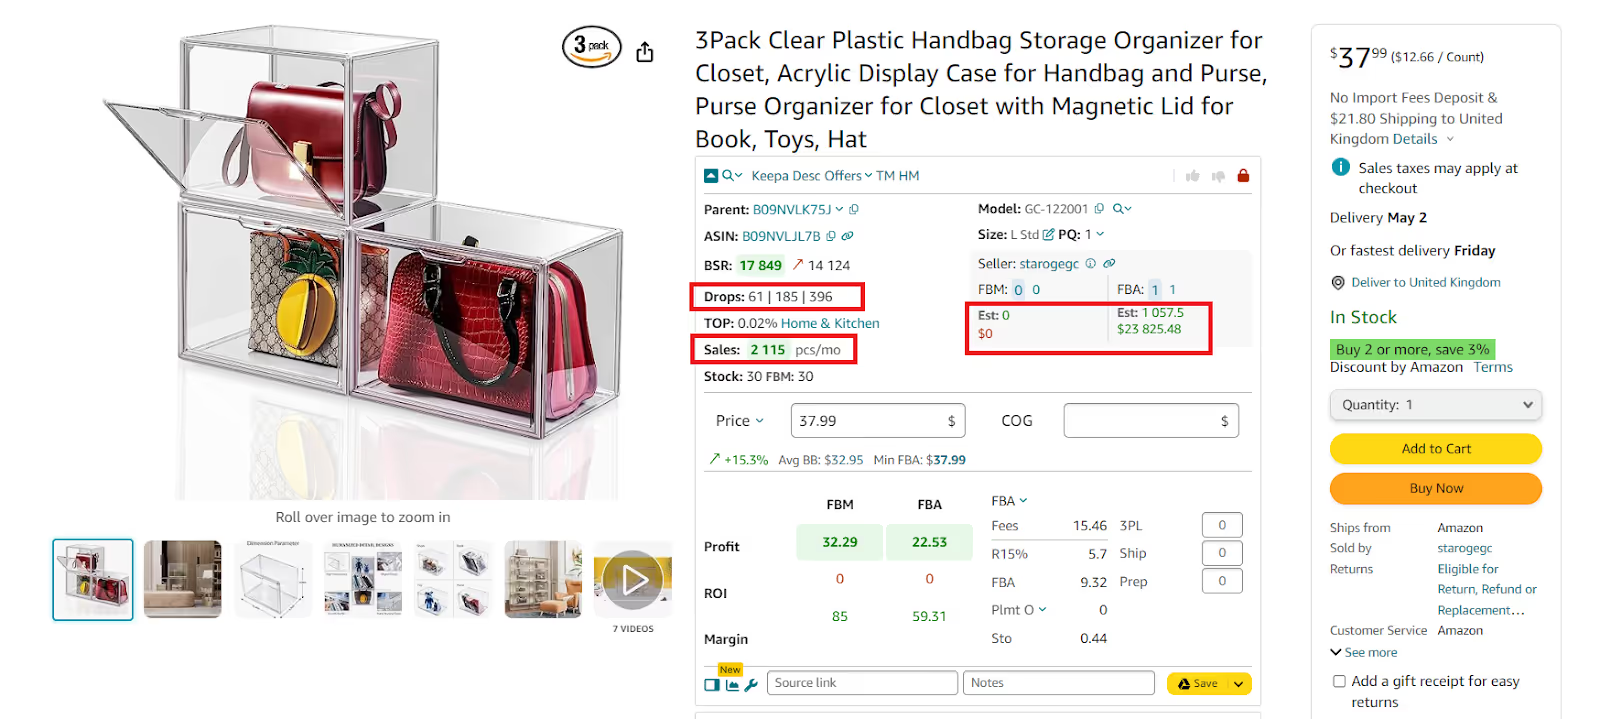
Check Minimum Order Quantities
Amazon wholesale sellers must often purchase the minimum number of units a supplier requires to purchase to fulfill an order – Minimum Order Quantities (MOQ). In that case, they must buy the number of units set by a supplier. However, the numbers are often negotiable.
Consider Amazon storage fees
Amazon charges storage fees based on product size and time in fulfillment centers. Aim for a balance between having enough stock to meet demand and avoiding high storage costs.
Delivery time
Consider how long it takes for your supplier to deliver new inventory. Factor this lead time into your calculations to avoid stockouts.
Other factors:
Research competition
Analyze how many units competitors have in stock. This can help you determine a strategic amount to order without overstocking. Seller Assistant’s Stock Checker shows how many product units are available in stock.
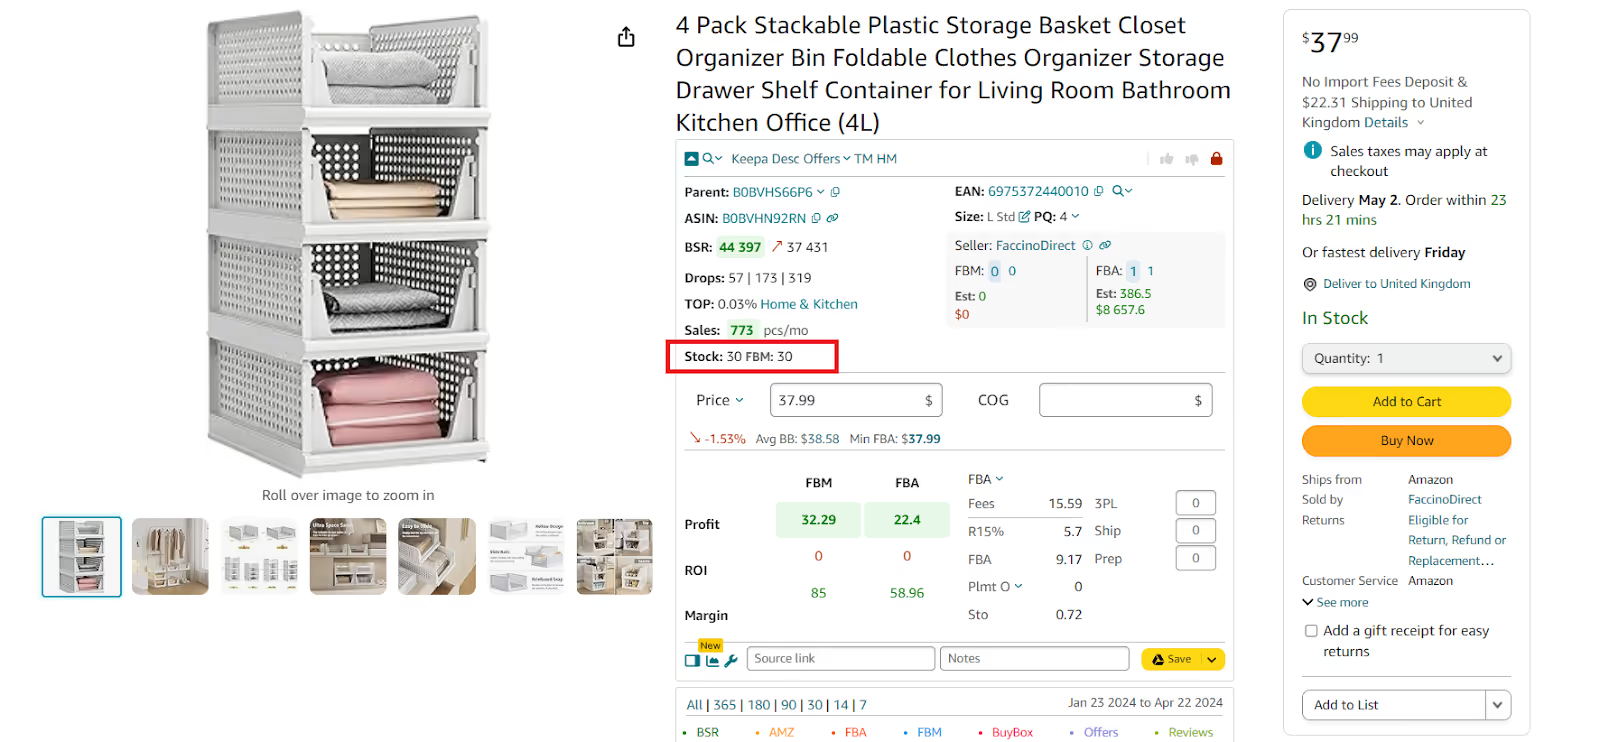
How to List a Product on Amazon?
There are two types of products on Amazon — those that already exist in the Amazon catalog and those that don’t exist on Amazon. You must list these types of products in different ways.
Listing existing Amazon products
Existing products are added to the listings already created on Amazon. If you resell other brands with online arbitrage, retail arbitrage, wholesale, or dropshipping, your products likely already exist on Amazon. According to Amazon rules, you can’t create duplicate listings of the same product. Your offer must be added to the same listing alongside other sellers’ offers.
Listing existing products step-by-step
Step 1. Go to your Seller Central account. In the side navigation menu, select Catalog > Add Products.’

Step 2. In the search bar under ‘Find your products in Amazon’s catalog,’ find your product by title, description, or keywords.

Step 3. Find your product in the list, select a condition, and click ‘Sell this product.’

Step 4: Create your offer: add your selling price (Standard Price), product condition (Offering Condition Type), and fulfillment channel (Fulfillment by Merchant — FBM, where you fulfill products yourself, or Fulfillment by Amazon — FBA, where Amazon picks, packs, and ships your products for a fee).

Step 5. Click ‘Save and finish.’
How to list new products on Amazon?
If you’re going to sell a product that doesn’t exist on Amazon, you have to create a brand-new listing. Majorly, new products are private label.
Listing new products on Amazon step-by-step
Step 1. Go to your Seller Central account. In the side navigation menu, select ‘Catalog’ > ‘Add Products’ > ‘List Your Products.’ Click the ‘Blank form’ button above the search bar and the ‘Start’ button below.

Step 2: Enter the product name and confirm the primary product category specified by Amazon (or change it).

Step 3. Add a brand and product ID, and click ‘Next.’

Step 4. Amazon will ask you to get brand authorization. Click ‘Apply to Sell’ and provide the necessary information. Wait for approval.

Step 5. When you get the approval, fill in the description, product, and offer details, and add safety and compliance documents, if necessary.
Step 6. Click ‘Save and finish.’
Related: How to List Products on Amazon in 2024 - Complete Guide
How to Ship Your Amazon Orders to Customers?
When you add your products to Amazon, you must specify how you will ship orders to the customers. Delivering your orders to customers is called fulfillment.
On Amazon, there are two most popular fulfillment methods: FBM, or Fulfillment by Merchant, and FBA, or Fulfillment by Amazon.
Fulfillment by Merchant
Amazon FBM, also called self-fulfillment, is when you, as the seller, handle the packing and shipping of orders yourself. FBM puts you, the seller, in control of all aspects of the fulfillment process.
.avif)
This method works well for sellers who don’t have many orders and can take care of packaging and sending them on their own. However, you must remember to package (prepare) your orders securely and add all necessary barcodes and labels. Another common reason to use FBM is when you sell bulk or other non-standard products and Amazon fees are high.
When you use the FBM fulfillment method, it is essential to ship orders out as soon as possible to avoid delays or negative customer feedback.
How Amazon FBM Works
Step 1. Choosing FBM
When adding a product offer in Seller Central, under "Inventory > Add a Product," select "I will ship the item myself" in the Fulfillment Channel section. This indicates you'll handle shipping instead of Amazon's FBA service.
Step 2. Inventory storage
With FBM, you're responsible for storing your products. This could be a dedicated warehouse, a spare room, or even your garage.
Step 3. Packing and shipping
Once a customer buys your product, you're responsible for securely packaging and shipping it to them. Ensure you use appropriate packaging materials and choose reliable shipping carriers.
Step 4. Customer service
You'll need to handle all customer inquiries and issues, from answering questions about the product to resolving any problems that might arise after the sale.
Related: What is Amazon FBM and How Does it Work?
Fulfillment by Amazon
FBA is when you send your inventory to Amazon's warehouses, and the platform handles the picking, packing, order shipping, and customer service on your behalf for a fee.
.avif)
With FBA, Amazon handles your logistics, saving you time and hassle. However, keeping track of your inventory levels and ensuring you're sending enough stock to Amazon's warehouses to replenish your stock is still important. Also, you must take care of shipping inventory to Amazon’s fulfillment centers.
How Amazon FBA Works
Step 1. Selecting FBA
When you list a product on Amazon, in Seller Central, under "Inventory > Add a Product," choose "Fulfillment by Amazon" in the Fulfillment Channel section. This puts Amazon in charge of fulfillment.
Step 2. Sending inventory to Amazon
Once you have products ready, you'll create a shipment plan in Seller Central and send your inventory to Amazon fulfillment centers. Make sure to follow Amazon’s detailed instructions on packaging and labeling requirements.
Step 3. Storage, picking, packing, and shipping
Amazon stores your products in their warehouses until a customer orders your FBA product. Then they pick, pack, and ship it directly to the customer. They handle packaging materials, shipping costs, and carrier selection, for a fee.
Step 4. Customer service
Amazon manages most customer service inquiries related to FBA orders, including questions about delivery or returns. You can set preferences for how you want to handle specific issues.
Step 5. Inventory management
You must track your FBA inventory levels and manage product reordering. Remember that with FBA you'll have to pay Amazon storage fees based on product size and storage duration.
Note. Amazon will ask you a question about your fulfillment method when you list your products, and it’s necessary to select FBA or FBM. You can change it at any time if you need.
Related: How Does Amazon FBA Work. Is Amazon FBA Worth it?
How to choose between FBA and FBM?
If you are not sure what is better for you: FBA or FBM, look at these factors to pick the best fit for your business.
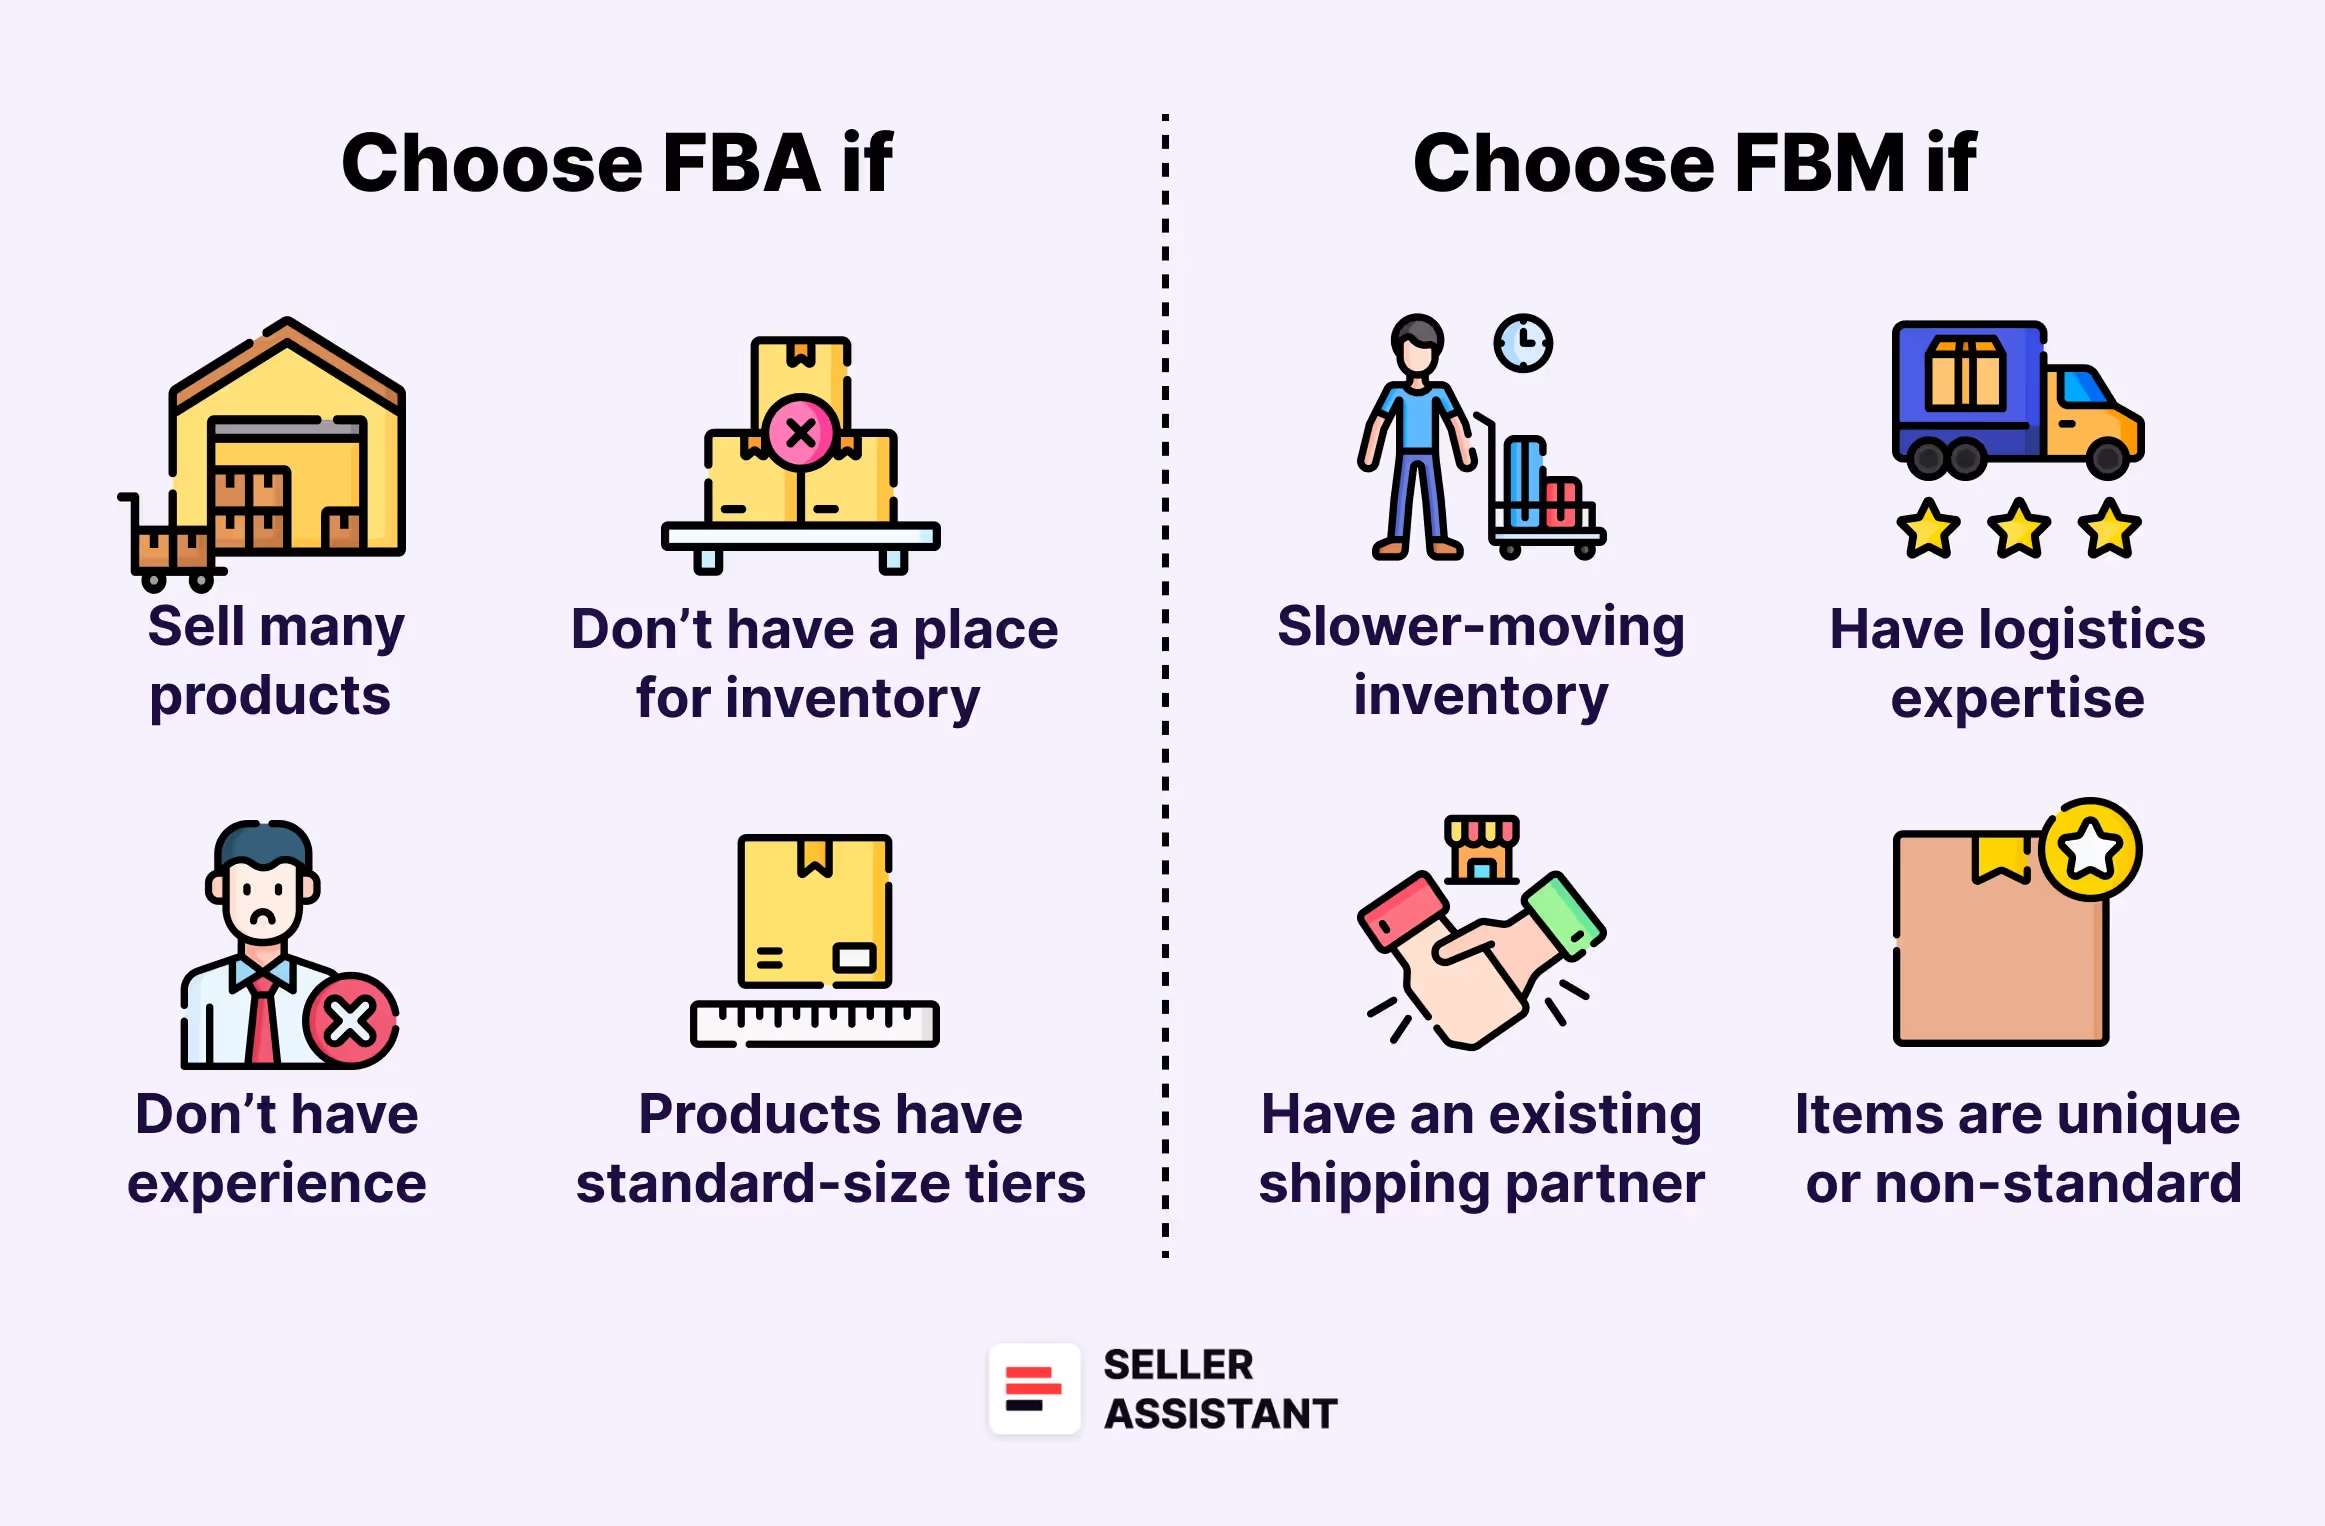
Go for FBA
- If you sell many products
FBA can help you handle large order quantities you can’t manage yourself. Amazon's fulfillment centers ensure efficient picking, packing, and shipping, freeing you to focus on growing your sales.
- If you do not have experience with fulfillment
Amazon has stringent packaging requirements. If you fail to prep your inventory in line with their rules, they will charge you extra for prep services. That can also create unnecessary delays. If you are not sure how to prepare your products, you can use Amazon’s services.
- If you don’t have a place to store inventory
If you don’t have a warehouse where you will keep your products until they are purchased, Amazon will store them in their fulfillment centers. However, you must remember about the storage fees.
- If your products have standard-size tiers
FBA works best with products that fit within their standard size tiers. Amazon charges bulk and heavy products differently from standard items, and the fees are much higher.
Go for FBM
- If you have slower-moving inventory
For products that don't sell quickly, FBM can be more cost-effective. You avoid storage fees associated with slow-moving items in Amazon warehouses.
- If you have logistics expertise
If you have experience in packaging, shipping, and customer service, you can potentially save money by handling fulfillment yourself with FBM.
- If you have an existing shipping partner
If you already have a reliable shipping and delivery partner, FBM allows you to leverage their services and potentially negotiate better rates than FBA fees.
- If your items are unique or non-standard
If you sell handcrafted or exclusive products, you may want to buy custom packaging, while Amazon offers standard solutions. Then you can fulfill these products yourself. Also, if your products have non-standard sizes or require special handling, third-party solutions may be cheaper than Amazon.
How to Package Amazon FBA Products?
Proper packaging ensures your product arrives safely and keeps your customer happy. It is also important to stick to Amazon’s requirements because Amazon can charge you for improper packaging because they will repackage the product.
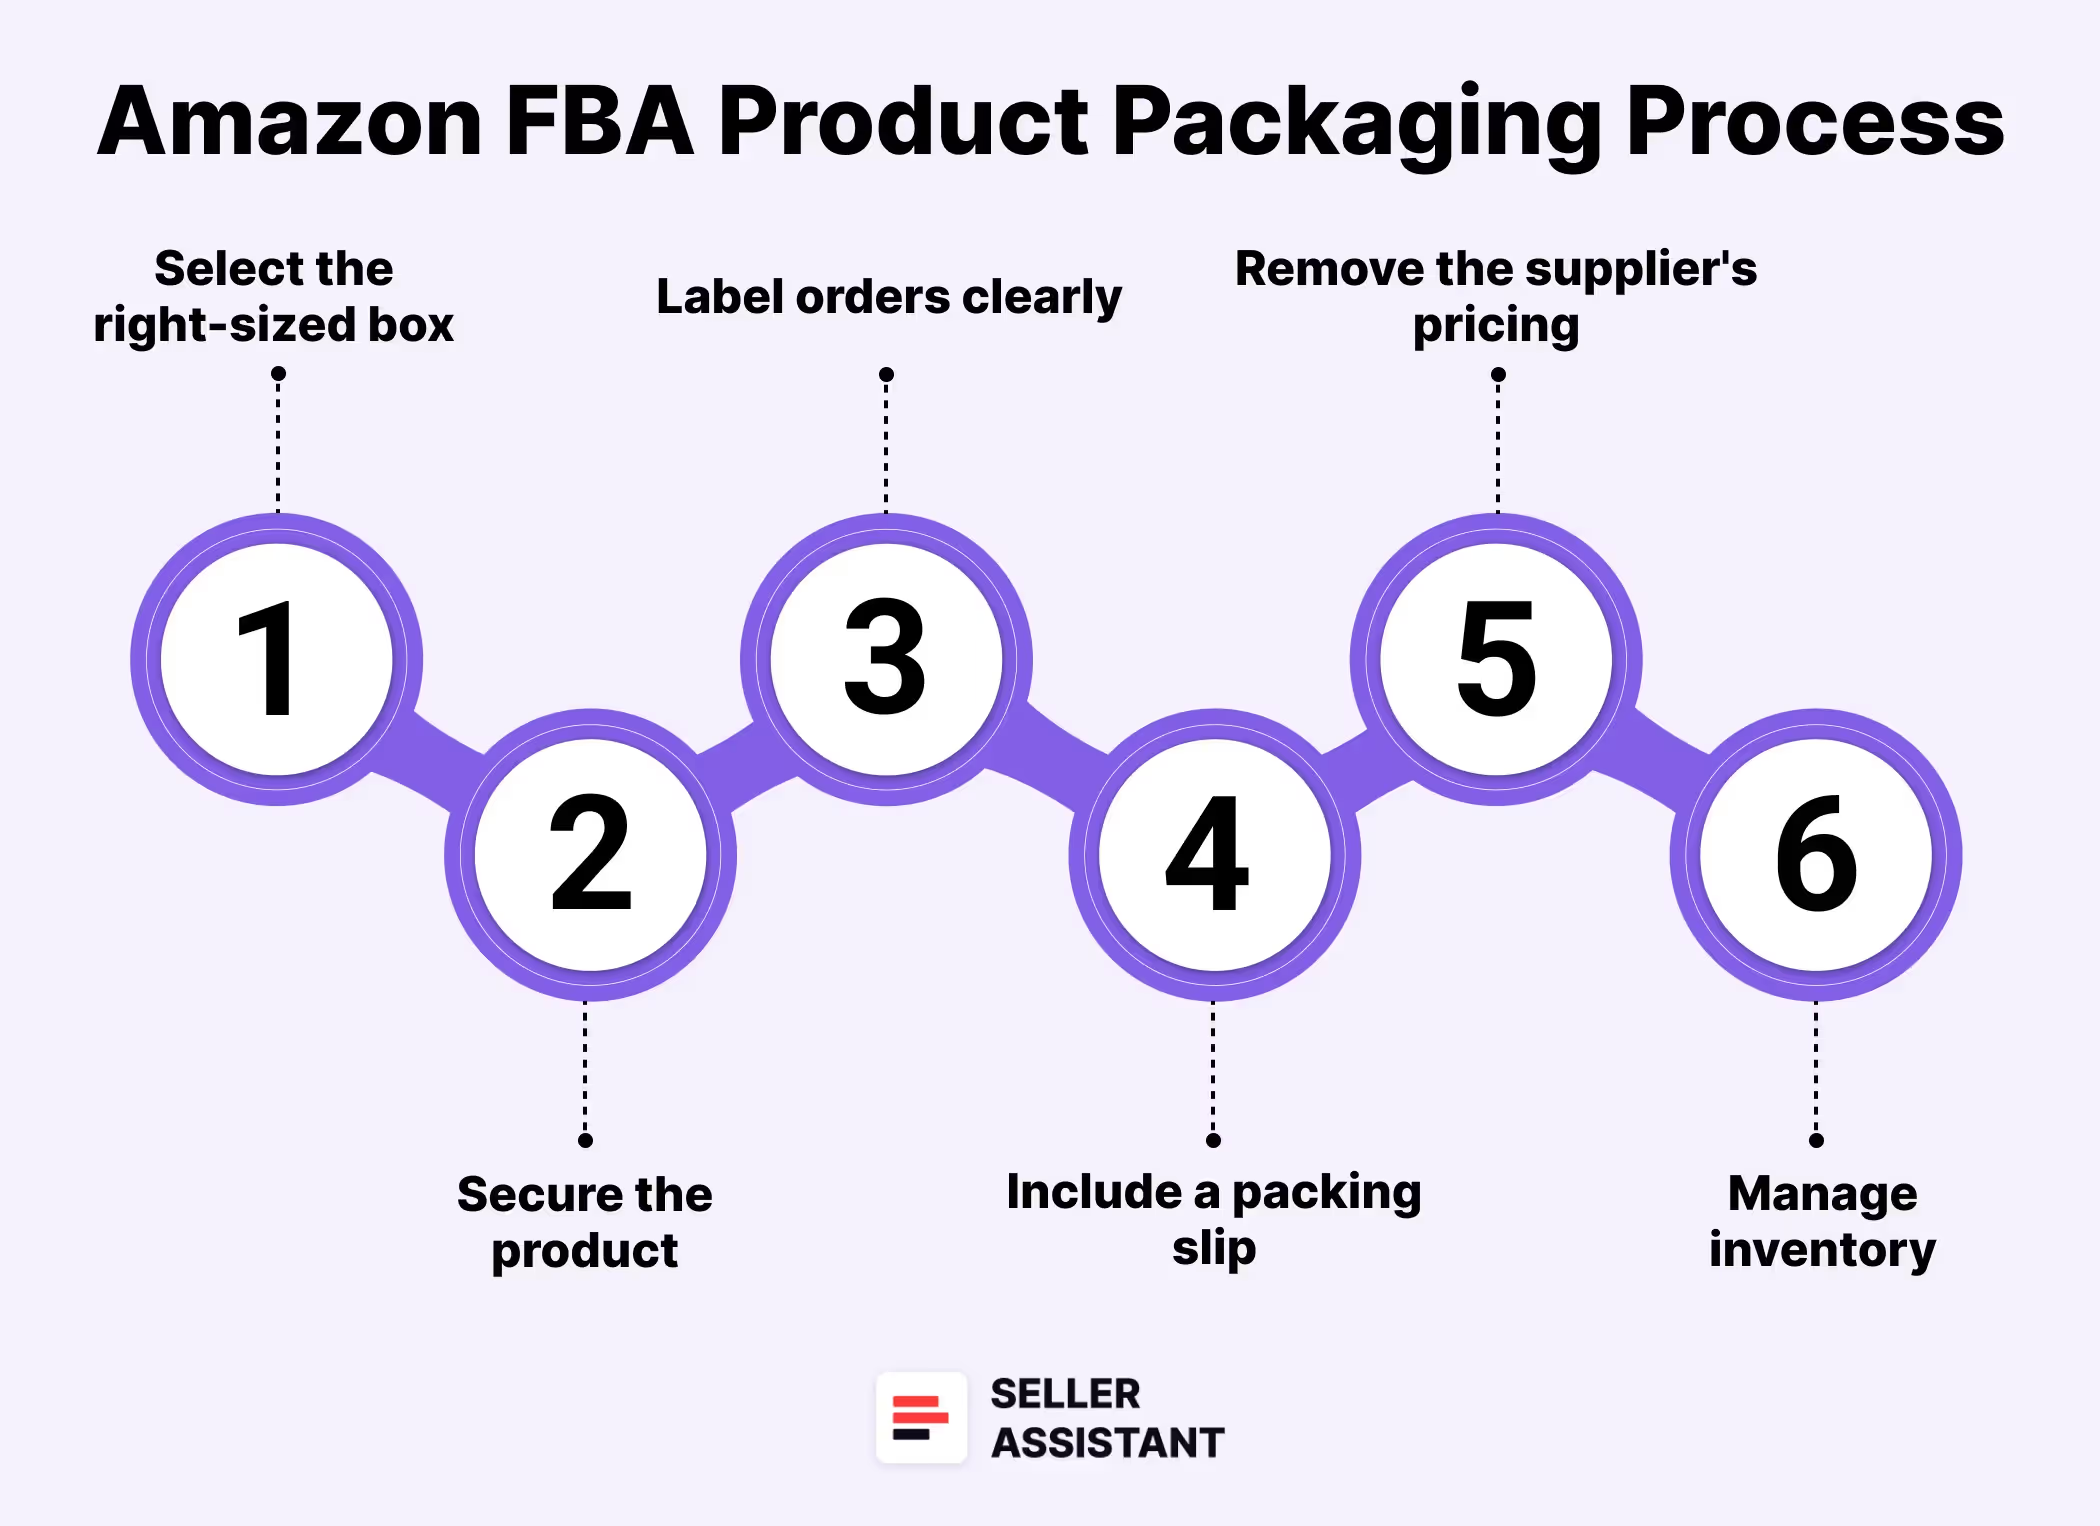
Steps to package your product
Step 1. Select the right-sized box
Use a box that fits your product. Avoid excessive empty space that can cause items to shift during transit. Amazon recommends using new, sturdy boxes to ensure they can withstand the shipping process. Repurposed boxes might not be strong enough.
Step 2. Secure the product
Use void-fill materials like packing peanuts, bubble wrap, or air pillows to prevent your product from moving around inside the box. Ensure the product is well-cushioned, especially for fragile items.
Step 3. Label orders clearly
Adhere to the Amazon shipping label provided with your order clearly on the outside of the box. Ensure the barcode is easily scannable. Use a special internal Amazon barcode, FNSKU, if Amazon requires it. Don't include any other markings or labels on the box unless they're part of Amazon's labeling requirements.
Step 4. Include a packing slip
While not mandatory, including a packing slip with the customer's order details inside the box can help ensure that everything you sent was received. This can also help with order discrepancies or returns.
Step 5. Remove the supplier's pricing
Don't leave any original pricing information on the product or packaging.
How to Ship Inventory to Amazon FBA?
While Amazon does the majority of fulfillment jobs if you use FBA, you still need to send your inventory to Amazon’s fulfillment centers. To do that, you must prepare (package) products as Amazon requires and create a Shipping plan in your Seller Central to tell Amazon what and how you send.
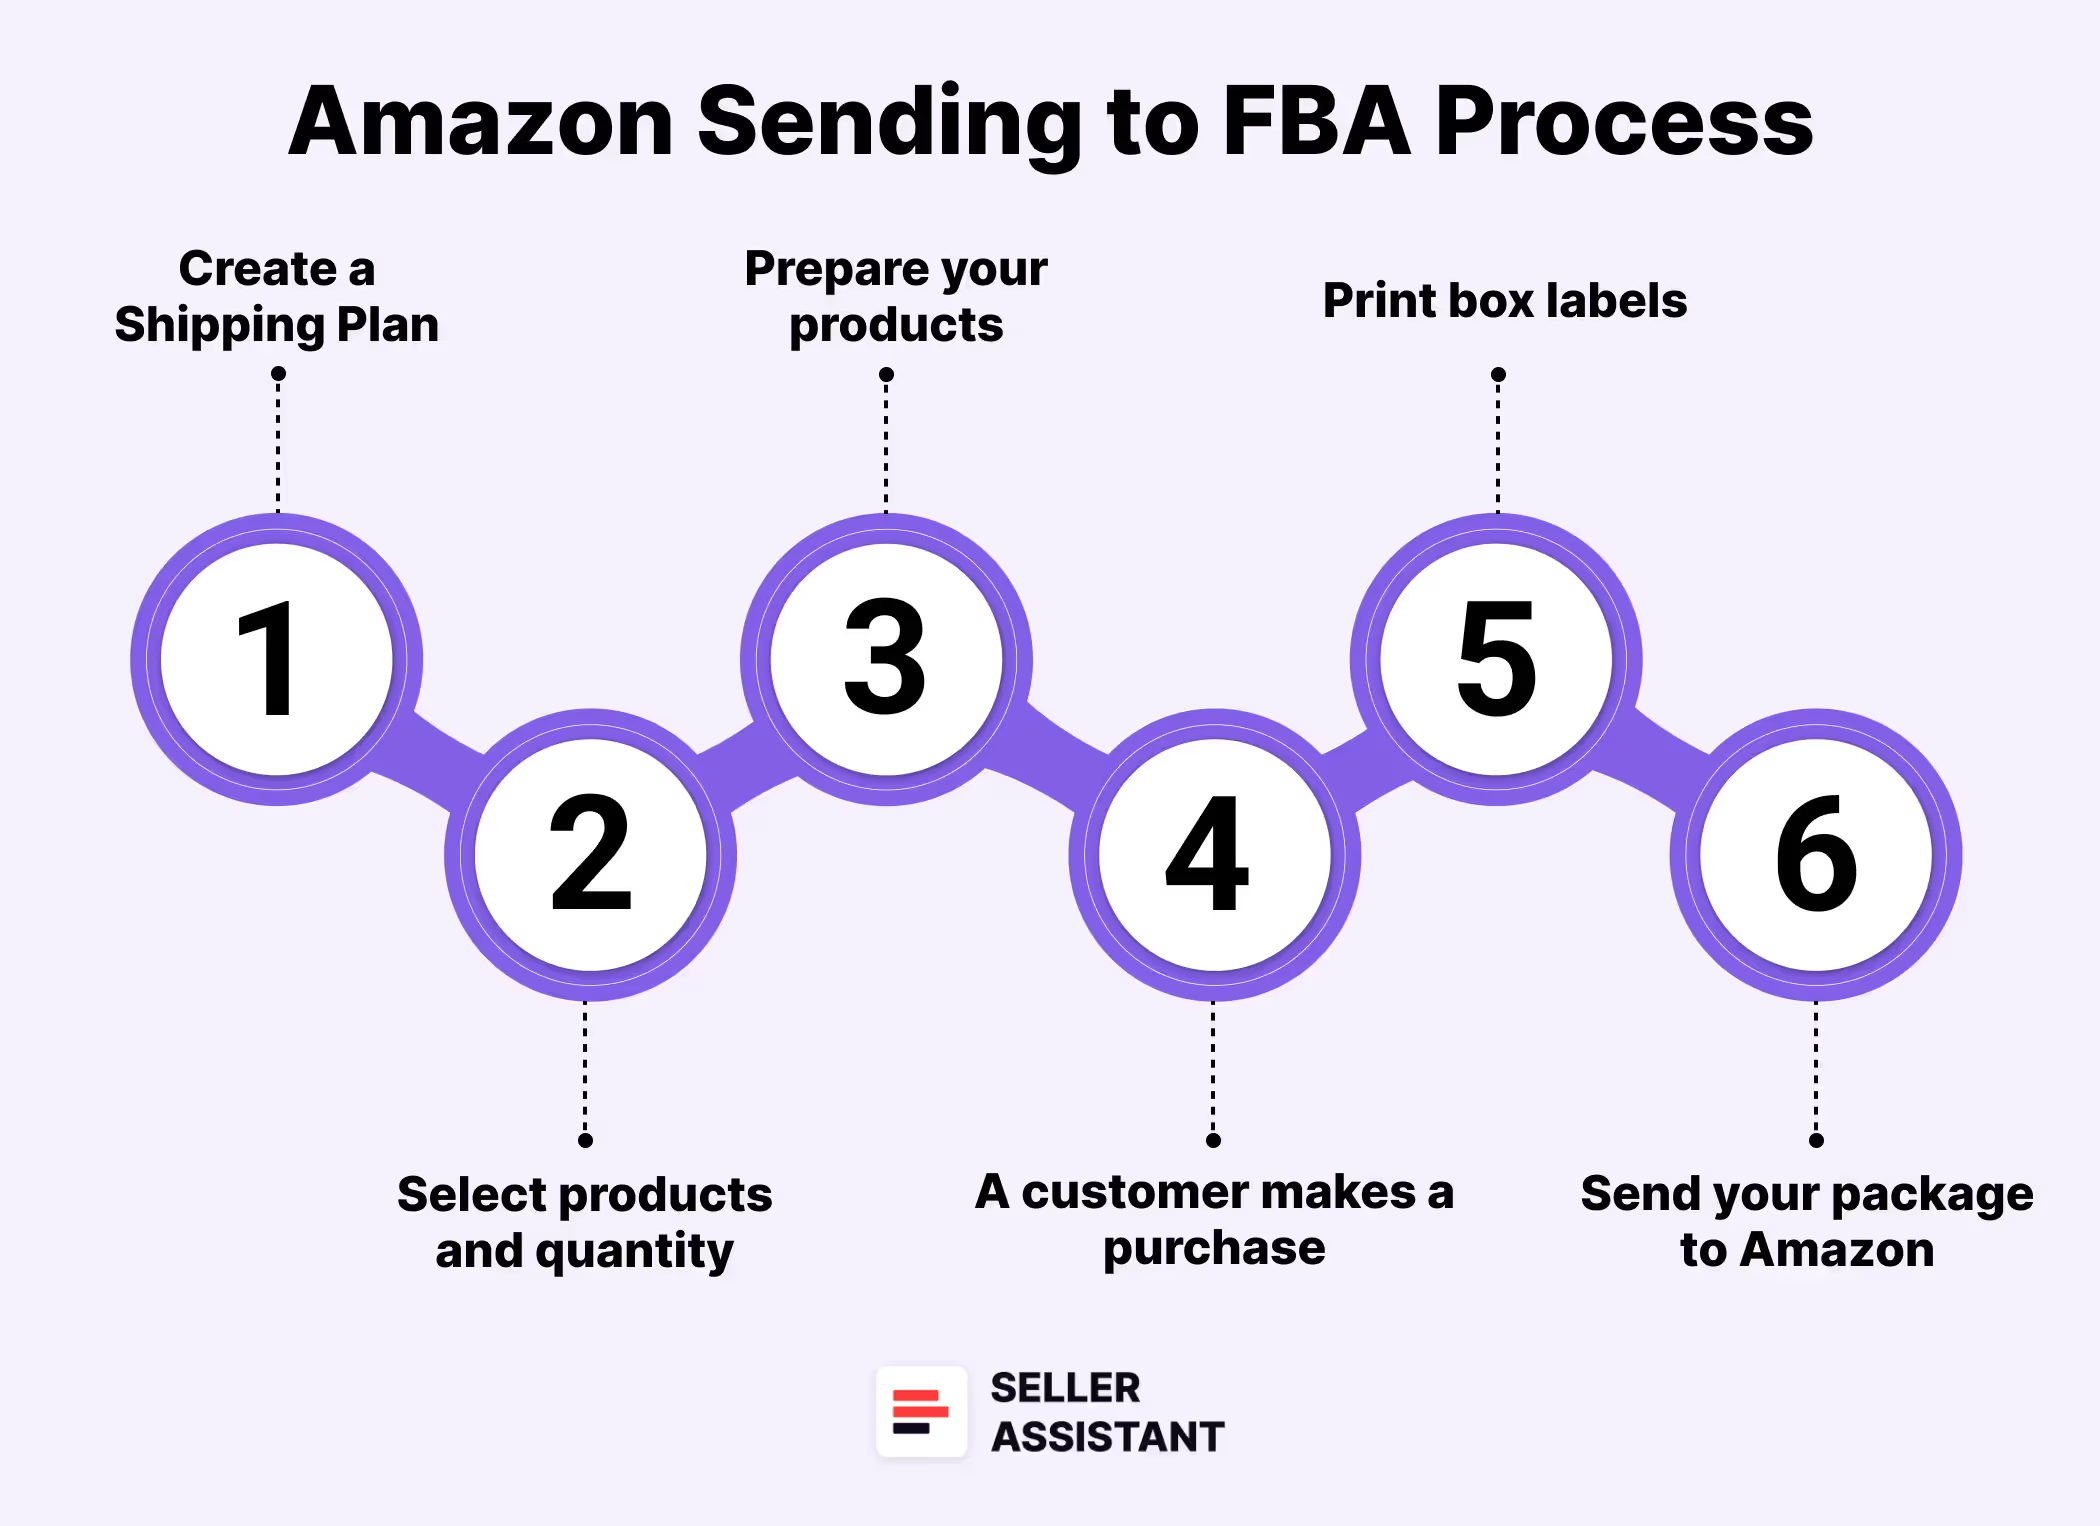
Steps to send products to Amazon FBA
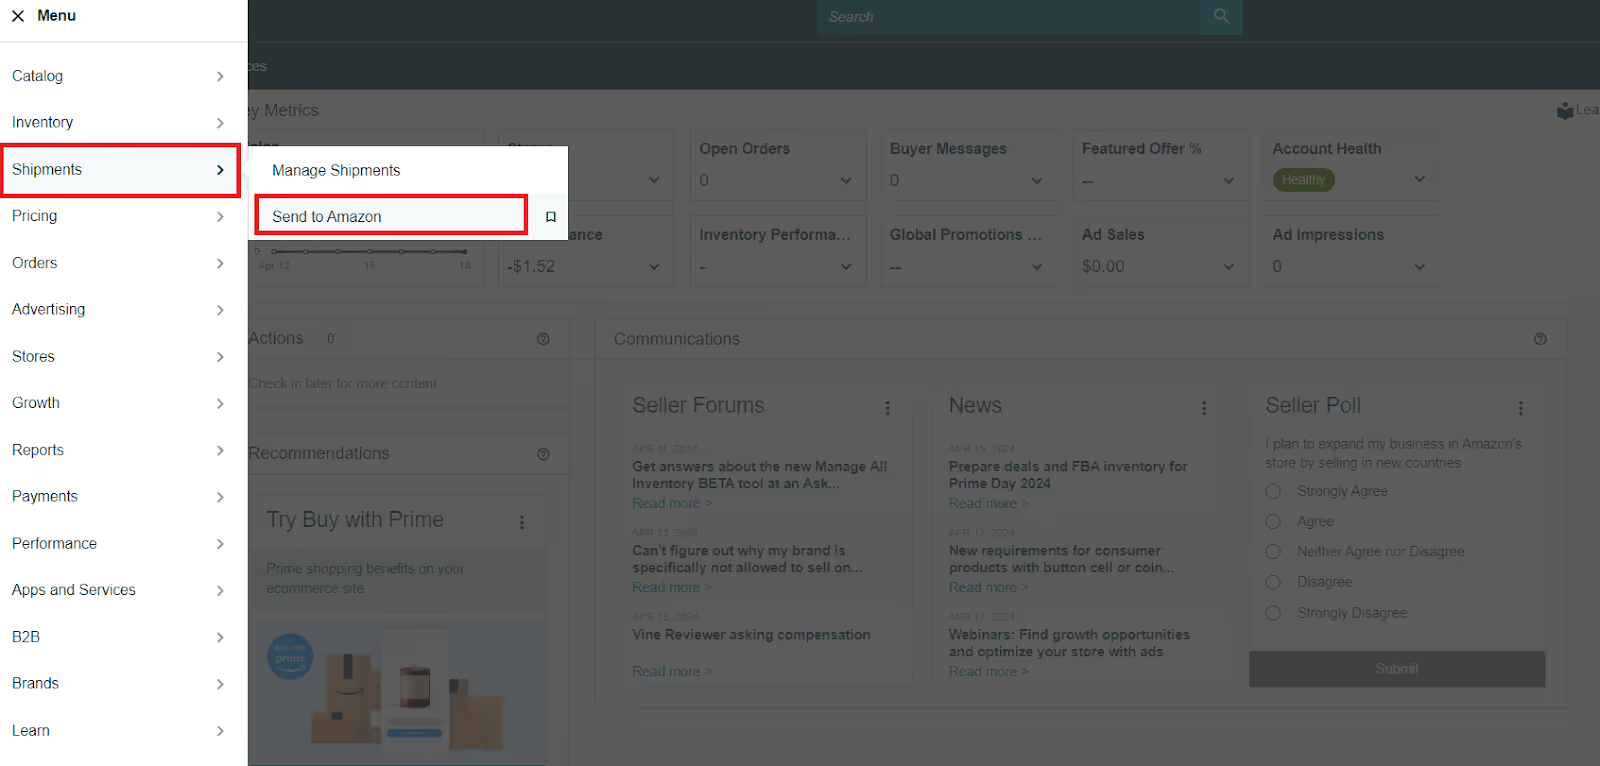
Step 1. Create a Shipping Plan
In your Seller Central side menu, go to Shipments > Send to Amazon.
Step 2. Select products and quantity
Select the products you want to send to Amazon and specify the quantity for each item.
Ensure the product information (size, weight, etc.) matches your listings to avoid processing delays.
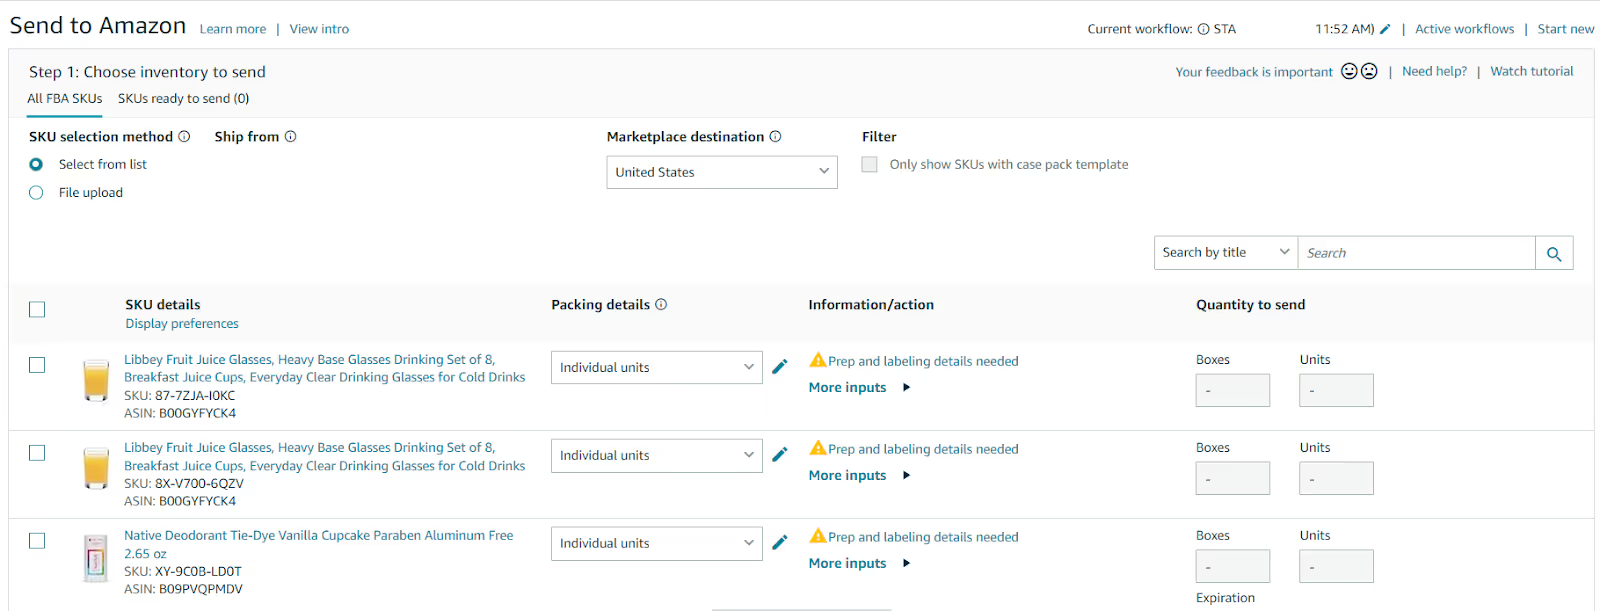
Step 3. Prepare your products
Package your products individually according to Amazon's guidelines we discussed above. Then, confirm shipment.
Step 4. Print box labels
Each box must have a unique FBA box ID label printed from your shipment workflow. If your product requires FNSKU labels, print them and apply them to the package. Check that the barcodes are visible on your box, are uncovered, and don’t fold over the edges. Make sure the labels are in line with Amazon’s requirements.
Step 5. Send your package to Amazon
When you’re finished, send your package to the carrier you’ve selected to be delivered to Amazon.
How to Price Your Amazon Products?
When pricing your products, you must always make sure your sales generate profit. When you resell something on Amazon, the profit is the selling price on Amazon minus all costs.
If you want to get profit from sales, you must price your product in such a way that it includes the profit you want to get, the cost of the item you resell (Cost of Goods Sold, COG), Amazon fees, shipping and handling costs (fulfillment), and other expenses.
On the other hand, your price must be competitive. That means it must be attractive to Amazon customers. That is, it must be equal to or 2-3% higher than the Buy Box price.
Therefore, to set the «good» price, you must maintain a balance between your costs and profit on the one hand, and the Amazon Buy Box price, on the other hand.
What are Amazon sales costs?
When you calculate your selling price, you must include such costs as COG, all Amazon fees, shipping and logistics, and sales tax and VAT if applicable.
Cost of Goods Sold
COG (Cost of Goods Sold) is the price you paid for the item you resell.
Amazon fees
All Amazon sellers selling plan fees and referral fees. Also, there are optional fees. You pay them if you use additional Amazon services.
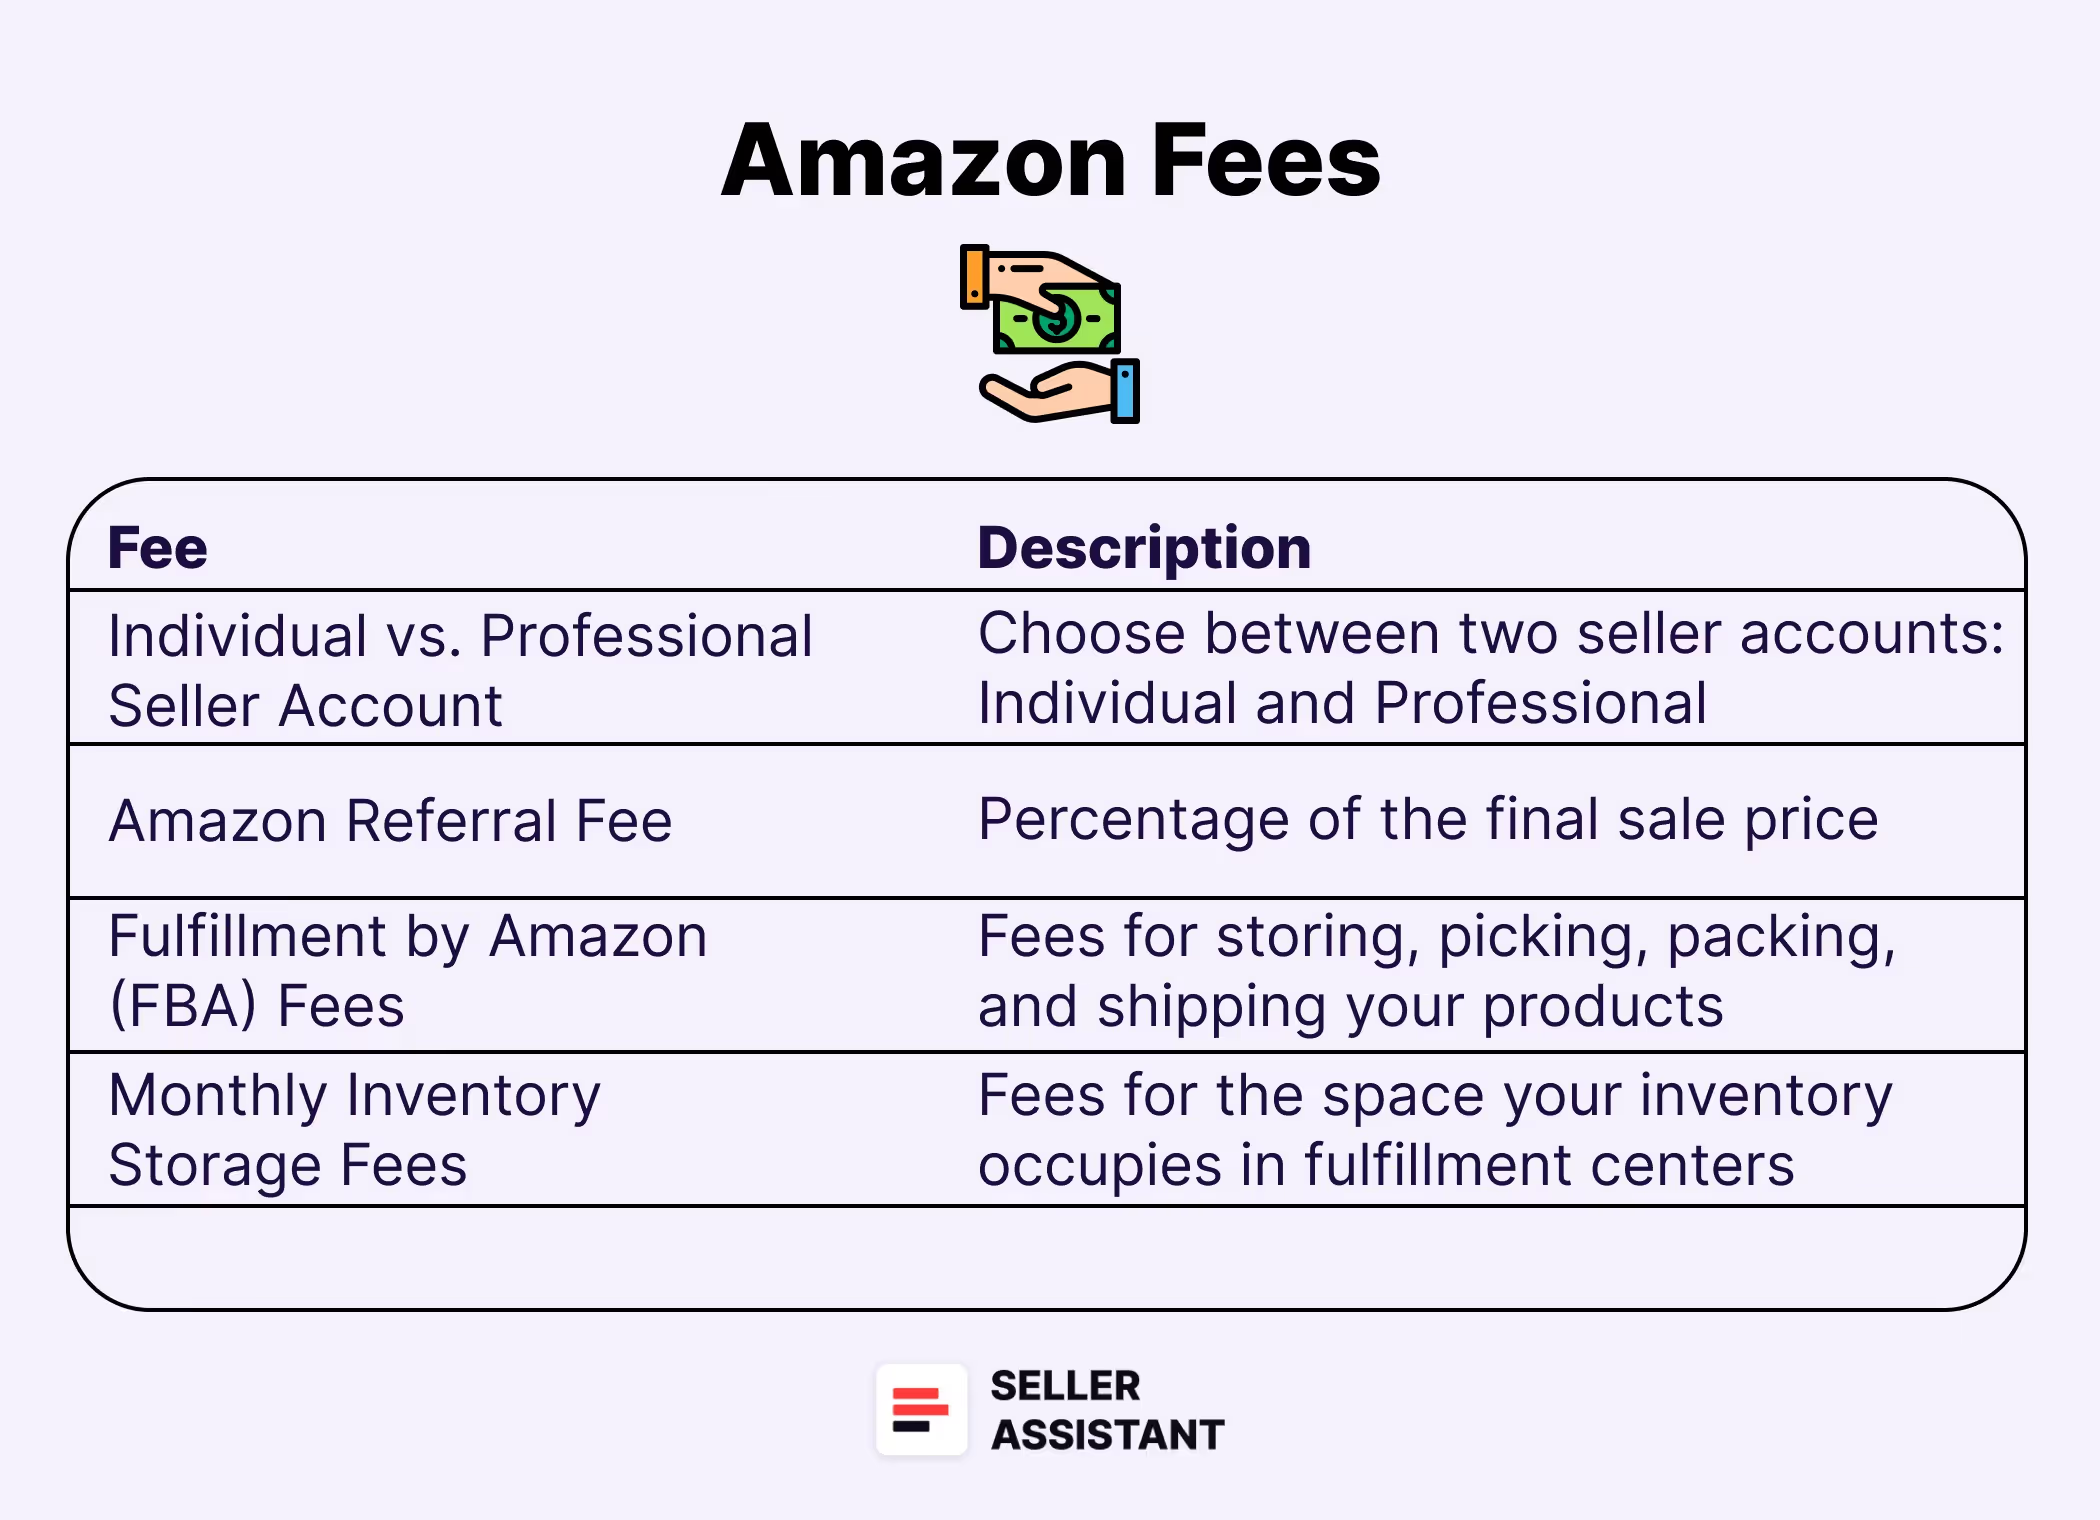
Selling plan fees
- The Individual plan costs $0.99 per unit sold, and the Professional plan costs $39.99 per month, no matter how many units you sell; or
- The Professional plan will save you money if you sell more than 40 units a month.
Referral fees
The referral fee is paid for each item you’ve sold on Amazon. The fee is a percentage and depends on the product category. Most referral fees are between 8% and 15%. However, in some categories, like Amazon Device Accessories, it hits 45%. In some cases, a minimum referral fee applies.
Fulfillment costs (FBA or FBM)
FBA fees
- Fulfillment fees are charged per unit. They are calculated based on the weights and dimensions of the product. The fees differ for standard and oversized products and depend on the size tier. Also, some products that require special care (hazmat, fragile, etc.) may be charged extra;
- Storage fees are charged for storing inventory in Amazon’s warehouses. These fees are calculated based on the daily average volume of the space inventory occupies. The rate is based on product type, size tier, and time of year.
- Inbound placement service fees
- The inbound placement service fee is the cost of spreading inventory across Amazon’s fulfillment centers close to customers. The fee was introduced on March 1, 2024.
FBM fees
Unlike FBA, FBM sellers pick, pack, and ship your products and handle customer service by themselves. FBM sellers don’t pay for this to Amazon. They pay to third-party service providers.
Other fees
Amazon may charge you other fees in some categories (Closing fees for selling media products), High-volume listing fees if you have more than 100,000 products listed, and Refund administration fees if the customer asks for a refund.
Logistics costs
Logistics costs are expenses for preparing orders (packaging and labeling) and delivering them to the customer (FBM sellers) or Amazon’s fulfillment center (FBA sellers).
Shipping to Amazon and prep center costs (FBA)
Shipping to Amazon includes the cost of shipping from the supplier to the Amazon fulfillment center.
Prep center fees
You can prepare products on your own if you don’t sell many products. However, if you sell many products, you can use a specialized service - preparation (prep) center. The preparation center is a service provider preparing your inventory for fulfillment according to Amazon standards. Prep center fees vary depending on which prep center you use.
3PL costs (FBM)
3PL is a third-party logistics service provider preparing your inventory and shipping it to the customer. This service is often used by FBM sellers.
Sales tax and VAT
- Sales tax for Amazon sellers is typically collected by Amazon on behalf of sellers. But in some cases, depending on where your business is located, you will need to collect it;
- VAT (Value Added Tax) is paid when you sell internationally.
Related: Amazon FBA Fees 2024
Amazon FBA Storage Fees Explained
Amazon FBA and FBM Fees in 2024
Profitability and break-even point
When you set your price, you must know how much money you will get after costs, and how profitable is your investment in the product.
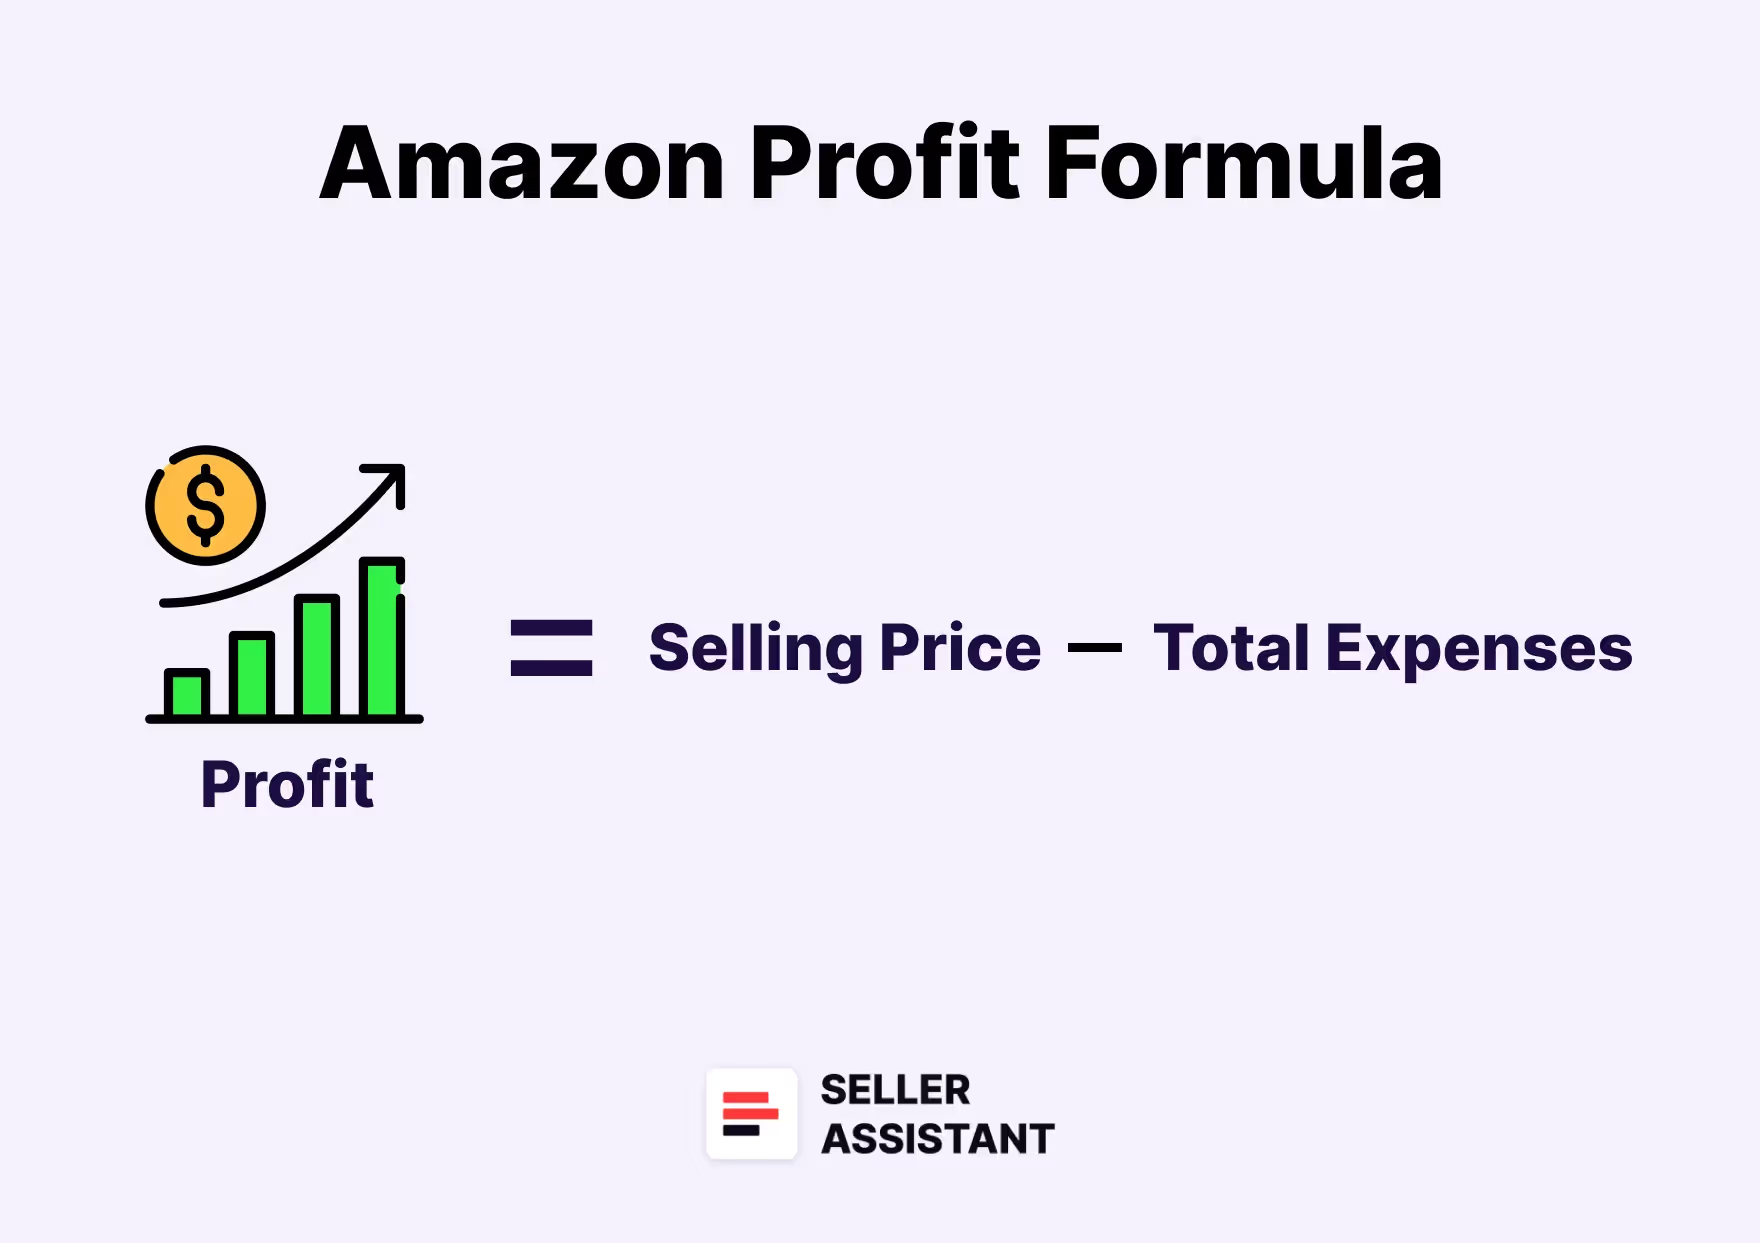
Profit
Profit is calculated as the selling price minus COG, referral fees, FBA fees (for FBA sellers), monthly storage fees sales (for FBA sellers), tax and VAT (if applicable), and logistics (3PL) costs (for FBM sellers).
ROI
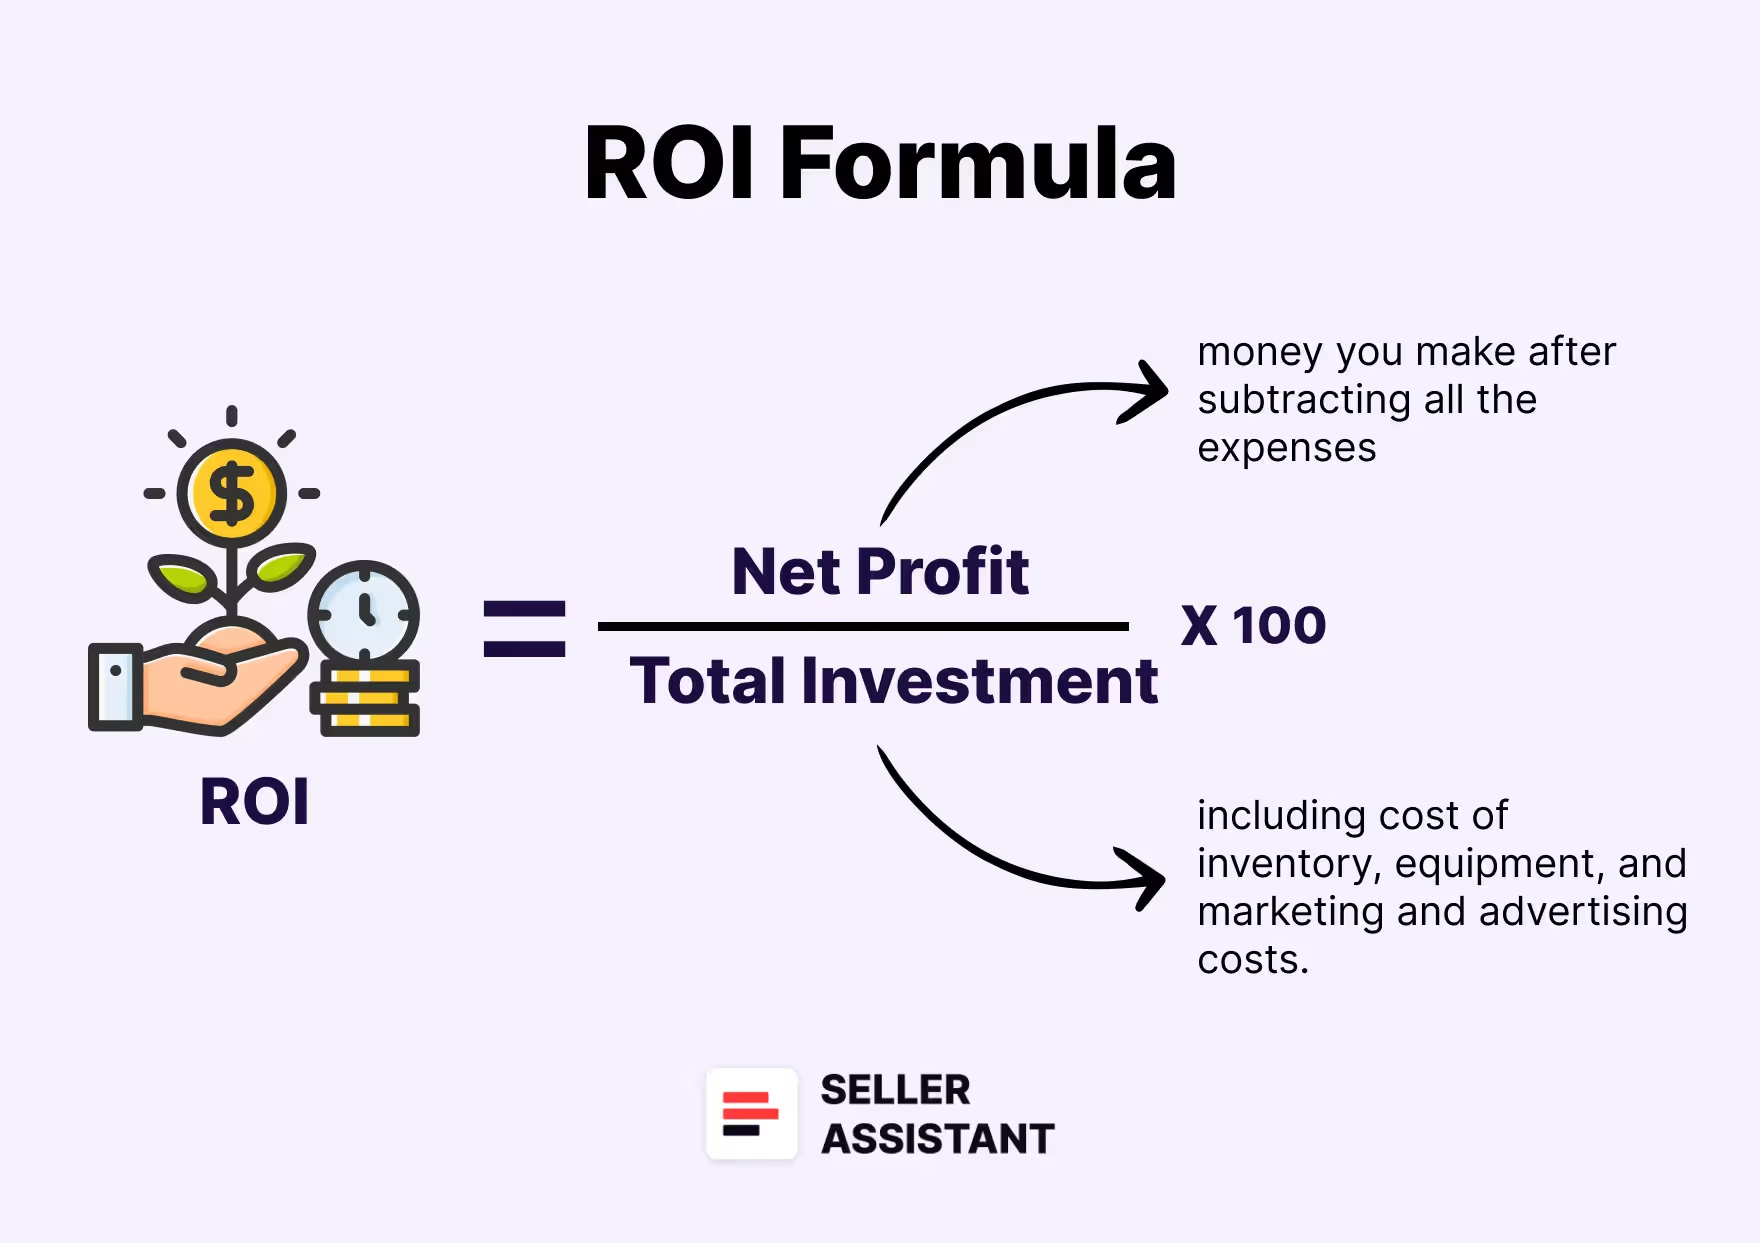
ROI (Return on Investment) is the profitability of investment expressed as a percentage. ROI is calculated as profit divided by COG, sales tax, and 3PL costs and multiplied by 100%. A «good» ROI is more than 10%.
Margin
The profit margin shows the profit percentage generated by sales. It is calculated as profit divided by price and multiplied by 100%. A «good» margin is 10-15%.

Break-even price point
When you set your price, you must calculate the break-even price point (your minimum selling price). A break-even price is the price point at which you earn zero profit, and will only cover the costs if you sell a product.
It’s important to set the break-even so as not to lose money when you reprice the product.
How to calculate costs, profitability, and price?
The most convenient way to calculate costs and profitability is Seller Assistant’s FBA&FBM calculator. It helps you calculate your expenses and product profitability.
You have two options: products fulfilled by Amazon (FBA) and products fulfilled by sellers (FBM). You can quickly calculate product profitability, fees, and logistics expenses for FBA and FBM separately.
Steps to calculating product price
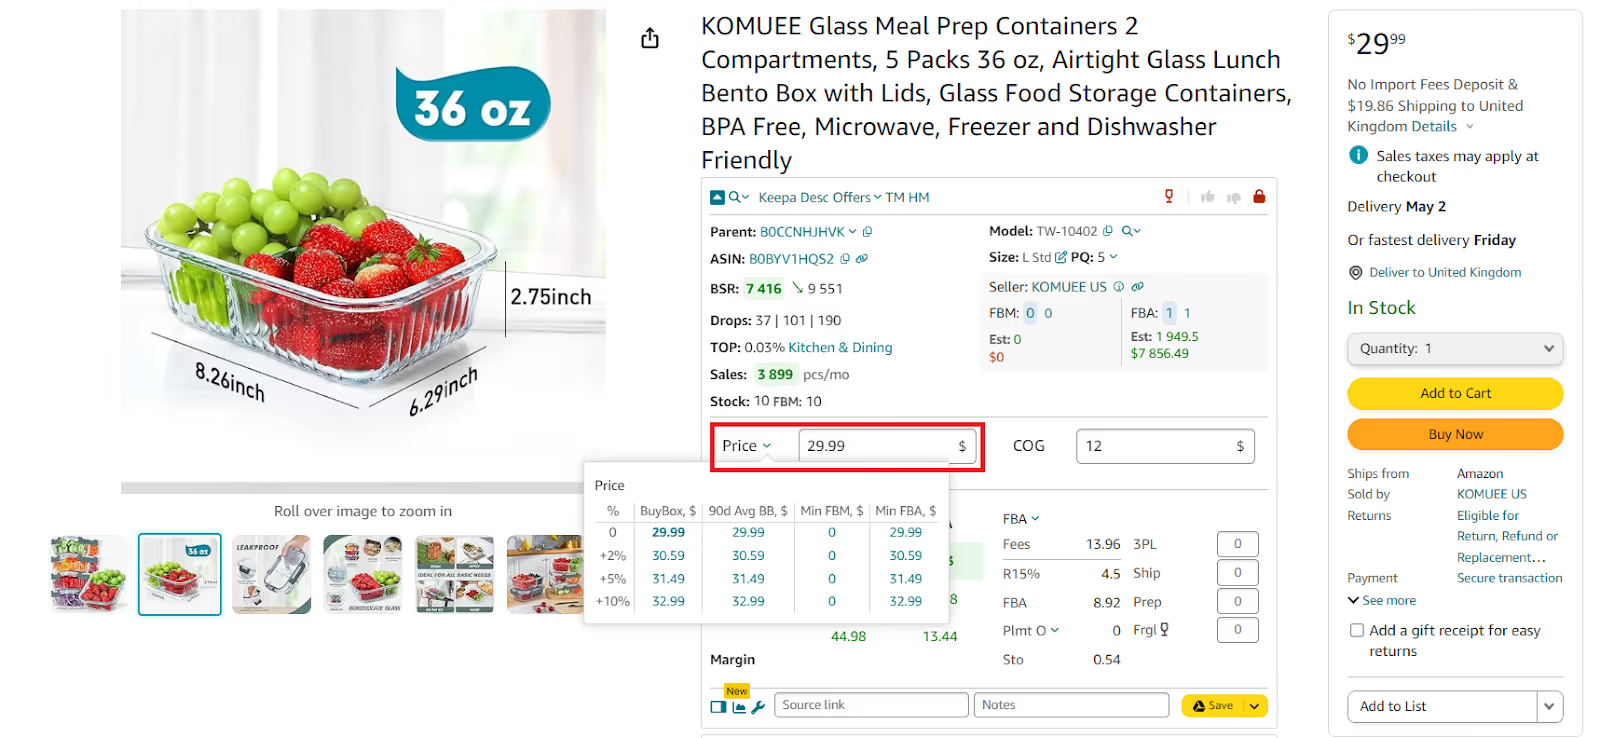
Step 1. Set your desired price
Seller Assistant shows you the maximum FBA and average (over 90 days) Buy Box prices (the best price offer). Click the small arrow beside the “Price” to set the Buy Box +2, 5, and 10%.
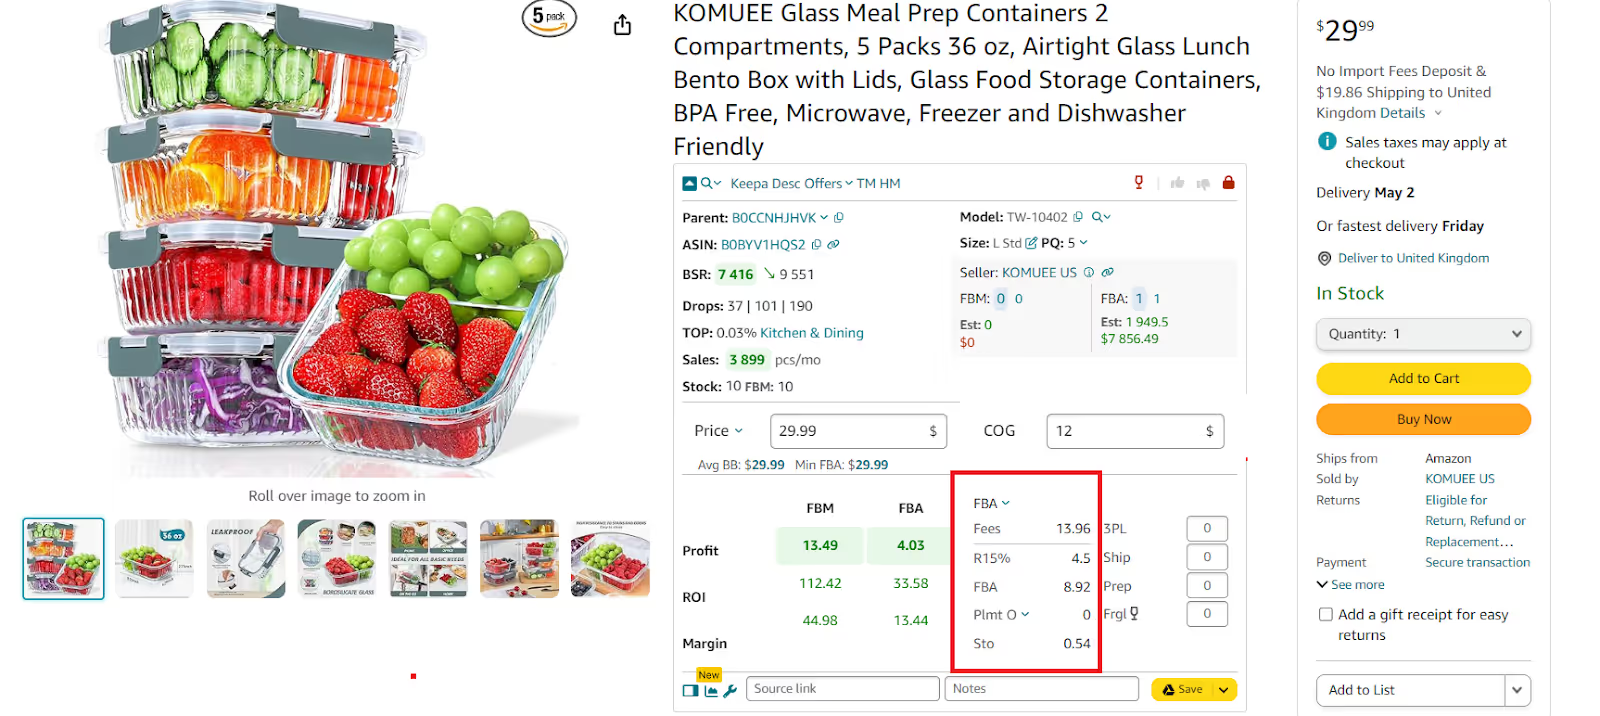
Step 2. Calculate your Amazon fees
Enter the Cost of Goods Sold (product price at the supplier) in the COG field. Select your fulfillment method (FBA or FBM). For FBA, you can choose the inbound placement fee option in the Plmt field (by default it is set to Optimized shipment split, $0). The calculator shows you all Amazon fees.
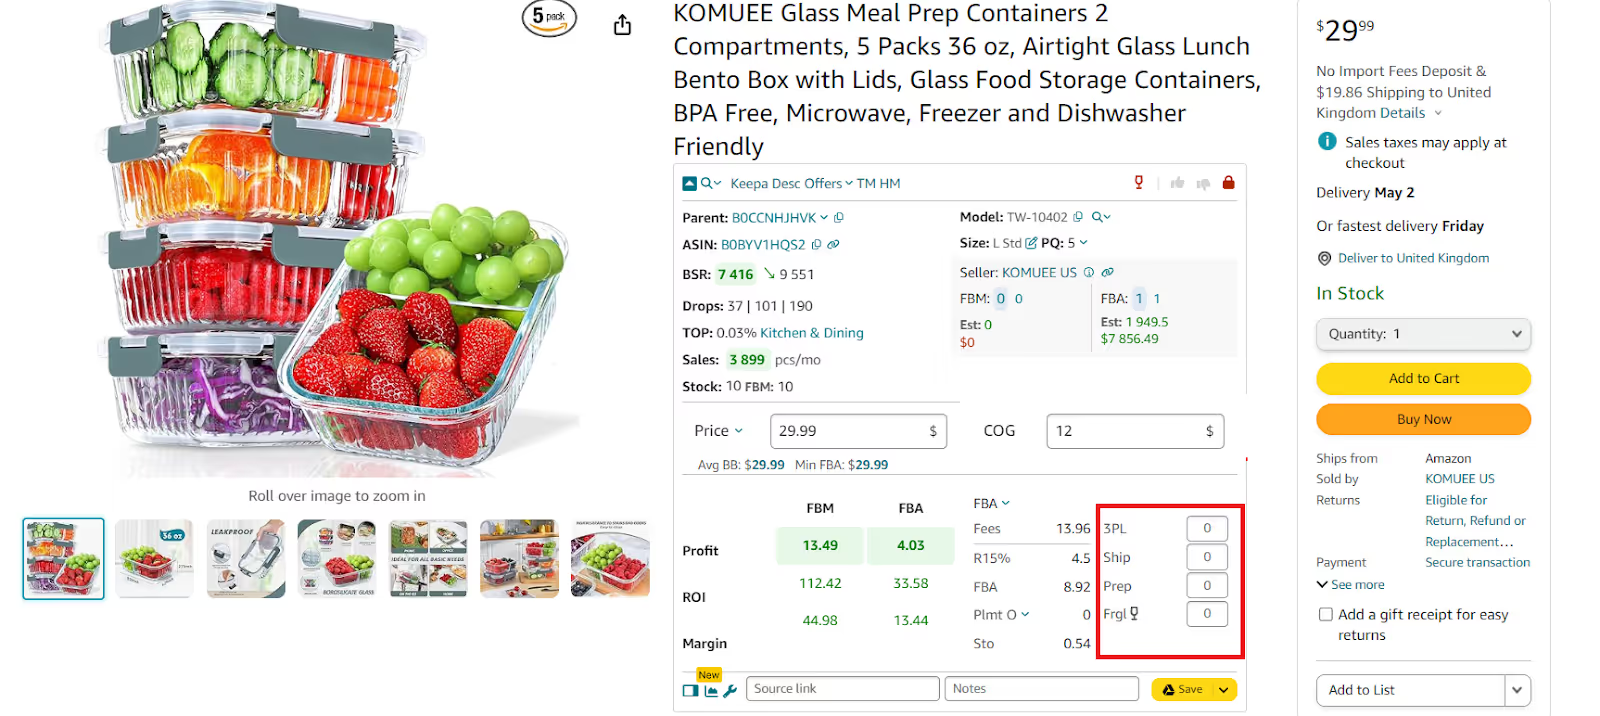
Step 3. Enter logistics costs
For FBM, add 3PL (Ship + Prep + Frgl) and shipping costs, for FBA add prep center fees (if you use that service), and shipping to Amazon costs.
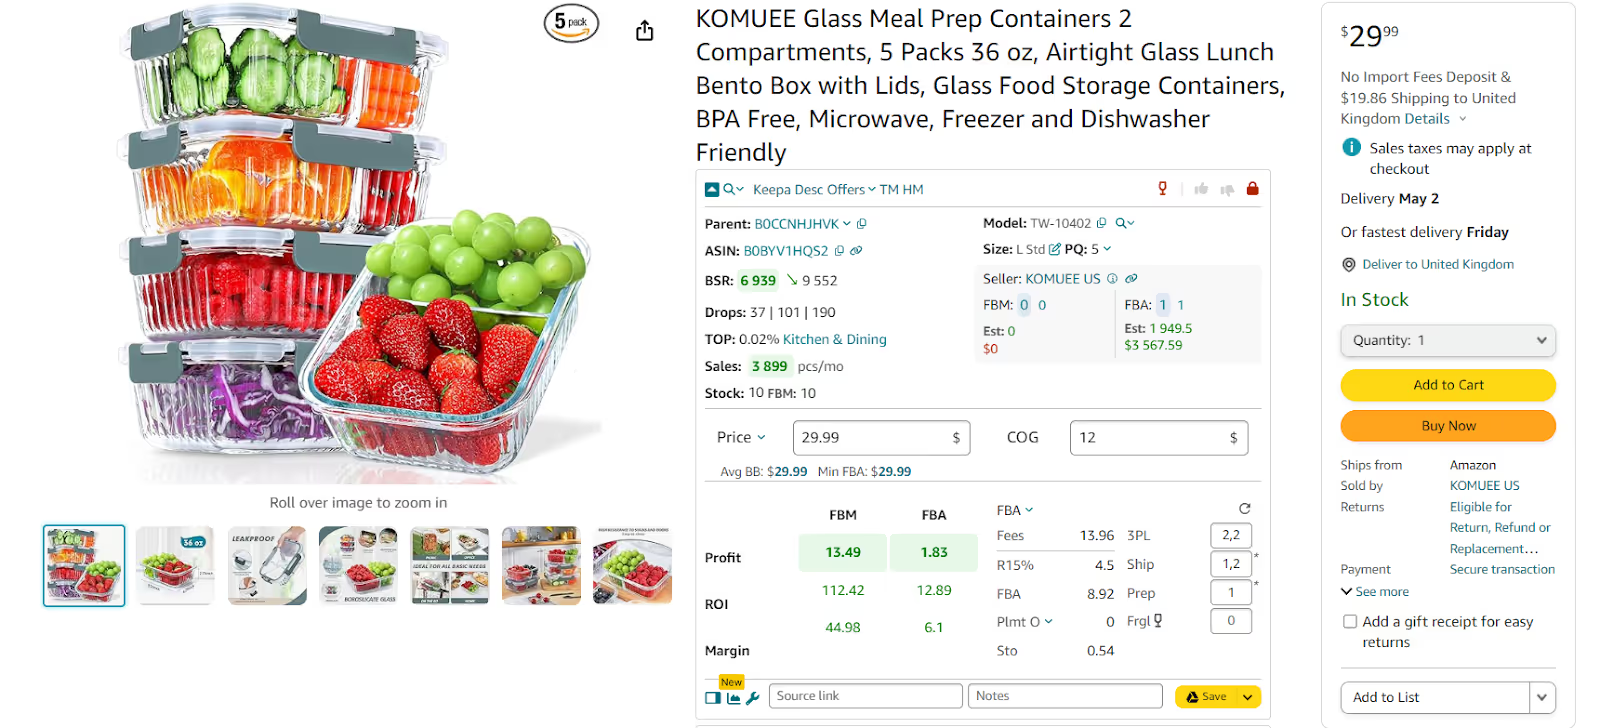
Step 4. Choose the minimum and maximum prices
Estimate the product’s profitability. The calculator automatically shows your profit, ROI, and margin. Hover your mouse over the ROI figure, and the calculator shows you the selling price with 0, 10, and 20% profit and ROI. Choose the minimum and maximum prices with the profit levels you want.
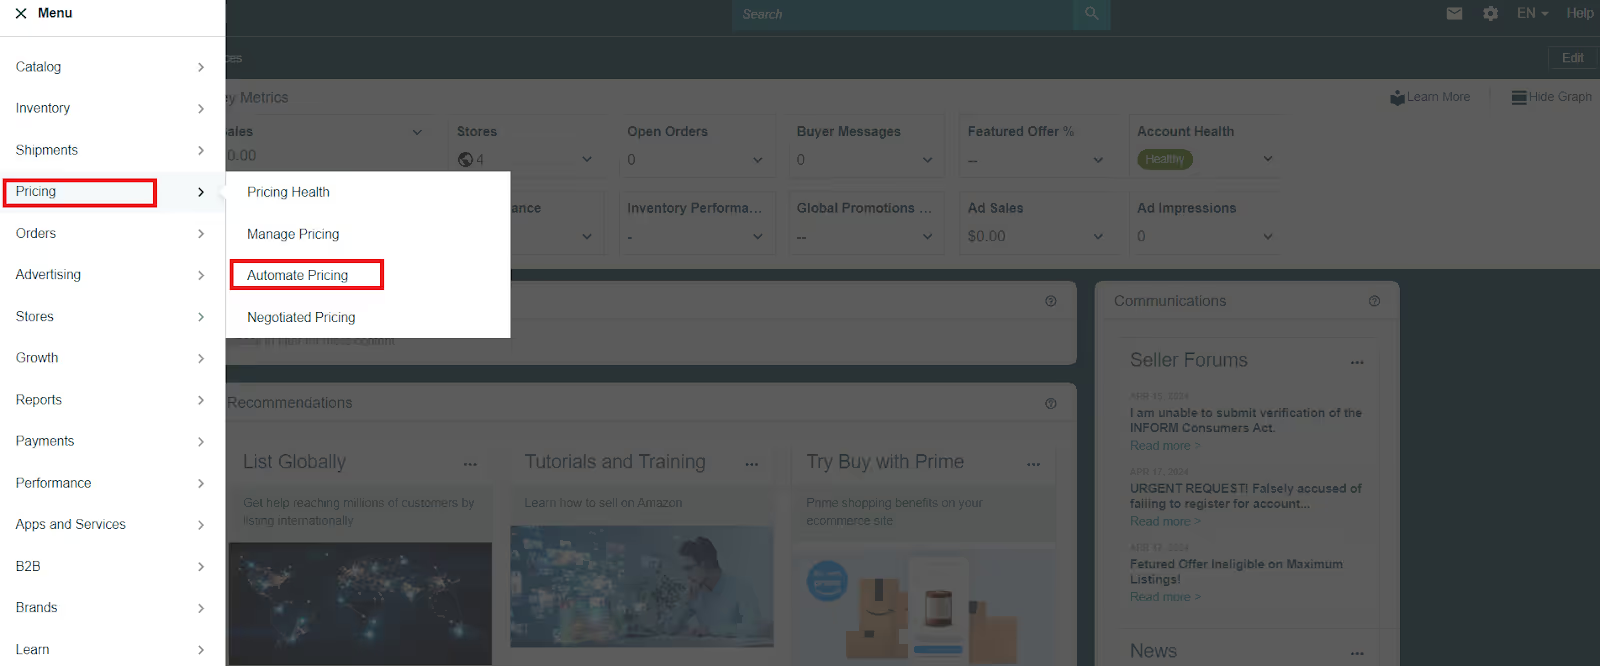
Step 6. Go to the Amazon repricer
In your Seller Central menu, go to Pricing > Automate Pricing
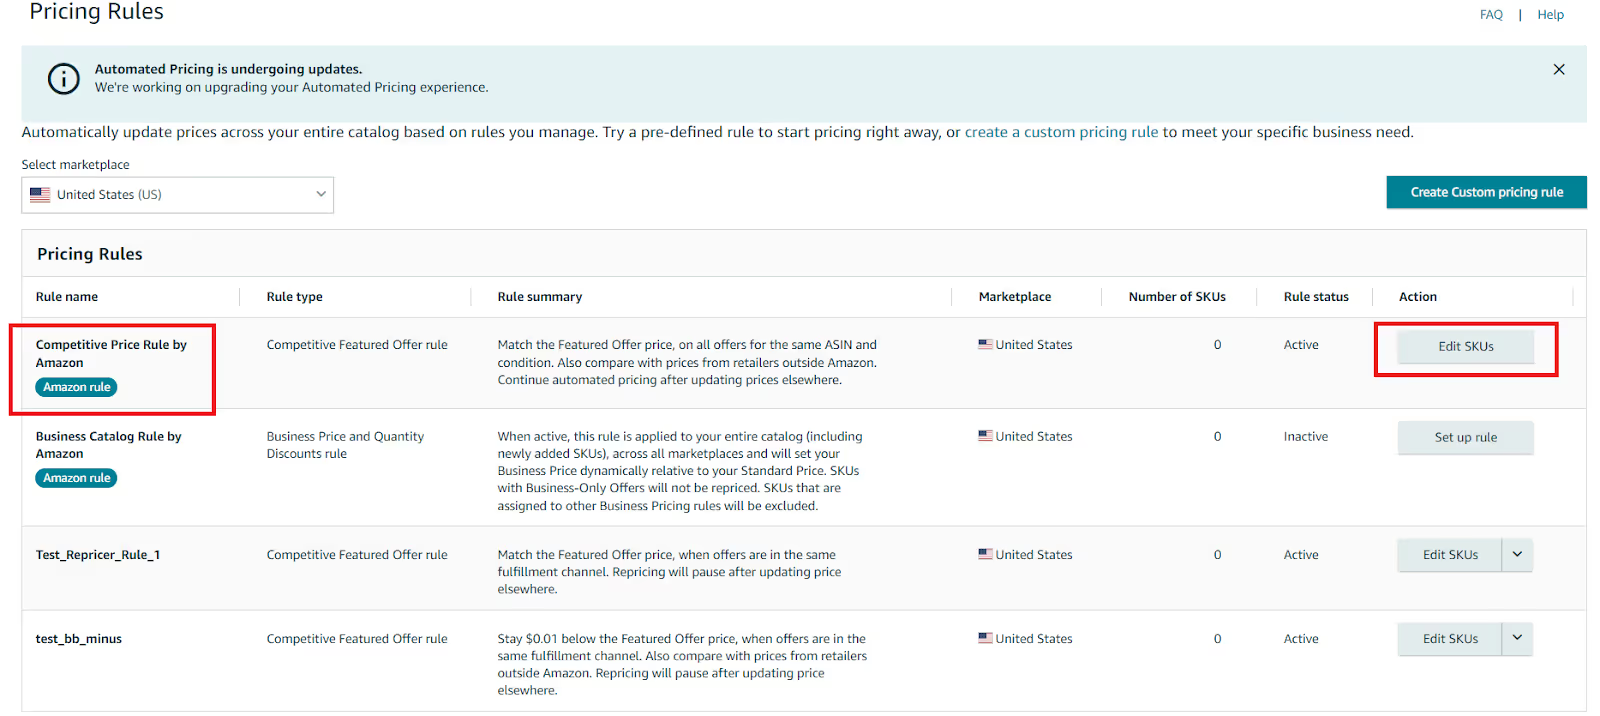
Step 7. Configure pricing rule
Select the pricing rule you want to use, and the number of SKUs, and click edit SKU.
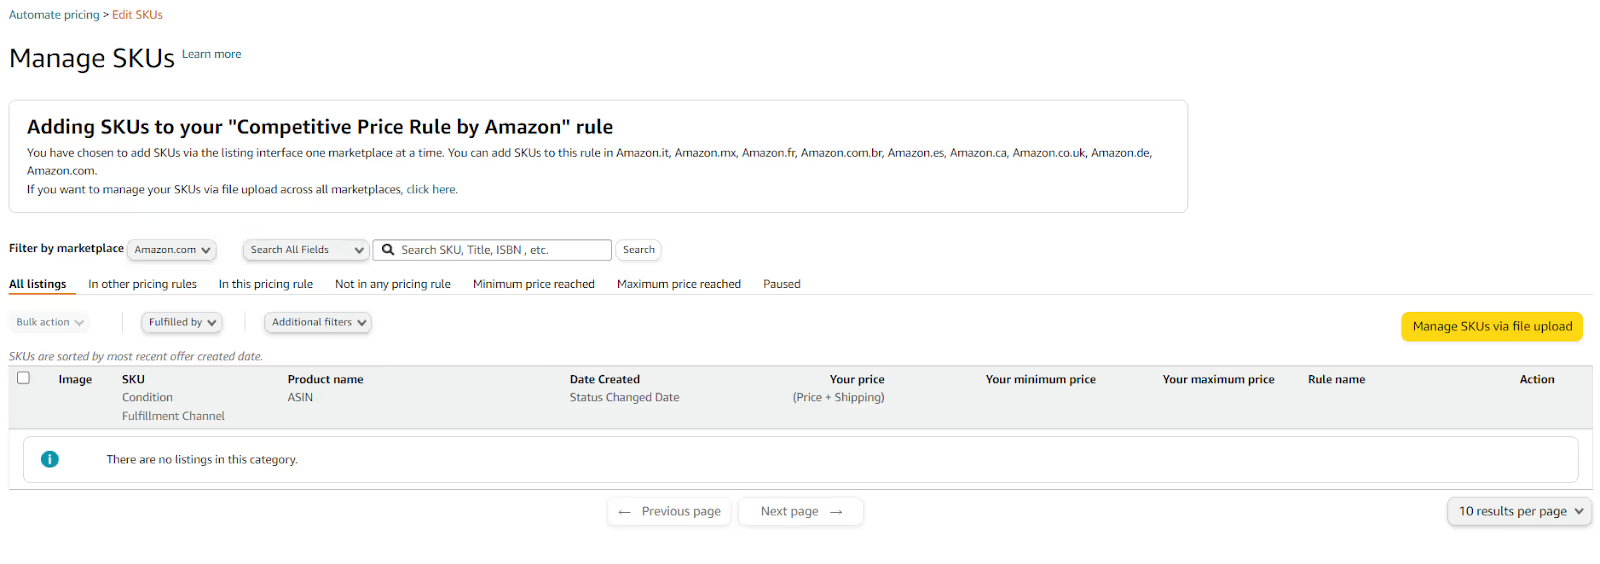
Step 8. Set minimum and maximum prices
Enter your selling price, minimum and maximum price levels you calculated with Seller Assistant in step 4, and launch the rule. Amazon Automate Pricing will automatically adjust your product prices against your competition to increase your chances of winning the Buy Box. It will automate your product price changes as they change on Amazon within the set limits.
How to Know My Product Was Sold?
When you use Amazon FBA, they take care of all order fulfillment processes, and you don’t need to know exactly when you receive each order. However, as an FBA seller, you must know it immediately to timely process and ship it out.
You can get this information in your Seller Central Order and the Amazon Seller Mobile App.
How to check product sales in Seller Central?
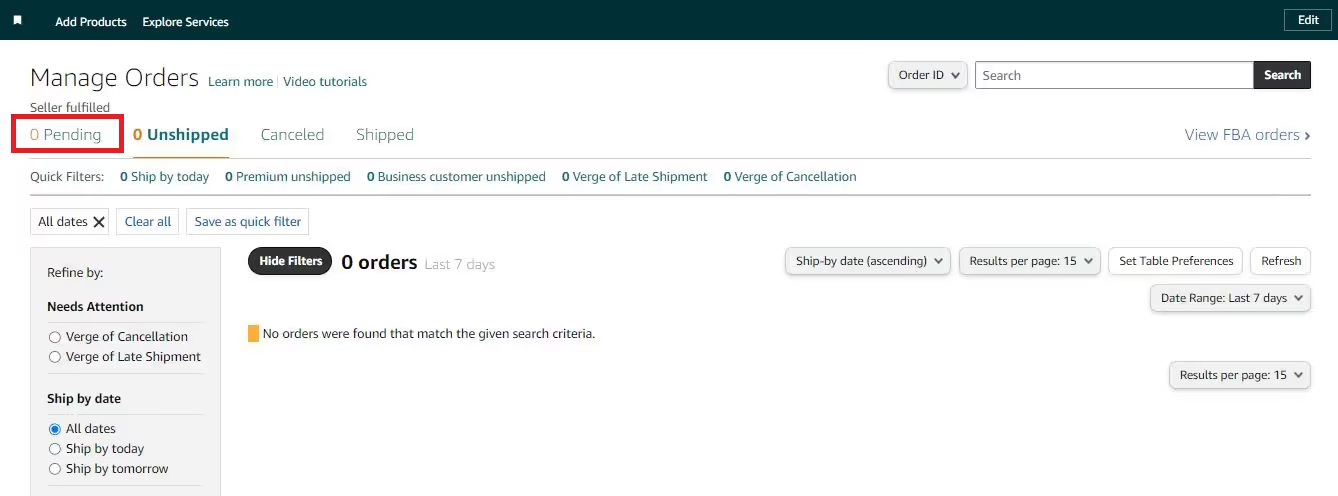
To check when a product sells in Seller Central, from the Menu, go to Orders > Manage Orders.
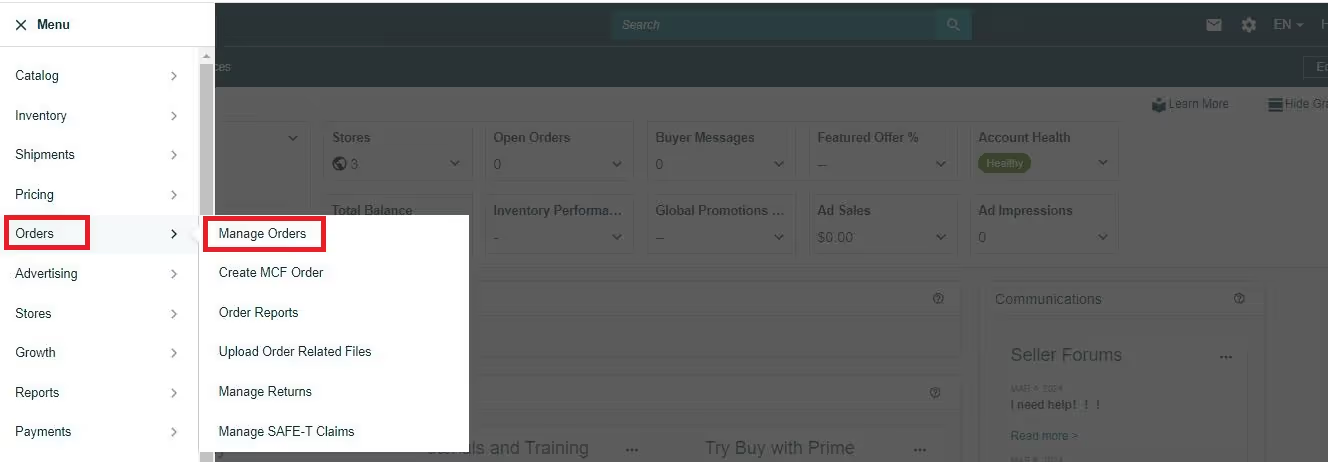
In the Manage Orders, you will see the customer orders in ‘Pending.’ After Amazon’s confirmation of the purchase, the status will change to ‘Unshipped.’ That means it’s time to ship the order.
How to check product sales in the Amazon Seller App?
In the Amazon Seller App, you will be automatically notified when it’s time to ship out the order.
How will I get money for the products I sell?
Amazon pays sellers every two weeks, on the 1st and 16th day of each month. The terms of Amazon payouts to sellers for their orders are called Amazon Seller Payment Schedule.
To get paid for your sales, you must add your bank account and a valid credit card to Seller Central. That is where Amazon will send your payments. Your account must support Automated Clearing House (ACH) transactions.
You can see how much and when Amazon pays you on the Payments dashboard and Payments report.
.avif)
Amazon seller payment process
- Positive account balance
You must have a positive or zero account balance to receive a payment. Amazon Pay will automatically disburse your funds to your bank account on the next scheduled settlement date. After Amazon sends it, it takes 3-5 business days for your money to arrive in your bank account.
- 7-day holding period
Orders must be delivered at least seven days ago. Amazon gives buyers seven days to return or inspect their orders, so your payments will be held until that period has passed.
- Deductions
Payments are for orders that were successfully delivered. In case of customer returns, chargebacks, and A-to-Z guarantee claims, Amazon will deduct the cost from your payment. Amazon fees are deducted from your payments as well.
Related: Amazon Seller Payment Schedule: Everything You Need to Know
Grow with Seller Assistant
Of all your Amazon sales processes these steps, product sourcing research is the most important one. It helps you choose profitable products and make money.
In a lot of cases, it takes sellers many hours a day to browse the internet in search of product ideas. Knowing this, we created software that helps you find winning products to sell and grow your business.
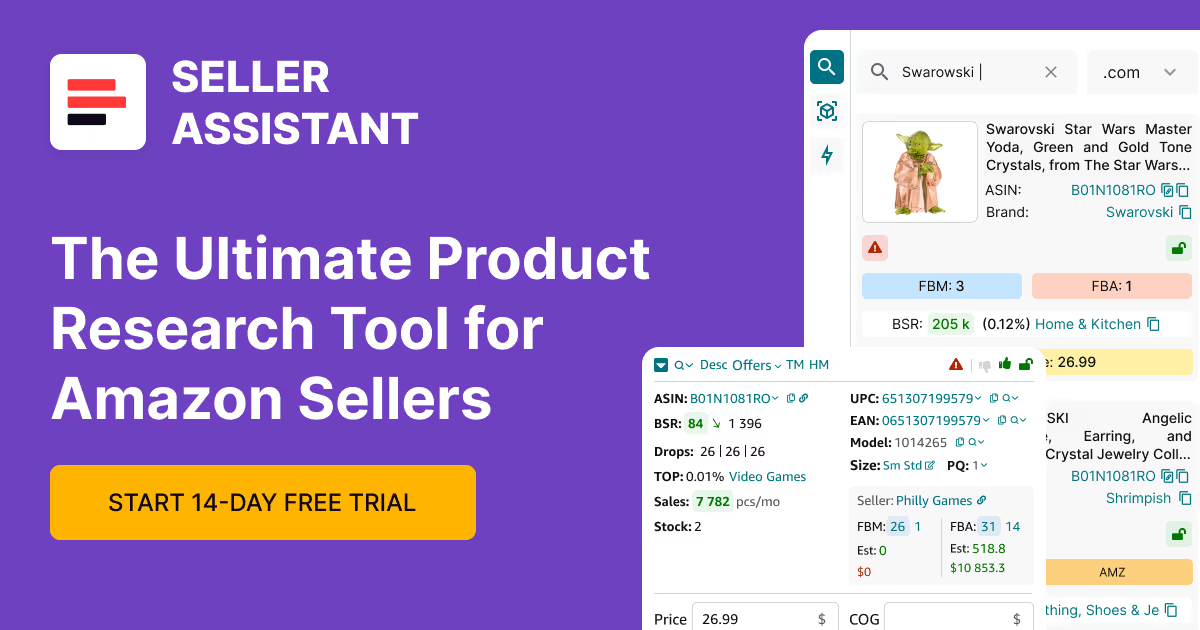
Seller Assistant is a powerful tool that combines all product sourcing features to find inventory for your store. With it, you’ll get access to Side Panel View, FBM&FBA Profit Calculator, Quick View, ASIN Grabber, Restrictions Checker, and other product research functionalities, in one tool.
Try it now, register for our 14-day trial, and grow your Amazon business with confidence.
.svg)


